


70
•
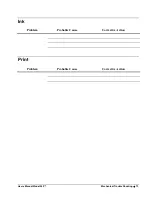
Electrical Trouble Shooting
Users Manual Model 545™
Problem
Probable Cause
Corrective Action
Printer advances fabric but
does not print.
1) If sense mark format fabric
registration sensor miss aligned.
1) Adjust sensor position so that the sensor light
on the front panel flashes as a sense mark /
hole passes under the sensor.
2) Print station(s) inactive.
1) Using the front panel - activate the needed print
station(s).
3) Print module not fully engaged.
1) Remove the ink cartridge and reinsert the
offending print module.
4) Print module void of ink.
1) Perform a level 4 clean level to purge the print
module of air and fill with ink.
5) Print module cable unconnected
or faulty.
1) Power off the printer and reinsert the offending
connector or replace cable.
6) Head Driver Board unplugged or
faulty.
1) Check Head Driver Board / AT board
connection and or replace Head Driver Board.
Printer stops after ever
third label.
1) Fabric registration sensor miss
aligned.
1) Adjust sensor position so that the sensor light
on the front panel flashes as a sense mark /
hole passes under the sensor.
2) Fabric registration sensor
uncalibrated.
1) Calibrate the sensor.
Print registration is off in
the feed direction.
1) Printer incorrectly threaded.
1) Check and rethread the fabric as needed.
2) Printer print position(s) are
incorrect.
1) Enter the Print / Cut Positions Mode on the
front panel and readjust the Print Position
setting(s) as needed.
3) Field(s) position incorrect in the
format.
1) Using Formatter / PcMate Plus, check and
readjust the field(s) position(s) as needed.
4) Bound roller(s).
1) Check that all rollers turn freely on their shafts.
If not – repair / replace.
Print registration is off in
the web direction.
1) Printer incorrectly threaded.
1) Check and rethread the fabric as needed.
2) Web guides incorrectly adjusted.
1) Check and adjust as needed.
3) Unwind incorrectly adjusted.
1) Check and adjust as needed.
4) Printer station 2 dot shift is
incorrect.
1) Enter the Print / Cut Positions Mode on the
front panel and readjust Station 2 Dot Shift
setting as needed.
5) Incorrect DIP switch settings on
the Thermal Control Board.
1) Check and reset DIP switches as needed.
Содержание 545
Страница 2: ...This page intentionally blank ...
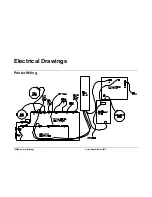
Страница 78: ...76 Electrical Drawings Users Manual Model 545 Electrical Drawings Printer Wiring ...
Страница 90: ......
Страница 91: ...Users Manual Model 545 Assembly Drawings 89 Assembly Drawings ...
Страница 94: ...92 Assembly Drawings Users Manual Model 545 Frame Assembly Drawing ...
Страница 96: ...94 Assembly Drawings Users Manual Model 545 Sub Frame Assembly Drawing ...
Страница 98: ...96 Assembly Drawings Users Manual Model 545 Power Unwind Assembly Drawing ...
Страница 100: ...98 Assembly Drawings Users Manual Model 545 Unwind Support Assembly Drawing ...
Страница 102: ...100 Assembly Drawings Users Manual Model 545 Unwind Nip Roller Assembly Drawing 9 9 10 2 1 11 4 5 3 6 7 8 8 ...
Страница 104: ...102 Assembly Drawings Users Manual Model 545 Unwind Snubber Assembly Drawing ...
Страница 106: ...104 Assembly Drawings Users Manual Model 545 Print Module Assembly Drawing ...
Страница 108: ...106 Assembly Drawings Users Manual Model 545 Cartridge Support Deck Assembly Drawing ...
Страница 110: ...108 Assembly Drawings Users Manual Model 545 Feed Assembly Drawing ...
Страница 114: ...112 Assembly Drawings Users Manual Model 545 Knife Assembly Drawing ...
Страница 116: ...114 Assembly Drawings Users Manual Model 545 Stacker Assembly Drawing Part 1 ...
Страница 118: ...116 Assembly Drawings Users Manual Model 545 Stacker Assembly Drawing Part 2 ...
Страница 120: ...118 Assembly Drawings Users Manual Model 545 Rewind Assembly Drawing ...


