EN
156
EN
157
Coating materials
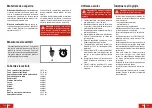
Measuring the viscosity
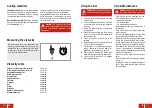
Dip the viscosity test cup
completely into
the spray material. Hold the test cup up and
measure the time (in seconds) until the liquid
empties out. Compare the measured “runout
time” with the viscosity table.
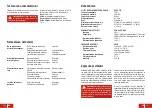
Viscosity table
Thinner-soluble varnishes/ primers
20-35 sec
Water-soluble varnishes / primers
20-50 sec
Automobile spray paint
18-22 sec
Wood preservatives
undiluted
Disinfectants
undiluted
Plant protectants
undiluted
Polishes
undiluted
Strippers
undiluted
Oils
undiluted
Glazes
undiluted
Mordants
undiluted
Hammer effect enamel
25-35 sec
Aluminium paints
20-30 sec
Suitable materials:
Water- and solvent-based
paints, finishes, primers, 2-component paints,
clear finishes, automotive finishes, staining
sealers and wood sealer-preservatives.
Not suitable materials:
Wall paints (emulsion
paints), alkali and acidic paints. Materials with
a flashpoint below 55 °C.
The paints usually need to be diluted for use
with the spray gun. You will find guidelines
for sprayable dilutions in the following viscos-
ity table (viscosity = consistency of the paint).
You can achieve the correct dilution by using
the viscosity test cup.
Caution!
This viscosity cup is only
used for measuring paint viscosity.
It is not a funnel, paint storage or paint
transporter.
Using the tool
Caution!
Never point the spray gun
at yourself, at other people or at ani-
mals.
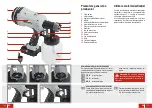
1.
Clean the surface to be sprayed and keep
it free of dust.
2.
Fit the required nozzle into the air cap and
screw them onto the spray gun using the
union nut.
3.
Screw the filled container
tightly onto
the spray gun.
4.
Adjust the spray setting and the material
volume. Test the settings on cardboard or
something similar.
5.
Cover all surfaces or parts not to be
sprayed.
6.
Hold the spray gun at an even distance of
10-30 cm to the target object.
7.
Pull the trigger
and move the spray gun
evenly cross-wise or up and down, de-
pending on the desired spray pattern.
8.
Begin spraying outside the target area.
Avoid interruptions inside the target area.
9.
Clean air cap
, whenever it is clogged
with coating material.
Care & Maintenance
Caution!
Make sure the tool is
switched off and the battery removed.
- Clean air cap, nozzles, feed tube and con-
tainer after every use and particularly if:
- no material emerges
- the material drips
- the atomisation is too coarse
- Always keep the tool clean, dry and free of
oil or grease.
- Wear safety glasses to protect your eyes
whilst cleaning.
- For safe and proper working, always keep
the machine and ventilation slots clean.
- Regularly check to see if any dust or foreign
matter has entered the grills near the mo-
tor and around the on/off switch. Use a soft
brush to remove any accumulated residue.
- If the body of the tool needs cleaning, wipe
it with a soft damp cloth. A mild detergent
can be used but nothing like alcohol, petrol
or other cleaning agent.
- Never use caustic agents to clean plastic
parts.
- Clean and lubricate the sealings at regular
intervals.
- Periodically check the proper fitting of all
parts. These could become loose with time
due to vibration.

