INSTALLATION
FOR FIRST TIME USE:
THE SOLAR LIGHT NEEDS TO CHARGE IN
FULL SUNLIGHT FOR 8
– 12 HOURS WITH THE SWITCH "ON." THIS
ALLOWS THE RECHARGEABLE BATTERIES TO REACH MAXIMUM
CAPACITY. If light doesn't turn on, remove batteries, wipe both ends with
a clean dry cloth and reinstall batteries. Check the batteries to ensure
that they are making secure contact with the terminals. If this doesn't
work, replace with new batteries.
CHANGING THE NUMBERS:
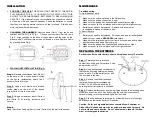
Remove frame (Part C) from the house
number box (Part A); see Fig. 1. Choose your numbers (Parts B); see
Fig. 2. Align the pegs on the back of the numbers with the holes on the
plastic panel. Push them into holes until locked in place. Replace frame
by pressing down firmly.
WALL MOUNT INSTALLATION (Fig. 3)
Step 1:
Measure the distance from (Parts I)
on the back of (Part A) and draw 2 circles
on the house representing where the 2
anchors (Parts K) will go.
Step 2:
Using a drill, start a hole at each
circles drawn on the wall of the house.
Insert (Parts K) into the two holes.
Step 3:
Using a screwdriver, insert (Parts J)
into (Parts K) by twisting clockwise until
secure.
Step 4:
Hang (Part A) by lining up (Parts I) onto (Parts K) on the wall of the house.
MAINTENANCE
Troubleshooting
Q: Light does not work.
A:
1. Make sure the switch is placed in the ON position.
2. Make sure the battery connection is tight.
3. Make sure the battery has been charged under direct sunlight.
4. Make sure your light is not placed near other night-time light sources.
5. Battery may need to be replaced. Replace with a new solar
rechargeable battery of the same size.
Q: Short run time
A:
1. Battery may need to be replaced. Purchase a new solar rechargeable
battery at your nearest
MENARDS®
retail store.
2. Make sure the solar housing is clear from dust, snow and debris which
would prevent the battery from charging.
3. Make sure the battery has been charged under direct sunlight.
4. Make sure your light is not place near other light sources.
REPLACING THE BATTERIES
For best results the solar battery should be replaced every 12 months.
Step 1:
Carefully place solar house
number face down on a flat surface. Slide
power switch to OFF.
Step 2:
Use a phillips head screwdriver to
remove the 4 screws holding the battery
cover in place. Set the battery cover and
the 4 screws to the side.
Step 3:
Remove the old batteries and
replace with new solar rechargeable
Ni-MH 1.2v AA 600 mAh batteries (3);
ensuring the correct polarity is observed.
Step 4:
Replace battery cover by aligning it properly and then inserting each
screw into one of the four holes and turning the screws clockwise until
secure, making sure to replace and tighten all 4 screws.
Step 5:
Allow the batteries to recharge for at least 24 hours in full sunlight
before pushing the switch back to ON position.
Caution: Solar rechargeable batteries contain Nickel-Cadmium or
Nickel-Metal Hydride and must be recycled or disposed of properly. Do
not mix old and new batteries. Do not mix alkaline, standard (carbon-
zinc), or rechargeable batteries.
1
2
3


