background image

ASSEMBLING THE TOOL

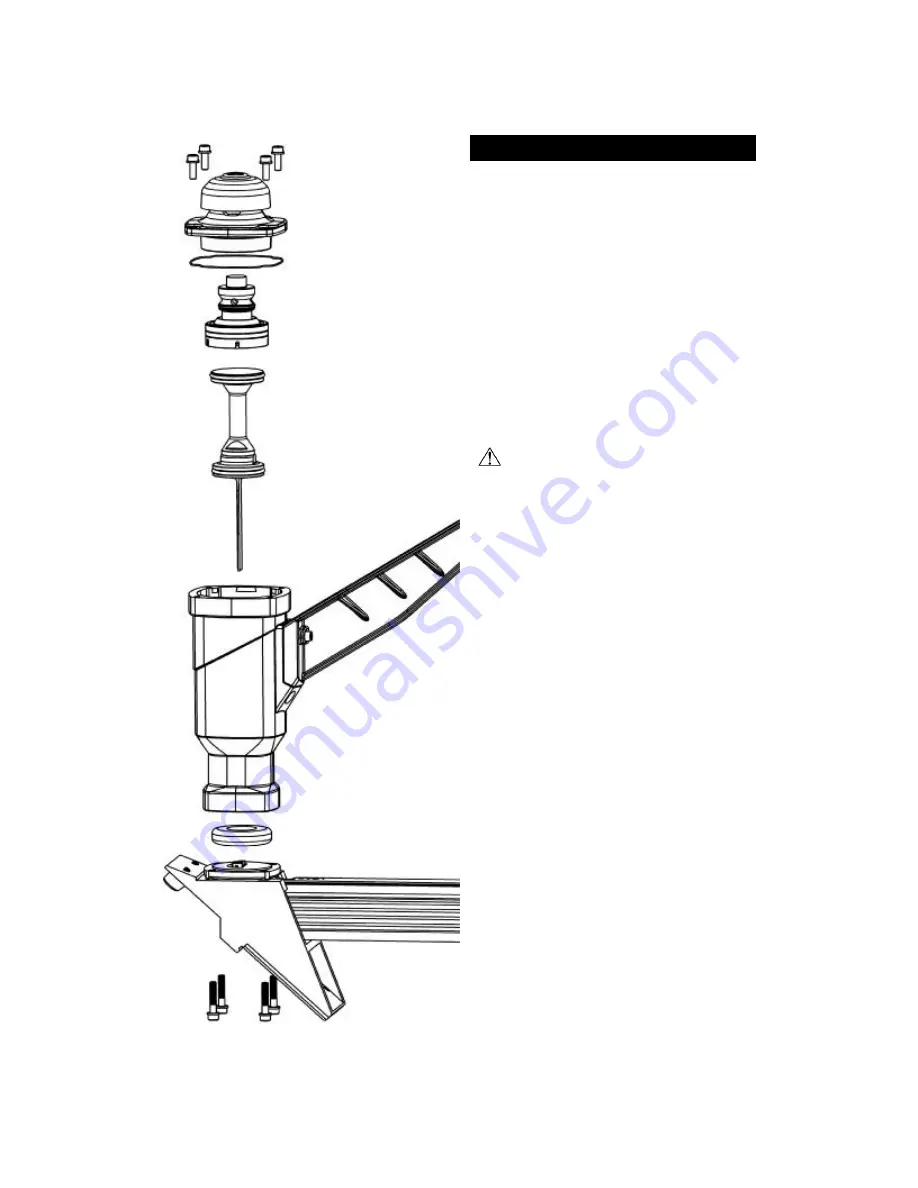
This  section  describes  how  to  re-assemble  the  tool
after maintenance. The following procedure assumes
that the base/magazine is already installed.

• Insert the piston assembly into the tool and engage

the  driving  blade  thru  the  opening  of  gate/foot
assembly guiding channel.

• Insert the valve assembly into the head.

• Inspect the head gasket; replace if necessary. Place

the gasket into the groove on the head flange. Some
oil  or  grease  will  help  to  keep  it  in  place  during
assembly.

• Insert the head assembly onto the body, making sure

that the gasket stays in place. Screw in place.

After reassembly, always actuate the tool
repeatedly WITHOUT FASTENERS against
a piece of wood to insure proper operation.

Содержание FNS-200

Страница 1: ...IMPORTANT DO NOT DESTROY It is the customer s responsability to have all operators and service personnel reand and understand this manual MODEL FNS 200 OPERATING MANUAL Printed in Canada 12 14 ...

Страница 2: ...ference if necessary Always keep hands feet or other body parts away from the fastener ejection area Never aim the tool in any direction other than the working area Always carry or manipulate the tool by its handle while the air supply hose is connected Never hit the head cap of the actuator if the plastic base is not sitting perfectly on the working surface Never leave the tool laying down on its...

Страница 3: ... than 110 psi 7 6 bar PREVENTIVE MAINTENANCE This tool requires minimal lubrication Use only detergent free oil such as t h e Paslode Pneumatic Lubricating Oil Few drops of oil weekly in the air inlet is sufficient Other types of lubricant may degrade the seals Check periodically to make sure that the head assembly is fully screwed onto the main body A loosen head will damage the tool LOADING THE ...

Страница 4: ...CE REPAIR Most maintenance to the tool can be made with the 5 mm Allen wrench supplied with the tool Disassembly of the tool must be done in a clean environment Some parts can be easily damaged if disassembled with improper tools or by inadequate methods Maintenance should only be performed by trained personnel Use only genuine Primatech replacement parts To prevent injury ALWAYS disconnect the ai...

Страница 5: ... gate foot assembly guiding channel Insert the valve assembly into the head Inspect the head gasket replace if necessary Place the gasket into the groove on the head flange Some oil or grease will help to keep it in place during assembly Insert the head assembly onto the body making sure that the gasket stays in place Screw in place After reassembly always actuate the tool repeatedly WITHOUT FASTE...

Страница 6: ...TIONS A one year warranty will apply to all housing and cap assembly casings NORMAL WEARING PARTS The following parts are considered normal wearing parts and are not under warranty bumper driving blade o rings piston ring WARRANTY STATEMENT Paslode s sole liability hereunder will be to replace any part of accessory which proves to be defective within the specific time period Any replacement part o...

Отзывы: