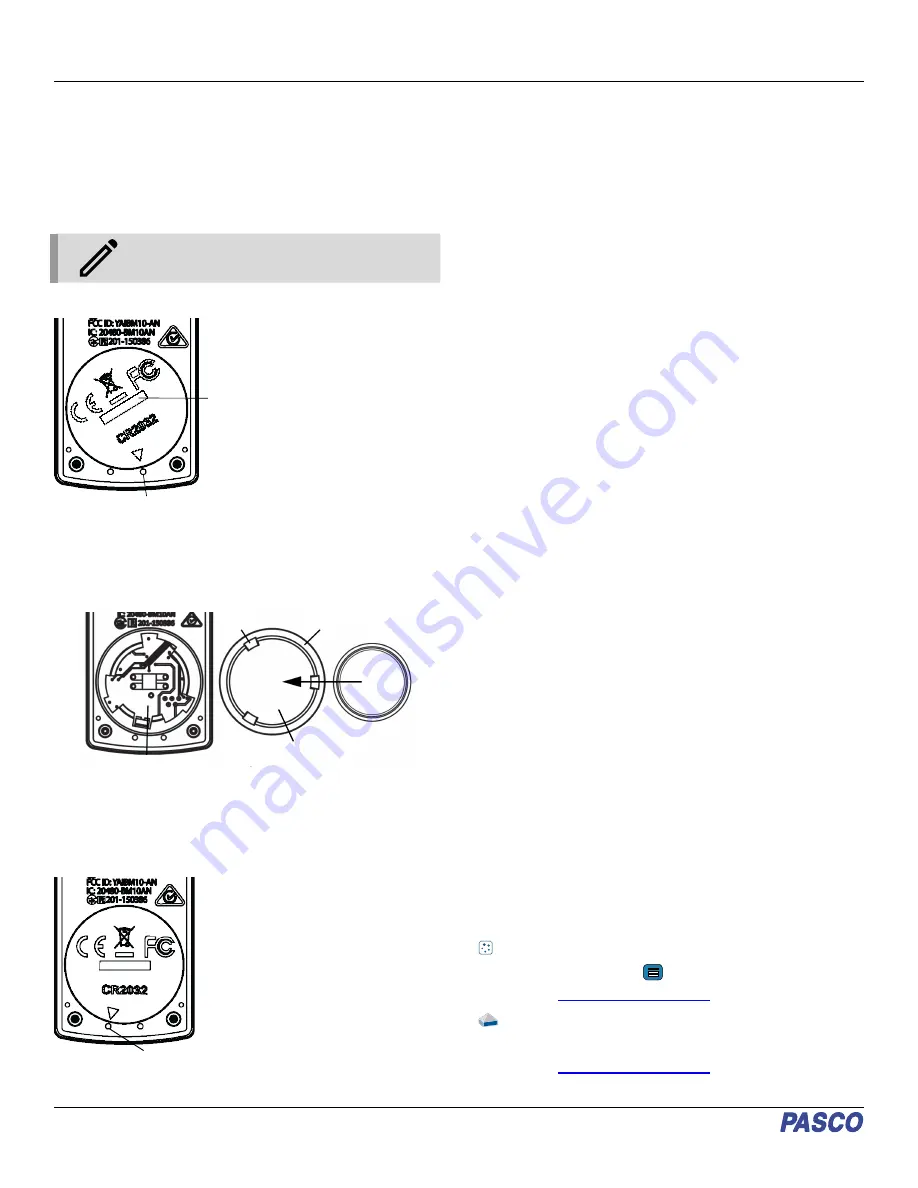
Battery removal and replacement
If the sensor’s Battery Status LED blinks red, the battery may
need to be replaced. Replacing the battery requires removing
the Battery Compartment Door on the bottom of the sensor,
removing the old battery, installing a new battery of the same
type, and replacing the Battery Compartment Door. This
procedure requires a coin and a CR2032 three volt battery, such
as those included in the PS-3504 Coin Cell Battery Pack.
NOTE: This type of battery is also commonly
available in electronic and commercial stores.
Removing the Battery Compartment Door
Coin
Slot
Second mark
Hold the sensor with the bottom
side up. Insert a coin into the
slot and use it to turn the
Battery Compartment Door
counterclockwise until the
indicator on the door is aligned
with the second mark on the
sensor.
Turn the sensor so the bottom
side is down, allowing the
Battery Compartment Door to
drop into the palm of your hand.
Make sure that the battery door
gasket stays on the door. The gasket is an "O-ring" that is held
in place by the tabs on the door. Do not touch the inside of the
battery compartment, as this may damage the sensor.
Replacing the battery
Gasket ("O-ring")
Tab
Battery
(CR2032)
Battery
Compartment Door
Do not touch!
Remove the used battery from the Battery Compartment Door
and replace it with a new battery of the same type. Note that the
battery is held in place by the small tabs on the door. The side of
the battery with the "+" on it should be against the door.
Replacing the Battery Compartment Door
First mark
Put the Battery Compartment Door,
along with the new battery, back onto
the sensor. Align the indicator on the
door with the second mark, then use
the coin in the slot to turn the door
clockwise until the indicator is aligned
with the first mark on the sensor.
When disposing of the battery, follow
the battery disposal guidelines under
Regulatory information.
Troubleshooting
• If the sensor loses Bluetooth connection and will not
reconnect, try cycling the ON button. Press and briefly hold
the button until the status LEDs blink, then release the
button.
• If the sensor stops communicating with the computer
software or tablet application, try restarting the software or
application.
• If the problem persists, press and hold the ON button for
ten seconds, then release the button. Turn on the sensor in
the usual way.
• If the above instructions do not fix the problem, turn
Bluetooth off and back on for your computer or tablet, then
retry the connection process.
Conductivity Probe maintenance
If readings become variable or well outside the expected range,
use the eraser of a No.2 pencil to clean the pins by pushing
each pin into the eraser material and removing. Repeat until no
film appears around the puncture holes. Rinse and dry the
conductivity probe before putting the sensor away for storage.
The probe fits in the Electrode Support (PS-3505).
Cleaning
When cleaning the probe, select an appropriate solvent for the
contaminants to which the probe is exposed:
• For general deep cleaning, use 0.1 M nitric acid.
• For oils, hot water with dish detergent can be used for
cleaning.
• For solutions containing lime or other hydroxides, clean
with a 5-10% solution of hydrochloric acid. When a stronger
cleaning solution is required, use concentrated hydrochloric
acid mixed into 50% isopropanol.
• For solutions containing algae and bacteria, use chlorine
bleach.
Clean by dipping or immersing the end of the probe in the
cleaning solution, agitating for two or three minutes, and rinsing
first with tap water and then several times with distilled or
deionized water.
Before measurement, immerse the probe in distilled water,
gently tap out any trapped air bubbles, soak for at least an hour
in distilled water, and recalibrate.
Software help
The SPARKvue and PASCO Capstone Help provide additional
information on how to use this product with the software. You
can access the help within the software or online.
SPARKvue
Software: Main Menu
> Help
PASCO Capstone
Software: Help > PASCO Capstone Help
Wireless Conductivity Sensor | PS-3210A
4


