


PS-3231
//code.Node
012-16652A
//code.Node Outputs
Within the Blockly-integrated Code tool, unique coding blocks have been created in SPARKvue and PASCO Capstone for
each output of the //code.Node to program and control their effects.
NOTE
: The use of the //code.Node outputs are not exclusive to its inputs. These outputs can be used in conjunction with
all lines of supported PASCO sensors.
To access and use the Code Blocks for the //code.Node:
(Must be version 2.1.0 or later)
1. Open PASCO Capstone and select Hardware
Setup from the Tools panel on the left.
2. Connect the //code.Node to the computer.
3. On the Tools tab, select Code.
4.
Select “Hardware” from the list of Blockly
Categories.
(Must be version 4.4.0 or later)
1. Open SPARKvue and select Sensor Data from
the Welcome Screen.
2. Connect the //code.Node to the device.
3. Once the //code.Node measurements appear,
select a template option.
4. Click the Code button on the bottom toolbar.
5.
Select “Hardware” from the list of Blockly
Categories.
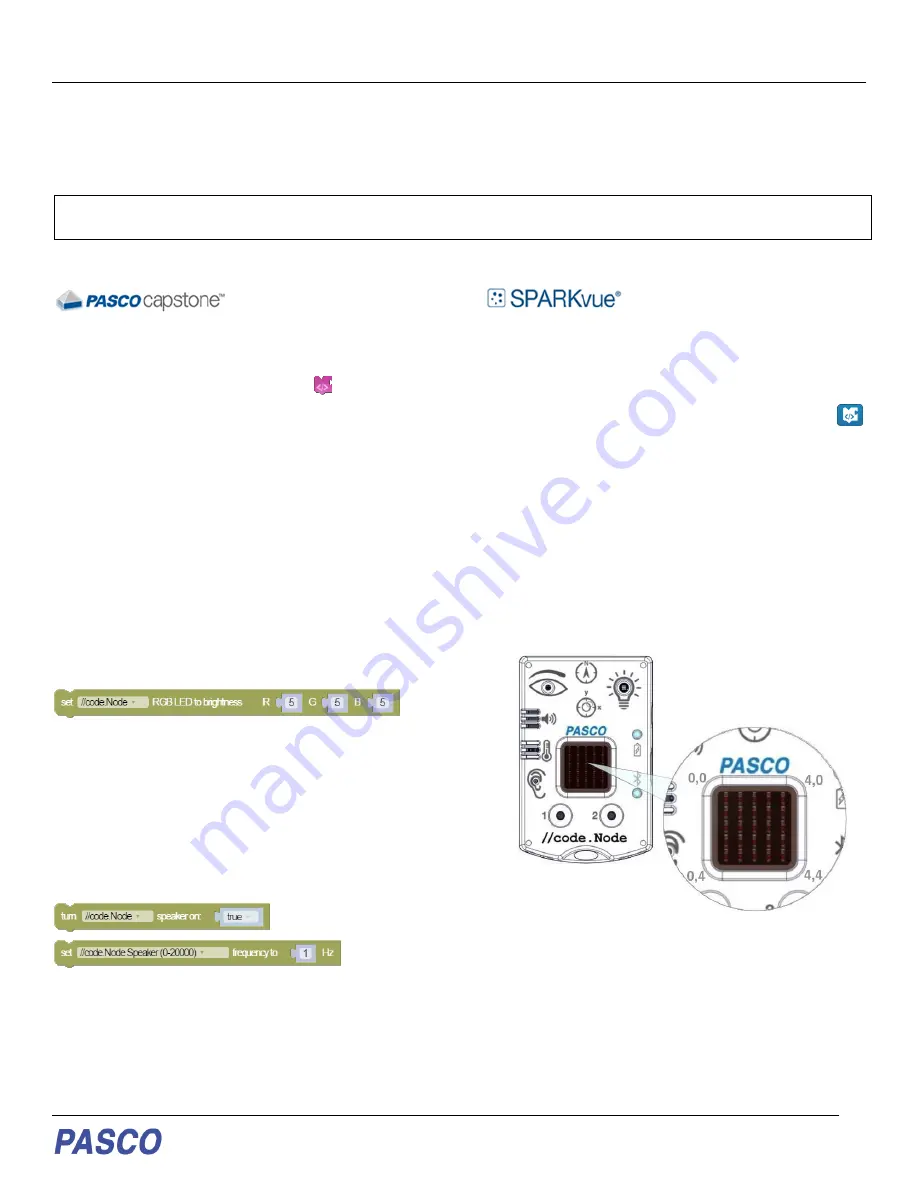
RGB LED
One output signal of the //code.Node is its Red-Green-
Blue (RGB) multi-color LED. The individual brightness
levels for red, green, and blue light of the LED can be
adjusted from 0
– 10, allowing for a spectrum of colors to
be created.
A single block is included in Code for the RGB LED (1)
and can be found in the Hardware Blockly category. A
brightness of ‘0’ will ensure that that selected color LED
is not emitted.
(1)
Speaker
While the volume is fixed, the frequency of the
//code.Node Speaker can be adjusted using the
appropriate Code blocks. The speaker can generate
sounds within a range of 0
– 20,000 Hz.
Two unique blocks are included in the software’s Code
tool to support the speaker output: one turns the speaker
on or off (2) and one sets the frequency (3).
(2)
(3)
5 x 5 LED Array
The central output of the //code.Node is a 5 x 5 array
consisting of 25 red LEDs. The LEDs in the array are
positioned using the (x,y) Cartesian coordinate system,
with (0,0) at the top left corner and (4,4) at the lower right
corners. A faint imprint of the corner coordinates can be
found at each corner of the 5 x 5 LED Array on the
//code.Node.
The LEDs in the array can be turned on individually or as
a set. The brightness of the LEDs is adjustable on a scale
of 0
– 10, where a value of 0 will turn the LED OFF.
Three unique blocks are in
cluded in the software’s Code
tool that support the 5 x 5 LED Array. One block sets the
brightness of a single LED at a specified coordinate (4).
Another block will set a group of LEDs to a specified
brightness level and can be programmed to keep or clear


