background image

Integrated Peripherals 


29

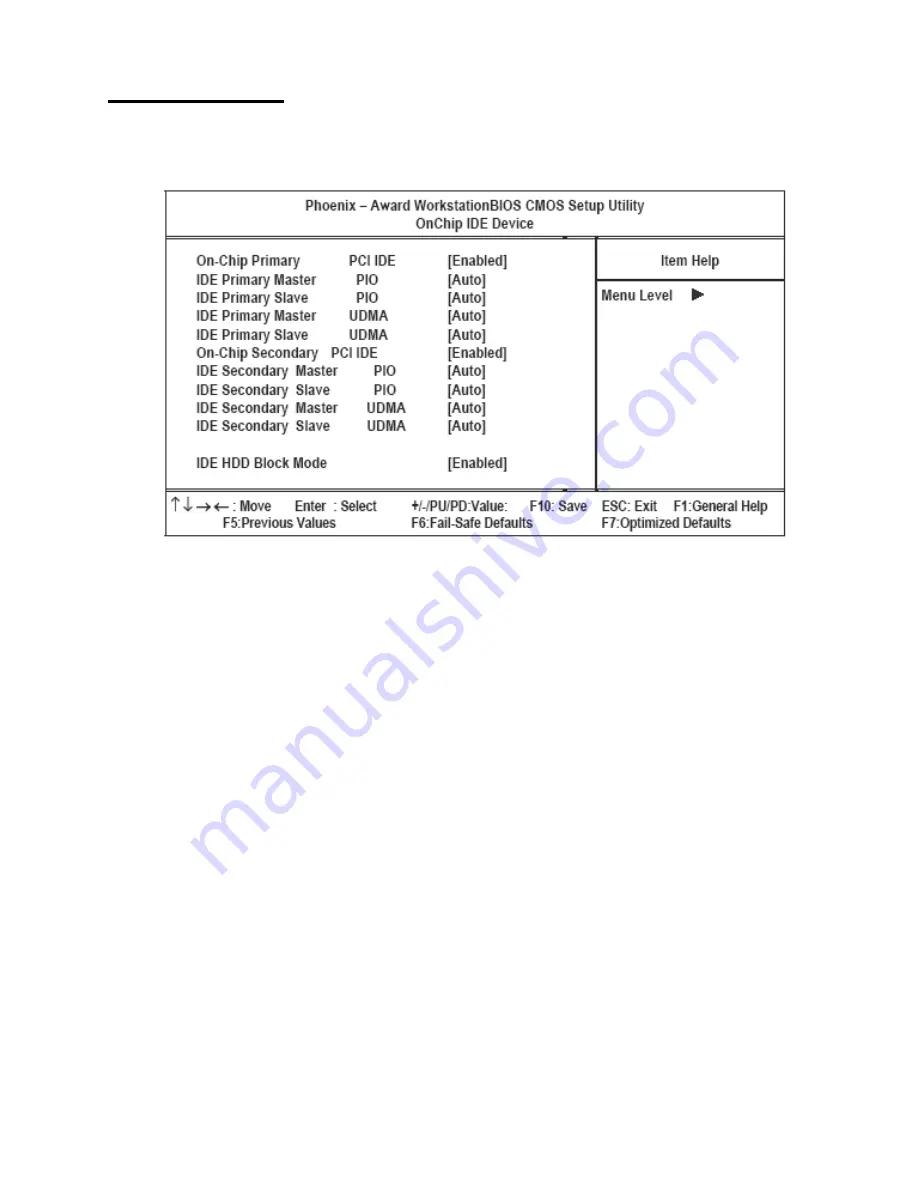
OnChip IDE Device

Use this item to enable or disable the PCI IDE channels that are integrated on the mainboard. Select the item and press 
<Enter> to open the following menu:

Figure 3.7

OnChip IDE Device menu

On-Chip Primary/Secondary PCI/IDE

Use this item to enable or disable the PCI IDE channels that are integrated on the mainboard. The default setting is 
Enabled.

IDE Primary/Secondary Master/Slave PIO

Each IDE channel supports a master device and a slave device. These four items let you assign which kind of PIO 
(Programmed Input/Output) is used by IDE devices. Choose Auto to let the system auto detect which PIO mode is 
best, or select a PIO mode from 0-4. The default setting is Auto.

Primary/Secondary Master/Slave UltraDMA 

Each IDE channel supports a master device and a slave device. This mainboard supports UltraDMA technology, which 
provides faster access to IDE devices. If you install a device that supports UltraDMA, change the appropriate item on 
this list to Auto. You may have to install the UltraDMA driver supplied with this mainboard in order to use an 
UltraDMA device. The default setting is Auto.

IDE HDD Block Mode 

Enable this field if your IDE hard drive supports block mode. Block mode enables BIOS to automatically detect the 
optimal number of block read and writes per sector that the drive can support and improves the speed of access to IDE 
devices. The default setting is Enabled.

Содержание PT-8800

Страница 1: ...PT 8800 User manual...

Страница 2: ......

Страница 3: ...alled and used in accordance with the instructions may cause harmful interference to radio communications However there is no guar antee that interference will not occur in a particular installation I...

Страница 4: ...r service technician uses parts specified by the manufacturer Avoid using the system near water in direct sunlight or near a heating device Revision history Version 1 01 April 2006 Chapter 1 Getting S...

Страница 5: ...rive HDD 12 Installing optional displays 13 Removing the mainboard cover and customer display cover 13 Mainboard reference 14 Attaching the customer display 15 Attaching the second display 16 Installi...

Страница 6: ...lts Option 38 Set Supervisor and User Passwords Options 39 Save Exit Setup Option 39 Exit Without Saving 40 Appendix 41 Troubleshooting 41 Tips for Troubleshooting 41 The Power On Self Test 41 Beep Er...

Страница 7: ...1 Main BIOS menu 20 Figure 3 2 Standard CMOS Features menu 21 Figure 3 3 IDE Primary Master Submenu 22 Figure 3 4 Advanced BIOS Features menu 24 Figure 3 5 Advanced Chipset Features menu 26 Figure 3...

Страница 8: ...vi...

Страница 9: ...on page 6 Adjusting display angles on page 7 Setup considerations on page 7 Connecting peripheral devices on page 8 Powering the PT 8800 on and off on page 9 Unpacking the PT 8800 The PT 8800 and cab...

Страница 10: ...ing items are included If any item is missing or appears damaged contact your dealer immediately PT 8800 SOME UNITS SHIP WITH CUSTOMER DISPLAY AND MSR INSTALLED POWER CABLE DRIVER CD ROM WITH DRIVERS...

Страница 11: ...cribes the parts and connectors on the PT 8800 Front right view Figure 1 2 Front right view of PT 8800 DESCRIPTION 1 15 inch TFT LCD touch screen 2 Smart card reader 3 Speakers 4 Compact Flash card re...

Страница 12: ...4 Chapter 1 Getting Started Rear right view Figure 1 3 Rear right view of PT 8800 DESCRIPTION 1 Customer display cover 2 MSR module 3 Mainboard cover 4 Rear cover 5 Rear cover latches 5 4 3 1 2...

Страница 13: ...OM2 connector 8 RJ 11 cash drawer connector 9 Powered USB connector 24V connect peripherals such as USB printers 10 Powered USB connector 12V connect peripherals such as a customer display 11 RJ 45 LA...

Страница 14: ...t exceed 2A 2 12V cannot exceed 3A 3 Total of 24V 12V cannot exceed 48 watts CAUTION Plugging a phone line into the LAN port RJ 45 connector can damage the con nector Take care to only plug an RJ 45 c...

Страница 15: ...When setting up the PT 8800 consider the following Use a desktop or counter that is stable and even Ensure there is enough room around the sides and rear of the PT 8800 for ventilation Ensure there is...

Страница 16: ...onnect a cash drawer 1 Remove the rear cover See Removing the rear cover on page 6 2 Connect the RJ 11 cable from the cash drawer to the RJ 11 connector on the PT 8800 CAUTION Do not plug a phone line...

Страница 17: ...ct the power cable to the power con nector on the PT 8800 and to an electrical outlet 3 Lift the cover 4 Press the power button The power LED turns on 5 To turn off the PT 8800 shut down the operating...

Страница 18: ...10 Chapter 1 Getting Started...

Страница 19: ...ion After replacing optional devices make sure all screws springs or other small parts are in place and are not left loose inside the case Metallic parts or metal flakes can cause electrical shorts CA...

Страница 20: ...Installing a hard disk drive HDD Refer to the following to install a HDD CAUTION Hold electronic circuit boards by the edges only Do not touch the components on the board unless it is necessary to do...

Страница 21: ...plays you must remove the mainboard cover and the top rear cover Removing the mainboard cover and customer display cover Refer to the following to remove the rear cover NOTE Refer to the documentation...

Страница 22: ...ts Mainboard reference When connecting the displays refer to the following for connector locations on the mainboard When replacing Align the customer display cover tabs with the openings on the PT 880...

Страница 23: ...he cable through the opening in the PT 8800 2 Align the tabs on the customer display with the openings on the PT 8800 3 Slide the customer display into place 4 Connect the customer display cable to CN...

Страница 24: ...ing the second display Refer to the following to attach the second display 1 Remove the two thumbscrews 2 Remove the I O board 3 Pass the diplay cables through the indicated opening 4 Secure the displ...

Страница 25: ...is on Refer to the following to install a CompactFlash card 5 Put the bracket cover on 6 Plug in the two cables to CN15 and CN23 See Mainboard reference on page 14 7 Replace the I O board 8 Replace th...

Страница 26: ...all a PCI card 3 To remove a card press the eject button and pull the card out 1 Remove the rear cover See Removing the rear cover on page 6 2 Insert the PCI card 3 Secure the card with one screw NOTE...

Страница 27: ...page 32 PnP PCI Configurations on page 35 Frequency Voltage Control Option on page 37 Other BIOS Options on page 38 About the Setup Utility The BIOS Setup Utility enables you to configure the followi...

Страница 28: ...e Award BIOS Setup Utility Figure 3 1 Main BIOS menu BIOS navigation keys The BIOS navigation keys are listed below KEY FUNCTION Scrolls through the items on a menu PU PD Modifies the selected field s...

Страница 29: ...wish to execute that option Other options lead to dialog boxes that prompt you for information Some options marked with a triangle lead to submenus that enable you to change the values for the option...

Страница 30: ...disk change the value to Manual and then manually configure the drive by entering the characteristics of the drive in the fields described below Capacity displays the capacity of the HDD in megabytes...

Страница 31: ...menu Video EGA VGA This item defines the video mode of the system This mainboard has a built in VGA graphics system you must leave this item at the default setting Halt On All But Keyboard This item...

Страница 32: ...is item at the default setting for better performance The default setting is Enabled Quick Power On Self Test Enable this item to shorten the power on testing POST and have your system start up faster...

Страница 33: ...ting repeat characters The default setting is 250 Security Option If you have installed password protection this item defines if the password is required at system start up or if it is only required w...

Страница 34: ...on The default setting is SPD CAS Latency Time This item enables you to specify the time delay in clock cycles or CLKs that elapses before the SDRAM carries out a read command after receiving it The v...

Страница 35: ...16M This item can be used to reserve memory space for some ISA expansion cards that require it The default setting is Dis abled Delayed Transaction The chipset has an embedded 32 bit posted write buff...

Страница 36: ...defines the operation of peripheral components on the system s input output ports Figure 3 6 Integrated Peripherals menu OnChip IDE Device See OnChip IDE Device on page 29 OnChip PCI Device See Onboa...

Страница 37: ...ystem auto detect which PIO mode is best or select a PIO mode from 0 4 The default setting is Auto Primary Secondary Master Slave UltraDMA Each IDE channel supports a master device and a slave device...

Страница 38: ...The default setting is Enabled USB Keyboard Support Enable this item if you plan to use a keyboard connected through the USB port in a legacy operating system such as DOS that does not support Plug an...

Страница 39: ...board COM port 2 The default setting is 2F8 IRQ3 LPT1 Port Mode Enables you to set the data transfer protocol for the parallel port There are five options SPP Standard Parallel Port EPP Enhanced Paral...

Страница 40: ...is 4E8 IRQ5 Power Management Setup Option Use this to control system power management Modern operating systems take care of much of the power manage ment This mainboard supports ACPI Advanced Configu...

Страница 41: ...r own timeouts for the power saving modes The default setting is User Define Video Off Method This item defines how the video is powered down to save power The default setting is V H SYNC Blank Video...

Страница 42: ...e up the system from a power saving mode The default setting is Disabled Resume On LAN Use this item to enable LAN activity to wake up the system from a power saving mode The default setting is Dis ab...

Страница 43: ...Auto ESCD Under this setting the system dynamically allocates resources to plug and play devices as they are required If you cannot get a legacy ISA Industry Standard Architecture expan sion card to...

Страница 44: ...support hardware monitoring this item lets you monitor the parameters for critical voltages criti cal temperatures and fan speeds You cannot make any changes to these fields They are display only Fig...

Страница 45: ...essor you have installed in your system Figure 3 13 Frequency Voltage Control Auto Detect PCI Clk When enabled BIOS disables the clock signal of unpopulated PCI slots reducing power consumption The de...

Страница 46: ...ng correctly try loading the fail safe defaults as a first step in getting your system working properly again If you only want to load fail safe defaults for a specific option select and display that...

Страница 47: ...tween upper and lower case characters Press Enter after you have typed in the password If you are deleting a password that is already installed press Enter when the password dialog box appears You see...

Страница 48: ...ave made in the Setup Utility and exit the Setup Utility When the Exit Without Saving dialog box appears press Y to discard changes and exit or press N to return to the main menu NOTE If you have made...

Страница 49: ...ical support or for passing on to service personnel Use some other electrical device to confirm that the electrical outlet is working Ensure all connections are securely attached The Power On Self Tes...

Страница 50: ...ed Have the PT 8800 serviced HARD DISK S FAIL 40 HDD controller diagnostics failed Have the PT 8800 serviced HARD DISK S FAIL 20 HDD initialization error Have the PT 8800 serviced HARD DISK S FAIL 10...

Страница 51: ...e the PT 8800 serviced An unidentified message is displayed Reboot the computer and run the BIOS Setup Utility Con firm the Setup Utility parameters If the same message is displayed after booting up a...

Страница 52: ...Jumper free setting on COM port and cash drawer port voltage selection LCD panel 15 inch TFT high brightness LCD I O support connectors Six RS232 ports 4 with 5v 12vdc power BIOS selection jumper fre...

Страница 53: ...ge 5 85 Power Supply One internal 220w full range ATX power supply Options Magnetic card reader 3 tracks Internal Smart Card Reader USB interface Rear Customer Display 2 x 20 VFD type Integrated secon...

Страница 54: ...46 Appendix...

Отзывы: