background image

INSTRUCTION MANUAL

ASLD2200 Monitor

Sludge Blanket Level Monitor 

Содержание ASLD2200

Страница 1: ...INSTRUCTION MANUAL ASLD2200 Monitor Sludge Blanket Level Monitor...

Страница 2: ...This page is intentionally left blank...

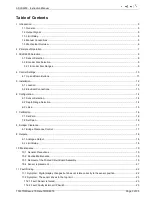
Страница 3: ...n 14 6 2 Depth Range Selection 14 6 3 Links 15 7 Calibration 16 7 1 Set Zero 16 7 2 Set Span 16 8 Scraper Clearance 17 8 1 Bridge Clearance Control 17 9 Outputs 18 9 1 Analogue Output 18 9 2 Limit Rel...

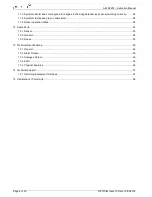
Страница 4: ...m 24 11 5 Sensor operation check 24 12 Spare Parts 25 12 1 Sensor 25 12 2 General 25 12 3 Repair 25 13 Technical Specifications 26 13 1 General 26 13 2 Alarm Output 26 13 3 Analogue Output 26 13 4 EMC...

Страница 5: ...l that is proportional to the location of the top of the sludge blanket With a normal setup the 4mA value relates to the bottom of the tank and 20 mA to the water surface 1 3 Limit Relay The ASLD2200...

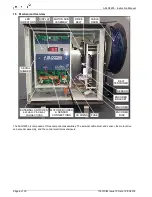
Страница 6: ...otor drive and encoder assembly and the control electronics enclosure Page 6 of 30 103370IM Issue 10 Date 19 03 2018 DISPLAY LED INDICATORS MOTOR SUB ASSEMBLY CABLE DRUM DRIVE BELT BELT TENSIONER SENS...

Страница 7: ...he tank 0 represents the bottom and 100 is the surface the liquid The user is provided with information about the sensor reading by the panel of LED s on the printed circuit board assembly PCBA The ou...

Страница 8: ...nts and is not normally applied to Sludge Blanket measurement The sensor should only be used if the sludge is very light with very clear supernatant IR40 range 0 to 1 500mg l This is the most commonly...

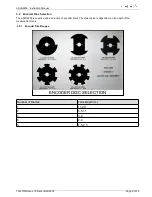
Страница 9: ...upplied with a selection of encoder discs The disk choice is dependant on the depth of the measurement tank 3 2 1 Encoder Disc Ranges Number of Blades Tank Depth m 1 11 20 2 5 5 11 4 3 6 6 2 4 8 1 5 2...

Страница 10: ...controls the function of these controls is explained in later sections Circuit Board Identity Type of Control Use Zero Push Button Calibration Top Limit Potentiometer Calibration Bridge Clearance Pote...

Страница 11: ...the front panel Both sets have the same function These buttons are normally used to aid cleaning of the sensor by bringing the sensor to the surface Up and Stop This button will cause the sensor to ri...

Страница 12: ...inimising the effect of disturbance caused by incoming sludge and by the tank scraper It is normal for the 4 20 mA output signal to be transmitted via slip rings to the site control system where this...

Страница 13: ...5v DC to Encoder Red 14 Input 1 from Encoder Blue 15 Input 2 from Encoder Yellow 16 0v DC to Encoder Black 17 Nominal 18v DC to Motor ve Green 18 Nominal 18v DC to Motor ve Red Brown 19 Not Used 20 No...

Страница 14: ...Treatment Thickeners 148121 IR8 Range 0 30 000 mg l Sewage Treatment Thickeners 6 2 Depth Range Selection The depth range depends on the encoder disc that has been fitted to the instrument this can be...

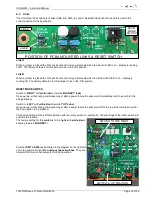
Страница 15: ...or after a power failure the sensor will immediately start to search for the sludge blanket Switch to LEFT with white ident towards TOP Label On power up either during commissioning or after a power...

Страница 16: ...tank Press the Red Zero push button to set the zero point it is sometimes necessary to press this button a few times to ensure a correct zero setting It is important that the zero point is set above t...

Страница 17: ...mand These external sensors can be wired in parallel to the up and down button on the outside of the enclosure using terminals 1 to 3 8 1 Bridge Clearance Control Associated with the scraper clearance...

Страница 18: ...he analogue output connect a multimeter on the mA setting Remove J13 and connect multimeter across Pins 4 5 The motor up and motor down controls can then be used to force the output to 4 mA and 20 mA...

Страница 19: ...ed by observation of the sensor during the first few weeks of operation Typically the sensor should be cleaned once per fortnight although on many sites once per month is sufficient The sensor can be...

Страница 20: ...ove 3x Orange connectors 4 Remove 2X Nylon pillars 5 Unscrew earth nut and remove earth wires 6 Remove 2x Posi head screws and remove printed circuit board assembly Page 20 of 30 103370IM Issue 10 Dat...

Страница 21: ...Instruction Manual 10 4 Sensor replacement 103370IM Issue 10 Date 19 03 2018 Page 21 of 30 UNSCREW 4 X BOLTS TO REMOVE SIDE PLATE SIDE PLATE REMOVAL DISCONNECT SENSOR SPADE CONNECTIONS SENSOR WIRING...

Страница 22: ...n any doubt please contact your local distributor or Partech 11 1 Symptom Digital display changes but does not relate correctly to the sensor position Fault Encoder incorrectly positioned Remove motor...

Страница 23: ...k that disc blade is not touching any part of the encoder when the motor is moving 11 2 Symptom The sensor drives to the top limit 11 2 1 Fault Sensor is fouled Clean the sensor If the problem persist...

Страница 24: ...elector switch manually drive the sensor up or down till the display reads 80 Remove the sensor from the water and check the sensor operation as follows Block the light path between the sensor gap and...

Страница 25: ...200 12 2 General Part No Description 101170 Mounting Bracket for ASLD2200 103370 Instruction Manual for ASLD2200 12 3 Repair Part No Description 117150 Encoder Disc 1 Bladed for ASLD2200 117160 Encode...

Страница 26: ...epth of tank typically 5 Resolution 100 mm Terminals Max conductor cross section 2 5 mm2 13 2 Alarm Output Number of Output 1 Contact Closure Alarm Types Zero and or 100 fixed Relay Rating 0 5 A 100 V...

Страница 27: ...fault 14 1 Returning Equipment for Repair If equipment needs to be returned to Partech for repair or service the following address should be used SERVICE DEPARTMENT PARTECH INSTRUMENTS ROCKHILL BUSINE...

Страница 28: ...elow EN 50081 1 1992 EMC Generic Emission Standard Residential commercial light industry EN 50082 1 1994 EMC Generic Immunity Standard Residential commercial light industry following the provisions of...

Страница 29: ...ASLD2200 Instruction Manual 103370IM Issue 10 Date 19 03 2018 Page 29 of 30...

Страница 30: ...Partech Instruments Rockhill Business Park Higher Bugle St Austell Cornwall PL26 8RA UK Tel 44 0 1726 879800 Email info partech co uk Web www partech co uk...

Отзывы: