background image

Electrical connec

ti

on


The connec

ti

on cable must be secured in a strain-relief clamp.   

The electric supply of the hob must have an isola

ti

on switch which enables you to disconnect it in case of an emergency or 

maintenance.   
 
When the appliance is to be installed above a built-in oven, the two appliances must be connected separately, to make it easier 
to take the appliances out and for electrical safety. Also ensure and that the plug can be reached easily when the appliance is 
installed. 


Ensuring adequate ven

ti

la

ti

on 

Always ensure the electric cooktop is well ven

ti

lated and the air inlet/outlet are not blocked. The base of the hob must have 

direct unrestricted ven

til

a

ti

on to the room where the hob is installed.   


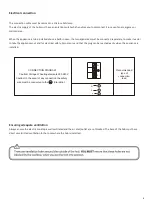
CONNECTION DIAGRAM 

Caution! Voltage of heating elements 220-240V


Caution! In the event of any connection the safety 

wire must be connected to the


E terminal.

Recommended 

type of 

connection 

lead 

N

L

E

N

L

8

Содержание VH-1-6S-4E

Страница 1: ...Installation and Operating Instructions For your convenience we recommend to attach the serial number label HERE Model VH 1 6S 4E VH 1 6W 4E 727626022019...

Страница 2: ...lly These will assist you appliance Please take special note of all detailed technical information and installation instructions It is essential that you follow these instructions to ensure the safety...

Страница 3: ...727626022019 2...

Страница 4: ...2 Product overview 3 Top view 3 Before using your Electric Hob 3 Using your Electric Hob 4 To start cooking 4 Advice on the use of cooking tops 4 Cleaning and Maintenance 5 Troubleshooting 5 Technica...

Страница 5: ...b during use or immediately after until the surface is cooled down Do not place empty pans or leave kitchen utensils on the hob as they can become hot very quickly This appliance must only be used by...

Страница 6: ...se ne cracks in the enamel hob which will trap dirt o Use only dry utensils Do not place wet or steamy parts eg lids on the hotplates Do not use pots and pans that are unsteady and likely to rock or o...

Страница 7: ...ol knob of the corresponding cooking area to the desired heating level 1 indicates the lowest heat setting and 6 is the highest heat setting When you have nished cooking turn the control knob to the 0...

Страница 8: ...ice After use a discolouration of the stainless steel hot plate rims is to be expected and cannot be avoided This does not a ect the operation of the cooktop Failure to correctly clean and maintain th...

Страница 9: ...l Speci cations Model VH 1 6S 4E VH 1 6W 4E Cooking Zones 4 Supply Voltage 220 240V 50Hz Power 1000W 145mm 1500W 180mm 2000W 180mm Red Centre Product Size LxWxH mm 580x500x76 Cut out Dimensions 557 L...

Страница 10: ...k surface is at least 40 50mm Please select heat resistant work surface material to avoid deformations caused by the heat radiation from the hotplate o When installing the hob over drawers a board mus...

Страница 11: ...e appliances out and for electrical safety Also ensure and that the plug can be reached easily when the appliance is installed Ensuring adequate ventilation Always ensure the electric cooktop is well...

Страница 12: ...ting rmly on the surface 5 Adjust the position of the brackets to suit the thickness of the work surface 6 Screw the hob to the underside of the work surface using the other end of the xing brackets a...

Отзывы: