background image

INSTALLATION

IMPORTANT: 

The hot air emitted by the tumble dryer can reach temperatures 

of up to 60

o

C. The appliance must therefore not be installed on floors which are 

not resistant to high temperatures. When operating the tumble dryer, the room 

temperature must not be lower than +5

o

C or higher than +35

o

C as it may affect the 

performance of the appliance.

Fitting the vent hose

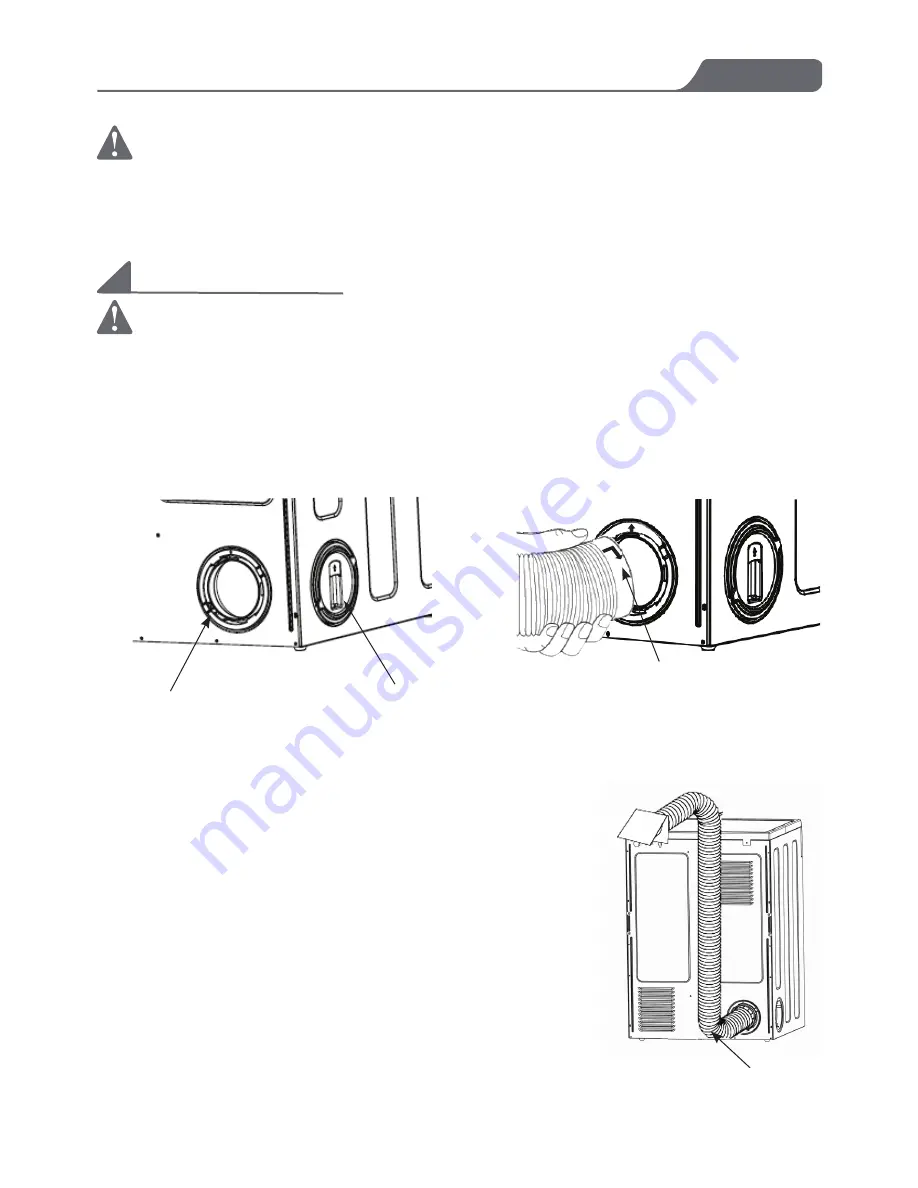
To simplify the installation, there is a choice of vent outlets: one at the back, the 

other on the left hand side.
Connect the hose to whichever is more convenient by pulling the ring nut (A) form 

the vent outlet at the back, aligning the arrows of the hose and ring nut, then 

fastening by screwing the hose to the direction of the arrow, and finally pushing it 

firmly back into place. The unused vents should now be sealed with the special snap 

cover (B) provided.

Advice:

If the hose is long and the room temperature is low, 

the moisture might condense inside the hose. This is 

an unavoidable natural phenomenon. To prevent this 

water from lying in the hose or flowing back into the 

tumble dryer, it is advisable to drill a small hole (dia. 

3mm) in the lowest point of the hose and to place a 

small container below it (C).
Once connected to the dryer, run the vent hose to the 

desired outlet point - it should contain no more than 

two bends. As to the outlet itself, if you have decided 

on a fixed wall/window grille, a good local builders 

merchant should be able to supply you with the 

necessary fittings and installation advice.

Appendix

A

B

A

C

17

Содержание PT-F6-W

Страница 1: ...to improving and updating product ranges we reserve the right to alter change and update technical specifications and appearance attributes of all Parmco Appliances products E OE Models PT F6 W 727626...

Страница 2: ...te of all detailed technical information and installation instructions It is essential that you only allow a qualified technician to install this appliance to ensure the safety and reliability of this...

Страница 3: ...nformation and tips Environmental information CONTENTS Safety information 1 Product description 4 Control panel 5 Use 6 Drying hints 10 Drying programmes 12 Care and cleaning 13 Something not working...

Страница 4: ...irements of the dryer under normal load The power plug must be connected to a three core socket with an earth wire and is grounded properly and reliably If the supply cord is damaged it must be replac...

Страница 5: ...ng oil constitute a fire hazard and should not be placed in the tumble dryer If you have washed your laundry with stain remover you must conduct an extra rinse cycle before loading your tumble dryer P...

Страница 6: ...extiles rubber backed articles and clothes or pillows fitted with foam rubber pads should not be dried in the tumble dryer Always unplug the appliance after use clean and maintenance Do not overload t...

Страница 7: ...PRODUCT DESCRIPTION Before Use 1 2 3 4 7 6 5 1 Control Panel 2 Drum Light 3 Filter 4 Adjustable Feet 5 Side Vent Outlet 6 Vent Pipe Cover 7 Rear Vent Outlet 4...

Страница 8: ...CONTROL PANEL Use Process 1 Programme Selector Dial 2 Sequence Indicator Lights Drying Cooling End Filter 3 Delay Button and Lights 4 Buzzer 5 Quick 6 Delicate 7 Start Pause 1 2 3 4 5 6 7 5...

Страница 9: ...onnect the appliance Open the door see picture Place the laundry in the drum one item at a time shaking them out as much as possible Close the door Please check that the laundry did not get caught bet...

Страница 10: ...Incorrect option selection If you select an option that is not compatible with the programme you have selected the option will not be selected If you selected the Buzzer option the buzzer will sound...

Страница 11: ...e corresponding pilot light comes on This option can also be used for time controlled dryer but cannot be used with the Quick option Select Start Pause Press this button to start the dryer after selec...

Страница 12: ...t turn the dial to O then to Air Dry and press the Start button Modifying the programme To change a programme which is running first cancel it by turning the programme selector dial to O Select the ne...

Страница 13: ...then rub it dry To avoid a static charge when drying is completed use either a fabric softener when you are washing the laundry or a fabric conditioner specifically for tumble dryers Remove the laund...

Страница 14: ...ve bathrobe 1200g night dress 200g napkin 100g ladies briefs 100g quilt cover 700g men s work shirt 600g sheet 500g men s shirt 200g pillowcase 200g men s pyjamas 500g tablecloth 250g blouse 100g bath...

Страница 15: ...ton trousers Damp 6kg For knitted items cotton shirts Iron 6kg For sheets bed linens table linens starched laundry Synthetics Extra 3kg For sheets tablecloths synthetics items Cupboard 3kg For synthet...

Страница 16: ...g the door Periodically clean the interior part of the door to remove any fluff Proper cleaning ensures effective drying Cleaning the filter Your dryer will only function well if the filter is clean T...

Страница 17: ...open Have not pressed the Start Pause button Plug in at mains socket Close loading door Press the Start Pause button again Drying results are unsatisfactory Wrong programme selected Filter clogged Inc...

Страница 18: ...than 35o C Dimensions wxdxh mm 595 x 555 x 850 It is dangerous to alter the specifications or attempt to modify this product in any way Care must be taken to ensure that the appliance does not stand...

Страница 19: ...eg paper rags etc To keep vibration and noise to a minimum when the dryer is in use it should be placed on a firm level surface NOTE If the floor is uneven adjust the adjustable feet DO not put any w...

Страница 20: ...ening by screwing the hose to the direction of the arrow and finally pushing it firmly back into place The unused vents should now be sealed with the special snap cover B provided Advice If the hose i...

Страница 21: ...hose is completely squashed the safety cut outs with which the machine is fitted may operate When operating the tumble dryer the room temperature must not be lower than 5o C or higher than 35o C as i...

Страница 22: ...te Instead it should be taken to the appropriate collection point for the recycling of electrical and electronic equipment By ensuring this product is disposed of correctly you will help prevent poten...

Страница 23: ...e for the product itself or if installed with a kitchen or house then proof of purchase can be from a Parmco reseller of products supplied by Parmco Liability under this warranty will not be accepted...

Отзывы: