background image

62

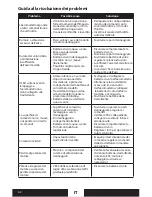
Guida alla risoluzione dei problemi

Problema

Possibile causa

Soluzione

L'aeromodello risponde 

a tutti i comandi tranne 
che al throttle

•  Il throttle non è in posizione
   folle al momento dell'imposta- 

zione dei comandi e/o il trim 
del throttle è troppo alto.

•  Il canale del throttle è invertito

•  Reimpostare la confi gurazione 

minima dei comandi con lo 
stick del throttle e il trim del 
throttle 

•  Invertire il canale del throttle 

sulla trasmittente

Rumore o vibrazione 

eccessivi dell'elica

•  Elica, spinner, asse del carrello 

o motore danneggiati

•  Sostituire le parti danneggiate

Durata del volo ridotta 

o alimentazione 
insuffi

  ciente 

dell'aeromodello

•  Batteria di volo quasi scarica
•  Elica o asse del carrello 

danneggiati

•  Batteria di volo danneggiata
•  Il cambio non si muove 

liberamente

•  Possibili condizioni di volo 

troppo fredde

•  Ricaricare completamente la 

batteria di volo

•  Sostituire le parti danneggiate
•  Sostituire la batteria di volo e 

seguire le relative istruzioni

• Lubrifi care l'asse del carrello e le 

boccole

•  Accertarsi che le batterie siano 

calde prima dell'uso

Il LED sulla ricevente 

lampeggia e 
l'aeromodello non 
viene collegato alla 
trasmittente

•  Attesa inferiore a 5 secondi 

dopo l'accensione della 
trasmittente e prima del 
collegamento della batteria di 
volo all'aeromodello

•  Trasmittente troppo vicina 

all'aeromodello durante la 
procedura di binding

•  Batteria della trasmittente 

quasi scarica

•  Scollegare e ricollegare la 

batteria di volo all'aeromodello

•  Allontanare la trasmittente 

accesa di circa un metro 

   dall'aeromodello, scollegare 
    la batteria di volo dall'aero- 

modello e ricollegarla

•  Sostituire le batterie della 

trasmittente

La superfi cie di 

comando non si muove 
o risponde con ritardo 
ai comandi

• Superfi cie di comando, 

antenna di controllo, 
leveraggio o servo 
danneggiati

•  Fili danneggiati o 

collegamenti allentati

•  Batteria di volo quasi scarica
•  Trim di controllo fuori 

regolazione

•  Sostituire o riparare le parti 

danneggiate e regolare i 
comandi

• Verifi care fi li e collegamenti, 

collegare o sostituire in base 
alle necessità

•  Ricaricare completamente la 

batteria di volo

•  Regolare i trim per ripristinare il 

totale controllo

Comandi invertiti

• Impostazioni della 

trasmittente invertite

•  Eseguire il test direzionale dei 

comandi e regolare i comandi 
della trasmittente in maniera 
appropriata

Perdita di potenza del 

motore

•  Motore o componenti del 

sistema di alimentazione 
danneggiati

• Verifi care l'eventuale presenza 

di danni a batterie, trasmittente, 
ricevente, ESC, motore e 
cablaggio (sostituire se 
necessario)

Potenza irregolare del 

motore e successiva 
perdita di potenza del 
motore

•  L'ESC utilizza la funzione di 

taglio di bassa tensione (LVC) 
graduale predefi nito

•  Ricaricare la batteria di volo

IT

Содержание T-28 Trojan BNF

Страница 1: ...Ultra Micro T 28 Trojan RTF BNF RTF Instruction Manual Bedienungsanleitung Manuel d utilisation Manuale di Istruzioni...

Страница 2: ...2...

Страница 3: ...personal property and cause serious injury This is a sophisticated hobby product and NOT a toy It must be operated with caution and common sense and requires some basic mechanical ability Failure to o...

Страница 4: ...onal Parts 15 Warranty and Service 15 Contact Information 16 First Flight Preparation Remove and inspect contents Begin charging the flight battery Install landing gear Install batteries into battery...

Страница 5: ...e damaged or even catch fire Li Po cells should not be discharged to below 3V each under load Battery Warnings Low Voltage Cutoff LVC The T 28 receiver features a soft low voltage cutoff LVC that occu...

Страница 6: ...a fully discharged not over discharged 120mAh battery takes approximately 30 40 minutes As the battery nears full charge the LED begins to blink 7 When the battery is fully charged the LED blinks appr...

Страница 7: ...for binding to a receiver 2 Make sure the flight battery is disconnected from the airplane 3 Power off the transmitter 4 Connect the flight battery in the aircraft The receiver LED will begin to flas...

Страница 8: ...nsmitter before doing these tests Move the controls on the transmitter to make sure aircraft control surfaces are moved correctly Mode 2 shown Control Direction Test Elevator Rudder Trim This transmit...

Страница 9: ...l surfaces See Servo Reversing in your transmitter manual 1 Be certain the battery is unplugged from the aircraft and the transmitter is turned off 2 Press and hold the digital trim button for the sur...

Страница 10: ...hape in the pushrod Control Centering 1 Remove the airplane and the landing gear from the box 2 Gently slide left and right mainlanding gear into plastic mounting clips on the bottom of the wings orie...

Страница 11: ...h red then bind the transmitter to the aircraft per instructions on page 6 Note The throttle trim must be at the lowest setting to arm the ESC 1 Install the fully charged flight battery in the airplan...

Страница 12: ...Removing tape or decals will remove paint from the fuselage 2 While the fuselage is open hold the white nylon nut on the prop shaft using needle nose pliers or hemostats 3 Turn the spur gear on the p...

Страница 13: ...ize hitting the prop While this does not damage the airplane it is possible to wear down the tips of the propeller if flying from an abrasive surface such as concrete or asphalt Note You can also rais...

Страница 14: ...ter powering transmitter and before connecting flight battery to aircraft Transmitter too near aircraft during binding process Batteries in transmitter low Disconnect then connect flight battery to ai...

Страница 15: ...ansmitter Mode 2 EU Optional SPMR66001E DX6i 6 Channel Transmitter Mode 1 EU Optional SPMR7700 DX7 7 Channel Transmitter Mode 2 Optional SPMR77001 DX7 7 Channel Transmitter Mode 1 Optional SPMR7700E D...

Страница 16: ...s as Horizon is not responsible for merchandise until it arrives and is accepted at our facility An Online Repair Request is avail able at www horizonhobby com http www horizonhobby com under the Repa...

Страница 17: ...nce and 2 this device must accept any interference received including interference that may cause undesired operation Caution Changes or modifications not expressly approved by the party responsible f...

Страница 18: ...ling of waste electrical and electronic equipment The separate collection and recycling of your waste equipment at the time of disposal will help to conserve natural resources and ensure that it is re...

Страница 19: ...digungen am Produkt eigenen und fremden Eigentum und ernsthaften Verletzungen f hren Bitte beachten Sie dass dieses Produkt ein hoch entwickeltes Hobby Produkt und kein Spielzeug ist Es erfordert bei...

Страница 20: ...den Erstflug Entnehmen und berpr fen Sie alle Packungsteile Laden Sie den Flugakku Montieren Sie das Fahrgestell in die Halterung auf der Unterseite der Tragfl chen und Rumpf Setzten Sie die 4 AA Bat...

Страница 21: ...rzeug oder in direkten Sonnenlicht Der Akku kann besch digt werden oder Feuer fangen Li Po Akkus sollten nicht bei Last unter 3V entladen werden Akku Warnungen Niederspannungsabschaltung Die T 28ist m...

Страница 22: ...tiefentladenen Akkus dauert ca 30 40 Minuten Ist die vollst ndige Ladung nahezu erreicht f ngt die LED an zu blinken 7 Ist der Akku vollst ndig geladen blinkt die LED alle 20 Sekunden und geht dann au...

Страница 23: ...Aktivieren Sie den Bindevorgang des Senders Sollten Sie einen MLP4DSM Sender verwenden dr cken Sie den linken Stick vertikal in das in das Geh use bis Sie ein Klicken h ren 6 Stellen Sie sicher dass...

Страница 24: ...uder Sie k nnen mit der Dual Rate Funktion bei dem Sender zwischen f r die H hen Seiten und Querruder zwischen gro en und kleinen Steuerausschl gen w hlen Wenn der Sender eingeschaltet wird befindet e...

Страница 25: ...Seiten und H henruders folgen Sie bitte diesen Anweisungen 1 Stellen Sie sicher dass der Flugakku nicht angeschlossen und der Sender ausgeschaltet ist 2 Dr cken Sie den digitalen Trimmbutton der Funk...

Страница 26: ...ogen zusammen oder auseinander Zentrieren der Kontrollen 1 Nehmen Sie das Flugzeug und das Fahrwerk aus dem Karton 2 Schieben Sie vorsichtig wie abgebildet das linke und rechte Hauptfahrwerk in die Ha...

Страница 27: ...Sender gebunden werden Hinweis Der Gaskn ppel mu auf der untersten m glichen Position stehen um den Regler zu armieren 1 Kleben Sie falls notwendig einen Streifen Klettband auf die R ckseite des Akkus...

Страница 28: ...fernt werden 2 Halten Sie bei ge ffneteten Rumpf die Kunstoffmutter an der Propellerwelle mit einer Spitzzange oder Pinzette fest 3 Drehen Sie das Zahnrad der Propellerwelle im Uhrzeigersinn um die Ku...

Страница 29: ...glichkeit einer Propellerbodeber hrung vermeiden Starten und landen sie auf einer glatten Fl che wie zum Beispiel Asphalt k nnen Sie das Risiko minimieren Hinweis Sie k nnen des Bugfahrwerk etwas hera...

Страница 30: ...f dem Empf nger blinkt Flugzeug l t sich nicht an Empf nger binden Sie haben weniger als 5 Sekunden gewartet mit dem Anschlie en des Flugakkus nach dem Einschalten des Senders Batterien im Sender sind...

Страница 31: ...o T 28 Auss tausch Servomechaniken EFLH1067 Sicherung Servo Parkzone Micro T 28 Artikel Nr Beschreibung PKZ3052 Parkzone Ladekabel Micro Lipo Akkus Optional EFLB1201S 120mAh 3 7V 14C Li Po Akku Option...

Страница 32: ...ne seiner Landesvertretung bed rfen der schriftlichen Schadensbeschr nkung Horizon ist nicht f r direkte oder indirekte Folgesch den Einkommensausf lle oder kommerzielle Verluste die in irgendeinem Zu...

Страница 33: ...rs bei Hubschraubern und RC Cars sind extrem aufwendig und m ssen deshalb vom K ufer selbst vorgenommen werden Europ ische Union Elektronik und Motoren m ssen regelm ig gepr ft und gewartet werden F r...

Страница 34: ...e 1999 5 EG R TTE erkl rt das Produkt PKZ T 28 Trojan Ultra Micro BNF PKZU1580 Ger teklasse 1 den grundlegenden Anforderungen des 3 und den brigen einschl gigen Bestimmungen des FTEG Artikel 3 der R T...

Страница 35: ...magement du produit lui m me ainsi que des risques de d g ts mat riels voire de blessures graves Ceci est un produit de loisirs perfectionn et NON PAS un jouet Il doit tre manipul avec prudence et bon...

Страница 36: ...uide de d pannage 46 Pi ces de rechange et pi ces optionnelles 47 Garantie et r parations 47 Coordonn es 49 Pr paration au premier vol Retirez le contenu de la bo te et inspectez le Commencez charger...

Страница 37: ...e la batterie peut tre endommag e ou prendre feu Les cellules Li Po ne doivent pas tre d charg es en dessous de 3 V Avertissements relatifs la batterie Coupure par tension faible Le r cepteur duT 28...

Страница 38: ...equiert de 30 40 minutes environ Lorsque la charge est presque compl te la DEL commence clignoter 7 Lorsque la batterie est compl tement charg e la DEL clignote toutes les 20 secondes environ ou s tei...

Страница 39: ...epteur commence clignoter g n ralement au bout de 5 secondes 5 Placez votre metteur en mode affectation Si vous utilisez l metteur MLP4DSM poussez la manette de commande de gauche verticalement vers l...

Страница 40: ...tteur permet au pilote de permuter entre grands et petits d battements pour les voies d aileron de gouverne de profondeur de gouverne de direction et des gaz l allumage cet metteur est automatiquement...

Страница 41: ...de votre metteur 1 Assurez vous que la batterie est d connect e de l avion et que l metteur est teint 2 Maintenez enfonc le bouton de trim num rique correspondant la surface dont vous souhaitez chang...

Страница 42: ...irez l avion et le train d atterrissage de la bo te 2 Faites doucement glisser les trains principaux gauche et droit dans les taquets de montage en plastique situ s sous les ailes en orientant les jam...

Страница 43: ...ion conform ment aux instructions de la page 6 Remarque pour l armement de l ESC le trim des gaz doit tre plac dans la position la plus basse 1 Installez la batterie de vol compl tement charg e dans l...

Страница 44: ...nies endommage la peinture du fuselage 2 Fuselage ouvert maintenez l crou en nylon blanc situ sur l arbre d h lice avec une pince bec fin ou une pince h mostatique 3 Faites tourner la couronne de l ar...

Страница 45: ...e contact de l h lice avec le sol Ceci ne risque pas d endommager l avion mais peut entra ner l usure des extr mit s de l h lice si la surface du terrain de vol est compos e d une surface abrasive tel...

Страница 46: ...teur et la connexion de la batterie de vol sur l avion L metteur tait trop proche de l avion pendant le processus d affectation Charge des batteries de l metteur trop faible D connectez la batterie de...

Страница 47: ...ilerons PKZU1522 Liaisons et biellettes m caniques d aileron PKZ3623 Levier de renvoi d aileron PKZ3624 Moteur et r ducteur PKZU1525 Ensemble queue complet PKZU1526 Jeu de biellettes m caniques de gou...

Страница 48: ...re s re et raisonnable peut provoquer des blessures et des d g ts mat riels cons quents Ce produit n est pas destin tre utilis par des enfants sans la surveillance par un tuteur La notice d utilisatio...

Страница 49: ...ident Gestion Internationale des Activit s et des Risques Horizon Hobby Inc FR Coordonn es Pays d achat Horizon Hobby Adresse Num ro de t l phone Courriel tats Unis Horizon Service Center Composants l...

Страница 50: ...quipements lectriques vous pouvez contacter votre mairie ou le service local de traitement des ordures m nag res FR Declaration of Conformity in accordance with ISO IEC 17050 1 No HH2010072902 Produi...

Страница 51: ...sso e alle cose nonch gravi lesioni alle persone Questo aeromodello un prodotto sofisticato per appassionati di modellismo e NON un giocattolo Deve essere azionato con cautela e responsabilit e richie...

Страница 52: ...blemi 62 Parti di ricambio e parti opzionali 62 Garanzia e assistenza 63 Informazioni di contatto 65 Preparazione al primo volo Rimuovere la confezione e verificarne il contenuto Iniziare a caricare l...

Страница 53: ...eria Taglio di bassa tensione LVC La ricevente T 28 dotata di un circuito di taglio di bassa tensione LVC graduale quando la batteria raggiunge i 3 V per ciascuna cella in condizioni di carico Quando...

Страница 54: ...modo eccessivo da 120mAh richiede all incirca 30 40 minuti Quando la carica quasi completa il LED inizia a lampeggiare 7 Quando la carica completa il LED lampeggia per circa 20 secondi o si spegne Not...

Страница 55: ...all aeromodello Il LED della ricevente inizia a lampeggiare di norma dopo 5 secondi 5 Impostare la trasmittente sulla modalit di binding Se si utilizza una trasmittente MLP4DSM portare lo stick sinist...

Страница 56: ...funzione Dual Rate della trasmittente consente al pilota di passare tra controllo high rate e controllo low rate per i canali dell alettone dell elevatore del timone e del throttle Quando viene accesa...

Страница 57: ...ersione servo nel manuale della trasmittente 1 Accertarsi che la batteria sia scollegata dall aeromodello e che la trasmittente sia spenta 2 Tenere premuto il pulsante del trim digitale relativo alla...

Страница 58: ...rello di atterraggio dalla confezione 2 Inserire delicatamente il carrello di atterraggio principale sinistro e destro nelle clip di montaggio di plastica nella parte inferiore delle ali orientando gl...

Страница 59: ...eromodello seguendo le istruzioni riportate a pagina 6 Nota affinch l ESC venga armato il trim del throttle deve essere nell impostazione pi bassa 1 Istallare la batteria di volo completamente carica...

Страница 60: ...vernice dalla fusoliera 2 Con la fusoliera aperta mantenere in posizione il dado bianco con inserto in nylon sull albero dell elica utilizzando pinze con becchi ad ago o emostatiche 3 Ruotare in senso...

Страница 61: ...ggi l aeromodello possibile che le punte dell elica si usurino se si vola da una superficie abrasiva come il cemento o l asfalto Nota possibile inoltre sollevare il carrello anteriore per evitare di c...

Страница 62: ...ia di volo all aeromodello Trasmittente troppo vicina all aeromodello durante la procedura di binding Batteria della trasmittente quasi scarica Scollegare e ricollegare la batteria di volo all aeromod...

Страница 63: ...6i a 6 canali mode 2 opzionale SPMR66001 Trasmittente DX6i a 6 canali mode 1 opzionale SPMR6600E Trasmittente DX6i a 6 canali mode 2 EU opzionale SPMR66001E Trasmittente DX6i a 6 canali mode 1 EU opzi...

Страница 64: ...nte Questo prodotto non concepito per essere usato dai bambini senza una diretta supervisione di un adulto Il manuale del prodotto contiene le istruzioni di sicurezza di fun zionamento e di manutenzio...

Страница 65: ...Horizon Hobby SAS 14 Rue Gustave Eiffel Zone d Activit du R veil Matin 91230 Montgeron 33 0 1 60 47 44 70 Stati Uniti d America IT Dichiarazione di conformit Informazioni sulla conformit per l Unione...

Страница 66: ...10 Smaltimento all interno dell Unione Europea Questo prodotto non deve essere smaltito assieme ai rifiuti domestici Invece responsabilit dell utente lo smaltimento di tali rifiuti che devono essere p...

Страница 67: ...67...

Страница 68: ...of Bachmann Industries Inc ParkZone E flite JR Celectra DSM2 Vapor and Ember are trademarks or registered trademarks of Horizon Hobby Inc Futaba is a registered trademark of Futaba Denshi Kogyo Kabus...

Отзывы: