


14
GB
CY
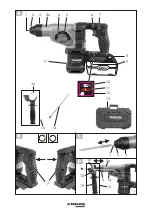
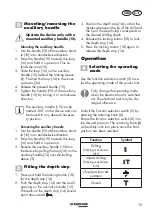
Adjusting the chisel
position
1. Set the function selection switch (5) to
the
symbol.
2. Turn the tool in the tool holder (1) to the
required position.
3. Use the function selection switch (5)
to select the
symbol for the chisel
operation.
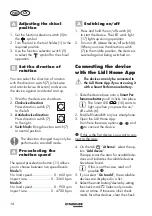
Set the direction of
rotation
You can select the direction of rotation
with the direction switch (7) (clockwise
and anticlockwise direction) and secure
the device against accidental start up.
1. Wait for the device to shut-down.
2.
Clockwise direction:
Press direction switch (7)
to the left.
3.
Anticlockwise direction:
Press direction switch (7)
to the right.
4.
Switch lock:
Bring direction switch (7)
to neutral position.
The direction changed may only be
performed in standstill mode.
Pre-selecting the
rotation speed
The speed preselection button (11) allows
you to choose between two speed levels:
Mode 1:
No load speed ..................... 0 - 660 rpm
Impact rate ........................ 0 - 3265 bpm
Mode 2:
No load speed
.....................
0 - 950 rpm
Impact rate
........................
0 - 4700 bpm
Switching on/off
1. Press and hold the on/off switch (6)
to start the device. The LED work light
(17) lights up during operation.
2. To turn it off, release the on/off switch (6).
When you move the direction switch
(7) to the middle position, the device is
secured against being switched on.
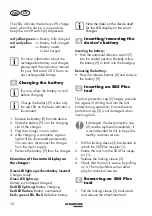
Connecting the device
with the Lidl Home App
The device can only be connected to
the Lidl Home App if you are using it
with a Smart Performance battery.
1. Slide the device base onto a
Smart Per-
formance battery
until it clicks into place.
The Smart LED
(10) starts to
light up when you press the on/
off switch (6).
2. Enable Bluetooth® on your smartphone.
3. Open the Lidl Home App.
From here there are options
,
and
to connect the device.
If this is the first device you want to con
-
nect to the app:
4. On the tab
“
At home
”, select the op
-
tion “
Add device
”.
The app scans the area for available de
-
vices and indicates if available devices
have been found.
If this is not the case, read on if
possible
.
5. If you select “
Go to add
“, the available
devices are displayed in a list.
6. Select the smart battery/device by setting
the check mark . Select only one de-
vice at a time. If there are other check
marks for other devices, clear the check
Содержание PKHAP 20-Li B2
Страница 3: ...28 4 mm x 28 4 19 18 14 3a 1 2 3 6 5 4 13 8 16 17 9 15 10 14 7 7 16 2 3 11 12 1 15 3 3a...
Страница 78: ...78 GR CY 1 A...
Страница 79: ...79 CY GR 2 3...
Страница 80: ...80 GR CY 4 N...
Страница 81: ...81 CY GR 5 130 C 6 1...
Страница 82: ...82 GR CY 2 A O B 7...
Страница 83: ...83 CY GR 6 12 9 LED 6 Parkside X 20 V Team 9 LED 1 9 2 9 3 4 5 9 LED LED LED LED LED LED LED Smart 7 9 8 9...
Страница 85: ...85 CY GR 4 18 14 5 18 14 5 5 4 5 4 1 5 2 1 3 5 7 1 2 7 3 7 4 7...
Страница 87: ...87 CY GR 5 5 Smart 4 5 6 2 7 8 9 Smart ID smart Parkside X20V Team Profi 57 100 540 950 Smart PUSH...
Страница 88: ...88 GR CY Lidl Home 1 2 3 4 1 2 3...
Страница 89: ...89 CY GR 3 2 1 1 13 0 C 45 C 2012 19...
Страница 90: ...90 GR CY 800 25 2006 66 EG 5...
Страница 91: ...91 CY GR 391005_2201 e mail...
Страница 93: ...93 CY GR www grizzlytools shop Service Center 92 91110028 91110029 9 9 6 6...
Страница 112: ...112...
Страница 118: ...118...
Страница 120: ...120...


