PWBS 180 B3
■
10
│
GB
│
IE
Mounting the adapter for external
extraction
♦
Push the dust extraction adapter onto the
extraction nozzle .
♦
Connect an approved dust extraction system.
NOTE
►
When sawing wood or other materials that
can create dusts that are hazardous to
health, always connect a suitable, certified
vacuum extractor appliance.
Adjusting the additional handle
The angle of the additional handle can be
adjusted to achieve a more favourable working
position for the guide hand in certain applications
(e.g. when grinding close to an edge).
♦
Loosen the two wing screws and tilt the
additional handle to the desired working
position.
♦
Retighten the wing screws .
Working procedures
WARNING! RISK OF INJURY!
►
Always remove the plug from the power
socket before working on the appliance.
►
Wait until the appliance has come to a
standstill before putting it down.
The removal rate and the surface quality are deter-
mined by the selection of the sanding tool, the
preselected speed level and the contact pressure.
Only sanding tools that are in perfect condition
provide a good sanding performance and protect
the appliance.
Sanding
■
Hold the appliance firmly with both hands
when working and ensure that you have
secure footing.
The appliance is guided more
safely with two hands.
♦
Connect your extraction system (internal or
external extraction).
♦
For external suction:
If possible, work with the remote switch-off or
the automatic start/stop function of the vacuum
cleaner. The vacuum cleaner switches on auto-
matically and switches off again after a time
delay in order to remove the remaining dust
from the suction hose.
♦
Switch on the appliance, place it with the entire
sanding surface on the surface you are working
on and move it over the workpiece with
moderate pressure.
♦
To prolong the service life of the accessory tool,
ensure that you apply even pressure.
♦
Use of excessive pressure does not lead to a
greater removal rate, but rather to increased
wear of the accessory tool.
♦
Lift the appliance off the working surface.
♦
For internal extraction:
Let the power tool run for a few more seconds
to remove the remaining dust from the suction
hose .
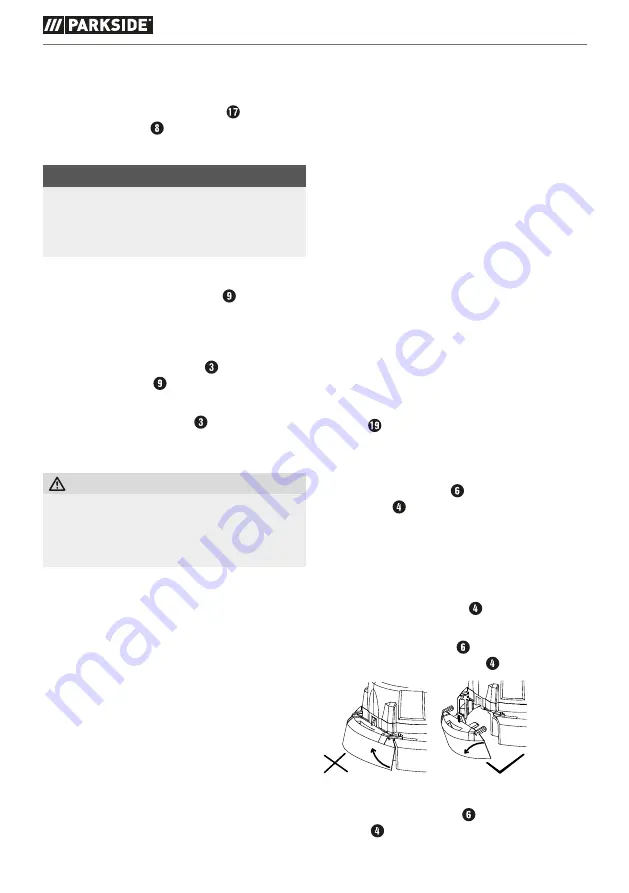
Sanding close to the edge
If you are sanding close to the edge, you can
remove a hood segment of the protective and
suction hood . This means that the accessory tool
you are using is closer to floor, wall and ceiling
edges as well as existing installations such as
pipes, and the adjacent surfaces can be precisely
machined.
Expect dust to develop during this work, as the
protective and suction hood is no longer closed
off.
♦
Pull the hood segment forwards out of the
protective and suction hood .
♦
Work the surfaces close to the edge.
♦
Push the hood segment back into the suction
hood until it locks into place.
Содержание 499896 2204
Страница 3: ......
Страница 4: ...A B 19a 18a...
Страница 52: ...PWBS 180 B3 48 FR BE...
Страница 68: ...PWBS 180 B3 64 NL BE...
Страница 98: ...PWBS 180 B3 94 PL...
Страница 114: ...PWBS 180 B3 110 SK...
Страница 160: ...PWBS 180 B3 156 IT...
Страница 176: ...PWBS 180 B3 172 HU...
Страница 220: ...PWBS 180 B3 216 RO...
Страница 222: ...PWBS 180 B3 218 BG PWBS 180 B3 18a 19a 1 1 m 3 5 m 1 25 L 1 6 2 40 80 120 1 YG8 1 1...
Страница 224: ...PWBS 180 B3 220 BG 2 a 3 a...
Страница 225: ...PWBS 180 B3 BG 221 4 a 5 a a...
Страница 226: ...PWBS 180 B3 222 BG...
Страница 227: ...PWBS 180 B3 BG 223 a a...
Страница 228: ...PWBS 180 B3 224 BG a...
Страница 229: ...PWBS 180 B3 BG 225 FFP 2...
Страница 230: ...PWBS 180 B3 226 BG A 12 3 2 mm...
Страница 231: ...PWBS 180 B3 BG 227 P2 19a 18a 19a 18a...
Страница 232: ...PWBS 180 B3 228 BG...
Страница 233: ...PWBS 180 B3 BG 229 2012 19 EU...
Страница 234: ...PWBS 180 B3 230 BG a b 1 7 20 22 80 98 3 II 3...
Страница 238: ...PWBS 180 B3 234 GR PWBS 180 B3 ON OFF 18a 19a 1 1m 3 5 m 1 25 1 6x 2x 40 80 120 1 YG8 1 1...
Страница 240: ...PWBS 180 B3 236 GR 2 3...
Страница 241: ...PWBS 180 B3 GR 237 4 5...
Страница 242: ...PWBS 180 B3 238 GR...
Страница 243: ...PWBS 180 B3 GR 239...
Страница 244: ...PWBS 180 B3 240 GR ON OFF Off...
Страница 245: ...PWBS 180 B3 GR 241 FFP2...
Страница 246: ...PWBS 180 B3 242 GR A 12 3 2 mm P2 19a 18a 19a 18a...
Страница 247: ...PWBS 180 B3 GR 243...
Страница 248: ...PWBS 180 B3 244 GR ON OFF ON OFF On Off On Off...
Страница 249: ...PWBS 180 B3 GR 245 2012 19 U a b 1 7 20 22 80 98...
Страница 250: ...PWBS 180 B3 246 GR Kompernass Handels GmbH 3 2251 1994...


