


PWBS 180 B3
GB
│
IE
│
9
■
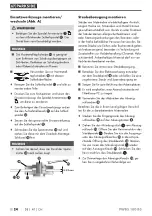
Fitting/changing accessory tools
(Fig. A)
WARNING!
►
Press the spindle locking button
only
when the grinding spindle is at a standstill.
Otherwise the appliance may be damaged.
NOTE
■
The carbide grinding head is suitable for
removing formwork transitions on exposed
concrete, residual concrete on formwork
boards or adhesive residues on tiles.
■
Only use carbide sanding
heads with an even sanding
surface.
♦
Clean the sanding spindle and all parts to
be mounted.
♦
Press the spindle locking button
to clamp
and release the accessory tool.
♦
To fit the accessory tool, place the mounting
flange onto the sanding spindle .
♦
Place the desired accessory tool onto the
sanding spindle .
♦
Screw the clamping nut and tighten it with
the two-hole assembly spanner .
NOTE
►
Make sure that the collar of the clamping
nut is facing outwards.
12
≤ 3,2 mm
Installing the dust extraction system
Dust from materials such as lead-based paints,
some types of wood, minerals and metal can be
harmful to health. Touching or inhaling the dusts
may cause allergic reactions and/or respiratory
illnesses of the user or people in the vicinity.
Certain dusts such as oak or beech dust are consid-
ered carcinogenic, especially in combination with
wood treatment additives (chromate, wood preserv-
atives). Materials containing asbestos may only be
worked on by specialists.
■
Always use dust extraction.
■
Operate the power tool either with the dust
bag or connect an approved dust and chip
extraction device.
■
Ensure that your workplace is adequately
ventilated.
■
We recommend you wear a respirator with
a class P2 filter.
■
Avoid kinking the suction hose .
Observe the applicable regulations in your country
regarding the materials to be worked.
♦
Plug the inlet side of the suction hose onto
the extraction nozzle .
♦
Pull the mouthpiece
19a
off the suction hose .
Open the zip on the dust bag
18a
. Now plug
the outlet end of the suction hose into the
corresponding opening on the dust bag .
Reconnect the mouthpiece
19a
to the suction
hose from the inside. Close the zip on the
dust bag
18a
.
♦
Proceed in the reverse order to dismantle the
suction hose .
Содержание 499896 2204
Страница 3: ......
Страница 4: ...A B 19a 18a...
Страница 52: ...PWBS 180 B3 48 FR BE...
Страница 68: ...PWBS 180 B3 64 NL BE...
Страница 98: ...PWBS 180 B3 94 PL...
Страница 114: ...PWBS 180 B3 110 SK...
Страница 160: ...PWBS 180 B3 156 IT...
Страница 176: ...PWBS 180 B3 172 HU...
Страница 220: ...PWBS 180 B3 216 RO...
Страница 222: ...PWBS 180 B3 218 BG PWBS 180 B3 18a 19a 1 1 m 3 5 m 1 25 L 1 6 2 40 80 120 1 YG8 1 1...
Страница 224: ...PWBS 180 B3 220 BG 2 a 3 a...
Страница 225: ...PWBS 180 B3 BG 221 4 a 5 a a...
Страница 226: ...PWBS 180 B3 222 BG...
Страница 227: ...PWBS 180 B3 BG 223 a a...
Страница 228: ...PWBS 180 B3 224 BG a...
Страница 229: ...PWBS 180 B3 BG 225 FFP 2...
Страница 230: ...PWBS 180 B3 226 BG A 12 3 2 mm...
Страница 231: ...PWBS 180 B3 BG 227 P2 19a 18a 19a 18a...
Страница 232: ...PWBS 180 B3 228 BG...
Страница 233: ...PWBS 180 B3 BG 229 2012 19 EU...
Страница 234: ...PWBS 180 B3 230 BG a b 1 7 20 22 80 98 3 II 3...
Страница 238: ...PWBS 180 B3 234 GR PWBS 180 B3 ON OFF 18a 19a 1 1m 3 5 m 1 25 1 6x 2x 40 80 120 1 YG8 1 1...
Страница 240: ...PWBS 180 B3 236 GR 2 3...
Страница 241: ...PWBS 180 B3 GR 237 4 5...
Страница 242: ...PWBS 180 B3 238 GR...
Страница 243: ...PWBS 180 B3 GR 239...
Страница 244: ...PWBS 180 B3 240 GR ON OFF Off...
Страница 245: ...PWBS 180 B3 GR 241 FFP2...
Страница 246: ...PWBS 180 B3 242 GR A 12 3 2 mm P2 19a 18a 19a 18a...
Страница 247: ...PWBS 180 B3 GR 243...
Страница 248: ...PWBS 180 B3 244 GR ON OFF ON OFF On Off On Off...
Страница 249: ...PWBS 180 B3 GR 245 2012 19 U a b 1 7 20 22 80 98...
Страница 250: ...PWBS 180 B3 246 GR Kompernass Handels GmbH 3 2251 1994...


