Parker V200 Скачать руководство пользователя страница 2

Page 2 / Bulletin 75-00 J
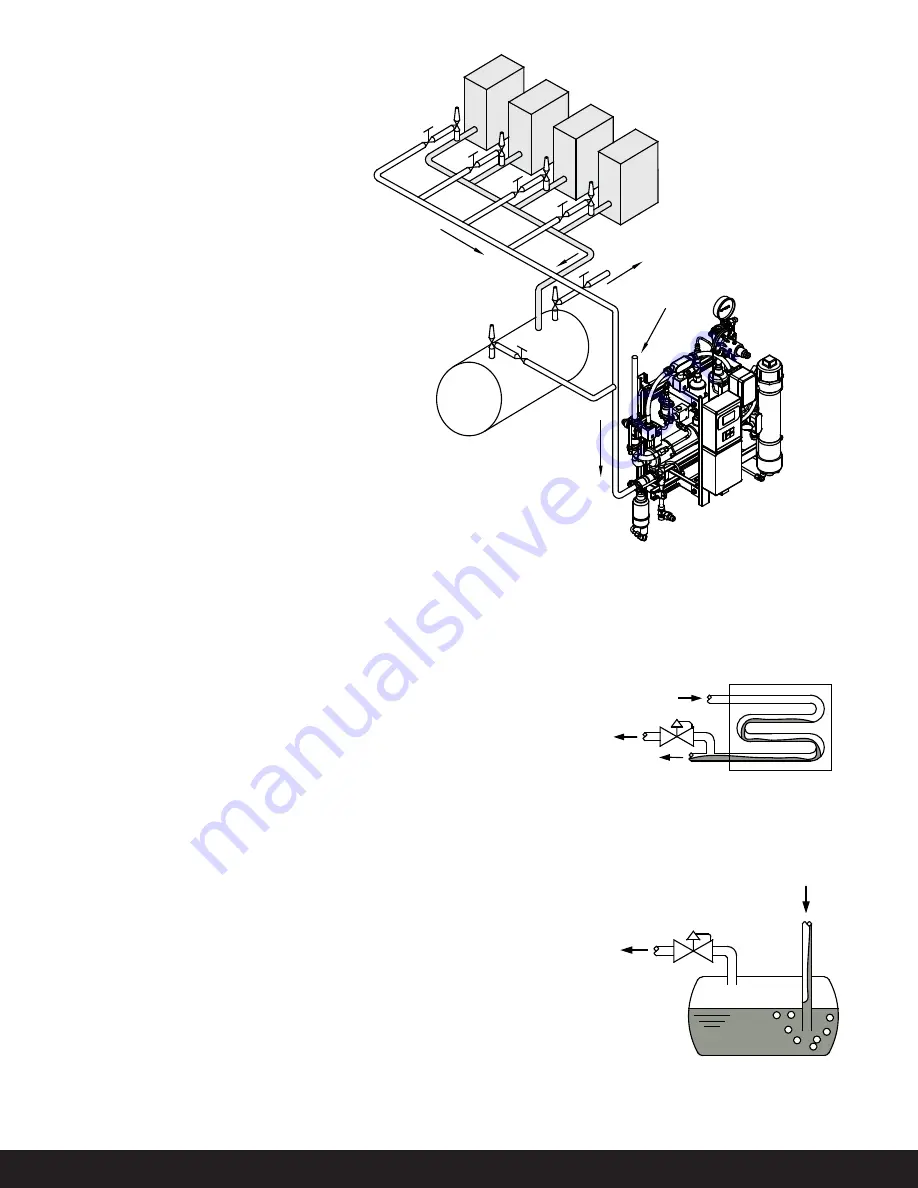
High 

Pressure
Receiver

Evaporative

Condenser

Auto Purger

(Model V200)

Evaporator
Liquid Line

Liquid 

Refrigerant 

Line

Gas

Refrigerant 

Line

Foul

Gas

Line

P

P

P

P

P

Purge Points

 (P)

V200 Auto Purger Multiple Purge Points

High 

Pressure 

Gas

Refrigerant

Foul 

Gas

Liquid 

Refrigerant

P

High Pressure Receiver 
Purge Point

Liquid 

Refrigerant

Foul

Gas

P

Introduction

Non-condensables like air, hydrogen, 
nitrogen, and hydrocarbon gases 
reduce the overall capacity of 
the refrigeration system.  Higher 
pressures, which in turn causes 
longer compressor runtime, longer 
condenser fan runtime, higher 
compressor discharge temperatures, 
increase compressor power costs, 
increase wear and tear on equipment, 
increase leaks, reduce system 
effi

  ciency, increase overall system 

energy costs are all consequences of 
non-condensables in the refrigeration 
system.

In a refrigeration system non-
condensables can be introduced by:

• Inadequate system evacuation such 

as servicing compressors, strainers, 
valves, start-up, etc.

• Refrigerant additions

• Leaks from valve stem packings, 

bonnet gasket, compressor shaft 
seal, control transducers, etc.

• Separation of ammonia molecules 

(hydrogen and nitrogen)

• Compressor oil breakdown 

(hydrocarbon gases) 

Th

  e base V200 Rapid Auto Purger 

removes the non-condensable gases 
from four purge points.  With the 
addition of up to two slave units, 36 
purge points possible.  Th

  is leads to 

lower condensing pressure, runtime 
of the compressors, and operating 
costs.  

Non-condensable indicators 
are excessively high condensing 
temperatures/pressures and 
saturated temperature/pressure 
deviations.  One indicator is a higher 
saturated condensing pressure/
temperature at the condenser for 
the given outdoor air wet bulb 
and heat rejection load.  Another 
indicator is the increasing diff erence 
between the observed condensing 
pressure and the saturation 
pressure corresponding to the liquid 
refrigerant temperature exiting the 
condenser.

Purge Points

Th

  e most common purge points 

in a refrigeration system are at the 
condenser drain, pilot receivers, 
thermosyphon receivers, high 
pressure receivers, liquid drain 

header, equalizing lines, and low 
velocity-high side areas.

Purge points should be located to 
ensure no liquid refrigerant is drawn 
by the purger.  Th

  e Auto Purger V200 

has a liquid drainer at the foul gas 
inlet to prevent any liquid refrigerant 
from entering the shell side of the 
heat exchanger.

Auto Purging

Th

  e start of a purge cycle can 

commence automatically, manually, 
time based, central management, 
and/or using the microprocessor.  Th

 e 

Auto Purger V200 can only purge one 
point at any given time.  

In automatic mode each purge point 
is sampled for a minimum of fi ve 
minutes.  If the purge conditions are 
not met within the sample time limit, 
the Auto Purger continues to the next 
purge point.  When a purge point 
meets the purge conditions within 
the sample time limit the Auto Purger 
starts the purge cycle.  Th

 e purge 

cycle shuts off  when the non-purge 
conditions are met. 

Evaporative Condenser
Purge Point

Содержание V200

Страница 1: ...ration systems Product Features Smaller compact design with equivalent capacity of our current model Light weight 29 5 kg 65 lbs Proprietary microprocessor control for all sensing and control function...

Страница 2: ...nsing pressure runtime of the compressors and operating costs Non condensable indicators are excessively high condensing temperatures pressures and saturated temperature pressure deviations One indica...

Страница 3: ...e without a vent occurring the system will shut off for two hours Purge Cycle The purge cycle consist of three main operations fill pre cool separating non condensable gases refrigerant and the releas...

Страница 4: ...require lower temperatures to condense Condensed refrigerant and non condensable gases rise through the heat exchanger and into the vapor vent As the liquid rises it lifts an orifice flow controller t...

Страница 5: ...the float will fall allowing the non condensable gases to escape through the orifice Non condensable gases will continue to accumulate producing an elevated pressure Once the pressure of the non conde...

Страница 6: ...ee electrical wiring diagram Contractors need to follow a WPS Welding 3 Procedure Specification for all welding The procedure must be qualified and welder doing the weld qualified to perform that proc...

Страница 7: ...s the Enter key to return to the main menu 2 When in the main operating screen press and release the Menu button Use the up down arrow buttons to select the Setup option Press and release the Enter bu...

Страница 8: ...e the up down arrow key to highlight the Time Based option Press and release the Enter key to save your selection The next step is to enter the time the purge cycle will start Use the up Down arrow ke...

Страница 9: ...Bulletin 75 00 J Page 9 V200 Auto Purger Electrical Wiring Diagram for a 4 Point Purger V200 Auto Purger Compact Design Dimensions 1 2 3 16 4 9 7 8 6 11 10 5 12 13 14 15 17 18 19 20 21 12 10 3 10...

Страница 10: ...Nylon 208669 Conversion Kit Steel Tube Cabinet Style to Nylon 208670 15 Liquid Drainer 1 2 Threaded Connection 309625 16 Gage 30 150 psig R717 309401 Gage 760mm 10 5 bar R717 309403 17 Optical Level...

Страница 11: ...shown on the purge point solenoids connections are common to the relay Incoming line power 120 240 volts should be supplied to these terminals An incoming natural should be supplied to one of each of...

Страница 12: ...This is located on the upper left side of the front panel 1 Check optical level sensor 17 for proper operation Loose wire defective sensor Replace if necessary Check liquid supply orifice 11 for obst...

Страница 13: ...he slave unit 2 circuit board is flashing Verify the proper communication setting This is done by pressing the up down arrow keys on the main controller 1 at the same time Several attempts may be requ...

Страница 14: ...and tube clamp from kit along with check valve assembly as shown in the cutaway view Tubing ends may need to be trimmed back for proper fit 3 Remove and discard steel lines fittings and bubbler 4 Rein...

Страница 15: ...ory This warranty is in force only when products are properly installed field assembled maintained and operated in use and service as specifically stated in Refrigerating Specialties Catalogs or Bulle...

Отзывы: