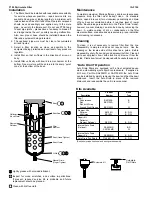
R35, 1/8" & 1/4" Miniature Regulators
IS-R35
Lightly grease with provided lubricant.
Inspect for nicks, scratches, and surface imperfections. If
present, reduced service life is probable and future
replacement should be planned.
Clean with lint-free cloth.
Service
Caution: Disconnect or shut off air supply and exhaust
the primary and secondary pressures before servicing
unit. Turning the Adjusting Knob counterclockwise does
not vent downstream pressure on non-relieving
regulators. Downstream pressure must be vented before
servicing regulator.
Caution: Grease packets are supplied with kits for
lubrication of seals. Use only mineral based grease or
oils. Do not use synthetic oils such as esters. Do not
use silicones.
Note: After servicing unit, turn on air supply and adjust regulator
to the desired downstream pressure. Check unit for leaks.
If leakage occurs, do not operate - conduct repairs and
retest.
A. Servicing the Bonnet and Piston Assembly
1. Disengage the Adjusting Knob by pulling upward. Turn
Adjusting Knob counterclockwise until the compression is
released from the Pressure Control Spring.
2. Unscrew the threaded Bonnet Assembly. Next, disassemble,
clean, and carefully inspect parts for wear and / or damage.
Wipe parts, clean with soapy water or denatured alcohol. If
using compressed air to blow dry, be sure to wear appropriate
eye protection. If replacement is necessary, use parts from
service kits.
3. Lubricate Piston O-ring with grease (supplied with kits).
4. Install Piston and Pressure Control Spring into Body. Then
install Bonnet Assembly to Body and tighten to 4.5 to 5.6
Nm (40 to 50 in. lb.).
B. Servicing the Poppet Assembly
1. Exhaust system media pressure as previously described.
Then remove Bottom Plug by unscrewing it from Body. Next,
remove Bottom Plug Seal, Poppet Return Spring and Poppet
Assembly.
2. Next, disassemble, clean, and carefully inspect parts for wear
and / or damage. If replacement is necessary, use parts from
service kits.
3. Lubricate O-ring and sliding surfaces using grease supplied
with service kit.
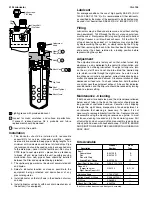
4. Install parts as shown.
5. Lubricate Bottom Plug Seal and install it in o-ring groove in
body. Be sure Disc Stem fits into center area of Piston
Assembly before installing Bottom Plug. Install Return Spring,
then screw Bottom Plug into Body until it bottoms out in body.
Tighten to 3.5 to 5.1 Nm (35 to 45 in. lb.).
6. Turn on media source and adjust to desired secondary
pressure as described in the
Operation
section. Check
regulator for leakage. If leakage occurs,
DO NOT OPERATE
— conduct repairs again.
Service Kits / Parts Available
Description
R35, 1/8" & 1/4"
Regulator Repair Kit
(Relieving)
RKR30
Regulator Repair Kit
(Non-Relieving)
RKR30K
Spring Cage Kit (A Range)
CKR35A
Spring Cage Kit (B & C Range)
CKR35BC
Adjusting Knob
R35-0545P
Return Spring
SPR-445-1
Bottom Plug
R35-0021P
Bottom Plug Seal
GSK-504Z101
Accessories
Mounting Bracket / Nut
SA161X57
Panel Mount Nut
R05X51
Gauges
0 to 60 PSI (0 to 4 bar)
K4515N18060
0 to 160 PSI (0 to 11 bar)
K4515N18160
!
!
Adjusting Knob
Adjusting Screw Assembly
Bottom
Plug Seal
Bottom Plug - Torque:
3.5 to 5.1 Nm (35 to 45 in. lb.)
Inner Valve
(Poppet) Assembly
Control Spring
Spring, Return
Piston
Assembly
Piston
O-ring
Body
Spring Cage (Bonnet) Assembly -
Torque: 4.5 to 5.6 Nm (40 to 50 in. lb.)


