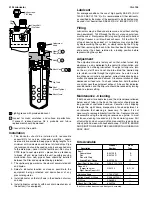
F105 Particulate Filter
IS-F105
Installation
1. The filter should be installed with reasonable accessibility
for service whenever possible – repair service kits are
available. Keep pipe or tubing lengths to a minimum with
inside clean and free of dirt and chips. Pipe joint compound
should be used sparingly and applied only to the male
pipe – never into the female port. Do not use PTFE tape
to seal pipe joints – pieces have a tendency to break off
and lodge inside the unit, possibly causing malfunction.
Also, new pipe or hose should be installed between the
filter and equipment being protected.
2. The upstream pipe work must be clear of accumulated
dirt and liquids.
3. Select a filter location as close as possible to the
equipment being protected and upstream of any pressure
regulator.
4. Install filter so that air flows in the direction of arrow on
body.
5. Install filter vertically with bowl drain mechanism at the
bottom. Free moisture will thus drain into the sump “quiet
zone” at the bottom of the bowl.
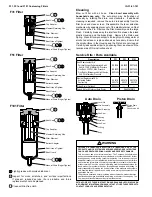
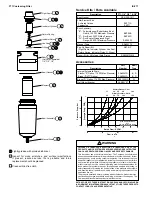
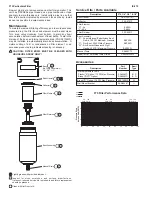
Bowl Seal
Body
Filter
Element
Bowl (Hand Tighten)
Bowl Guard
Deflector
(Vane Plate)
Element
Retainer
O-Ring
Manual Drain
(Finger Tighten)
Maintenance
To maintain maximum filtering efficiency, and to avoid excessive
pressure drop, the filter must be kept clean. On standard
filters, open drain cock (turn clockwise) periodically and drain
off any bowl accumulation before it reaches level of lower
baffle. Bowl drainage is automatic in the “Piston Drain” model,
however, manual draining can also be done by removing the
bowl. A visible coating of dirt or condensate on the filter
element surface, or an excessive pressure drop, is an indication
that cleaning is necessary.
Cleaning
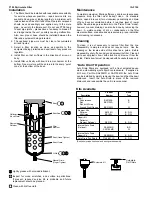
To clean, it is not necessary to remove filter from the line.
Disassembly is simple and does not require tools. Use the
drawing on the reverse side of this sheet as a guide. Before
disassembly, shut off air supply and depressurize filter. Clean all
parts, except plastic bowl, with alcohol and blow out from the
inside. Plastic bowls must be cleaned with household soap only.
“Auto Drain” Operation
Auto Drain filters are equipped with a float actuated device
which automatically ejects liquid contaminants. If supplied in
Kit Form, Part No. SA602MD or SAF105MD, the Auto Drain
can be installed by simply removing the bowl and then the bowl
draincock. Insert the Auto Drain in place of the removed
draincock and reassemble the unit in reverse order.
Kits Available
Product
Bowl
Description
Number
Type
Bowl*
Polyurethane
BKF105B
B
Zinc
BKF105D
D
Zinc with Wrap
Around Sight Gauge
BKF105W
W
Element Kits
5 Micron
EK100G
B, D, W
40 Micron
EK100J
B, D, W
Repair Kit
Deflector,
Element Retainer
RKF100
B, D, W
Internal Auto Drain
(Optional)
SA602MD
B, D
SAF105MD
W
Internal Auto Drain
Repair Kit
RK602MD
B, D, W
Auto Drain Dirt Shield
F700-0071P
B, D, W
*Bowl kits include bowl seal and bowl guard assembly.
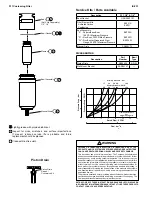
Lightly grease with provided lubricant.
Inspect for nicks, scratches, and surface imperfections.
If present, reduced service life is probable and future
replacement should be planned.
Clean with lint-free cloth.
Autodrain Kit
Autodrain
Dirt Shield


