background image

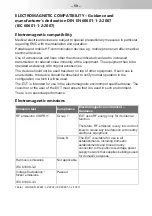
Electromagnetic immunity

Immunity test

IEC 60601 test
level

Compliance
level

Electromagnetic environment –
Guidance

Electrostatic
discharge (ESD)

IEC 61000-4-2

±6 kV contact

±8 kV air

±6 kV contact

±8 kV air

Floors should be wood, concrete
or ceramic tile. If floors are
covered with synthetic material,
the relative humidity should be at
least 30%.

Electrical fast
transient /burst

IEC 61000-4-4

±2 kV for power
supply lines

±1 kV for input /
output lines

±2 kV for power
supply lines

±1 kV for input /
output lines

Mains power quality should be
similar to that of a typical
commercial or hospital
environment.

Surge

IEC 61000-4-5

±1 kV common
mode

±2 kV differential
mode

±1 kV common
mode

±2 kV differential
mode

Mains power quality should be
similar to that of a typical
commercial or hospital
environment.

Voltage dips, short
interruptions and
voltage variations
on power supply
input lines

IEC 61000-4-11

<5% U

T

1)

(>95% dip of U

T

)

for 1/2 cycle

40% U

T

(60% dip of U

T

)

for 5 cycles

70% U

T

(30% dip of U

T

)

for 25 cycles

<5% U

T

(>95% dip of U

T

)

for 5 s

<5% U

T

1)

(>95% dip of U

T

)

for 1/2 cycle

40% U

T

(60% dip of U

T

)

for 5 cycles

70% U

T

(30% dip of U

T

)

for 25 cycles

<5% U

T

(>95% dip of U

T

)

for 5 s

Mains power quality should be
similar to that of a typical
commercial or hospital
environment. When the user of
the Medical Electrical Equipment
continued function also calls in
the event of disruption of supply,
it is recommended the EUT from
an uninterruptible power supply
or a battery.

Power frequency
(50 Hz/60 Hz)
magnetic field

IEC 61000-4-8

3 A/m

3 A/m

Power frequency magnetic fields
should be at levels characteristic
of a typical location in a typical
commercial or hospital
environment.

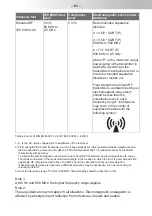
Conducted RF

IEC 61000-4-6

3 V

eff

150 kHz to
80 MHz

3 V

eff

150 kHz to
80 MHz

Portable and mobile RF
communication equipment should
be used no closer to any part of
the EUT, including cables, than
the recommended separation
distance calculated from the
equation applicable to the
frequency of the transmitter.

– 60 –

Содержание VELOX

Страница 1: ...VELOX VELOX Junior 2016 PARI GmbH Spezialisten f r effektive Inhalation 055D1001 B 01 16...

Страница 2: ...de Gebrauchsanweisung 3 en Instructions for use 31 Electromagnetic compatibility 59...

Страница 3: ...ianten 8 Materialinformation 8 Wartung 8 Lebensdauer 9 INHALATION 10 Inhalation vorbereiten 10 Inhalation durchf hren 13 Ger tesignale 17 REINIGUNG UND DESINFEKTION 18 Vorbereitung 18 Steuerungseinhei...

Страница 4: ...1 26 Angaben zur elektromagnetischen Vertr glichkeit 27 Empfohlene Schutzabst nde 27 Umgebungsbedingungen f r den Betrieb 27 SONSTIGES 28 Transport und Lagerung 28 Entsorgung 28 Garantiebedingungen 28...

Страница 5: ...rodukt zu vermeiden 1 4 Umgang mit dem Ger t Der VELOX ist ein elektrisches Ger t das mit Kleinspannung betrieben wird Er ist so konzipiert dass keine stromf hrenden Teile zug nglich sind Bei nicht ge...

Страница 6: ...Gef hrdungen falsch ein wodurch eine Verletzungsgefahr bestehen kann Achten Sie darauf dass Sie alle Produktbestandteile stets au er Reichweite von Ba bys und Kleinkindern aufbewahren F r die Behandlu...

Страница 7: ...seinheit 2 Vernebler1 bestehend aus 2a Medikamentendeckel farbig 2b Medikamentenbeh lter mit Aerosolerzeuger2 farbig 2c Verneblerkammer 3 Mundst ck1 4 SMARTMASK Baby1 3 5 Netzteil 6 VELOXcare 7 Tasche...

Страница 8: ...pie von bakte riellen Infektionen der Atemwege z B bei Pseudomonas aeruginosa vorgese hen 2 4 Gegenanzeigen Keine 2 5 Produktvarianten Den VELOX gibt es in zwei verschiedenen Versionen VELOX Zur Behan...

Страница 9: ...Vernebler ist f r 365 Anwendungen und 52 Desinfektionen ausgelegt Wenn die Behandlung einer Krankheit eine intensivere Nutzung und oder h ufigere Desinfektionen erforderlich macht verk rzt sich die L...

Страница 10: ...Verneb lers einzusetzen Das Netzteil hingegen sollte erst unmittelbar vor der Inhalation an geschlossen werden Batterien einsetzen bzw wechseln ffnen Sie den Batteriefachdeckel der Steuerungseinheit...

Страница 11: ...age Verbinden Sie den Medikamentenbeh lter mit der Verneblerkammer Pr fen Sie die korrekte Position der beiden Ventilfl gel an der Unterseite des Medika mentenbeh lters und korrigieren Sie diese ggf v...

Страница 12: ...rkammer und schlie en Sie die Laschen Verbinden Sie den Vernebler mit der Steuerungseinheit Stecken Sie den Vernebler in die Steue rungseinheit Schlie en Sie die Lasche an der Unterseite des Ger ts St...

Страница 13: ...maximal 6 ml max 6 ml Schrauben Sie den Medikamentendeckel auf den Vernebler 3 2 Inhalation durchf hren VELOX einschalten Bei Betrieb mit dem Netzteil Stecken Sie den USB Stecker des Netzteils in den...

Страница 14: ...dst ck inhalieren Halten Sie den VELOX waagerecht Nehmen Sie das Mundst ck zwischen die Z hne und umschlie en Sie es mit den Lip pen Atmen Sie m glichst langsam und tief durch das Mundst ck ein und en...

Страница 15: ...d Nase auf Um Aerosolverluste zu reduzieren achten Sie darauf dass die Maske dicht sitzt Kranke S uglinge wehren sich h ufig gegen das Andr cken der Gesichtsmaske und drehen den Kopf hin und her F r e...

Страница 16: ...elt wird Der Medikamentenrest sollte direkt nach Beendigung der Inhalation entsorgt werden damit er nicht versch ttet wird Inhalation unterbrechen Schalten Sie den VELOX grunds tzlich aus wenn Sie die...

Страница 17: ...driger Batteriestand LED blinkt gr n Batterie leer zu niedrige Spannung LED blinkt dreimal orange 1 Piepton Das Ger t wird automatisch abgeschaltet Der Vernebler ist nicht mit der Steuerungseinheit ve...

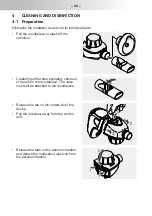
Страница 18: ...iehen Sie das blaue Ausatemventil am Mundst ck vorsichtig aus dem Schlitz her aus Das Ventil muss danach immer noch am Mundst ck h ngen ffnen Sie die Lasche an der Unterseite des Ger ts Ziehen Sie den...

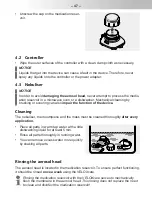
Страница 19: ...e Funktion des Ger tes beeintr chtigen Reinigung Der Vernebler das Mundst ck und die Maske m ssen nach jeder Anwendung gr ndlich gereinigt werden Legen Sie alle Teile ca 5 Minuten lang in warmes Leitu...

Страница 20: ...e Klappen Sie das VELOXcare auf Setzen Sie den Medikamentenbeh lter mit seiner ffnung nach unten in das Unterteil des VELOXcare Info Die blauen Ventilfl gel m ssen sich oben befinden Klappen Sie das V...

Страница 21: ...s F llen Sie 2 5 ml isotone Salzl sung oder destilliertes Wasser in das VELOXcare max 2 5 ml Bei Betrieb mit dem Netzteil Stecken Sie den USB Stecker des Netzteils in den USB Anschluss an der Steuerun...

Страница 22: ...amentenbeh lter Sp len Sie das VELOXcare und den Medikamentenbeh lter gr ndlich mit Lei tungswasser aus Der Medikamentenbeh lter muss im Anschluss an eine Sp lung im VELOXcare desinfiziert werden Das...

Страница 23: ...tionszeit erreicht ist Schalten Sie das Ger t daher nicht vorzeitig ab Achten Sie au erdem auf des sen Sauberkeit und berpr fen Sie regelm ig die Funktionsf higkeit Chemische Reinigung mit Desinfektio...

Страница 24: ...gung und Desinfektion Er setzen Sie gebrochene verformte oder stark verf rbte Teile 4 4 Trocknung und Aufbewahrung Legen Sie alle Teile auf eine trockene saubere und saugf hige Unterlage und las sen S...

Страница 25: ...von 15 Minuten ist erreicht Es ist Salzl sung oder Medikament in den Steckerbereich gelangt Sp len Sie den Stecker des Verneblers mit Leitungswasser aus und sch tteln ihn gut ab Wischen Sie mit einem...

Страница 26: ...rien 70 g Vernebler inkl Mundst ck Abmessungen B H T 139 mm 66 mm 61 mm Gewicht inkl Mundst ck 40 g 6 3 Aerosoldaten Aerosoldaten gem DIN EN 13544 1 sind auf Anfrage bei der PARI GmbH erh lt lich 6 4...

Страница 27: ...mbH oder im Internet unter www pari com auf der jeweiligen Produktseite unter Technische Daten zu erhalten 6 6 Empfohlene Schutzabst nde Empfohlene Schutzabst nde zwischen tragbaren und mobilen Hochfr...

Страница 28: ...r den Eintritt des Garantiefalls nicht eingeschr nkt Als Garantie sowie Eigentumsnachweis gilt der vom Fachh ndler abgestempelte Garantieschein Was wird von der Garantie erfasst Sollte ausnahmsweise e...

Страница 29: ...Abnutzung ausgesetzt sind Im Falle einer Reklamation bringen Sie bitte das vollst ndige Ger t zu Ihrem Fach h ndler oder schicken Sie es uns im Originalkarton verpackt und frankiert mit dem vom Fachh...

Страница 30: ...dk rpern oder Wasser Minimale und maximale Umgebungstemperatur Minimale und maximale Luftfeuchtigkeit Minimaler und maximaler Luftdruck Das Medizinprodukt wurde nach dem 13 August 2005 in Verkehr gebr...

Страница 31: ...Product variants 36 Material information 36 Maintenance 36 Operating life 37 INHALATION 38 Preparing for inhalation 38 Performing the inhalation 41 Device signals 45 CLEANING AND DISINFECTION 46 Prep...

Страница 32: ...54 Information about electromagnetic compatibility 55 Recommended safety distances 55 Ambient conditions for operation 55 MISCELLANEOUS 56 Transportation and storage 56 Disposal 56 Terms and conditio...

Страница 33: ...voltage It has been designed so that no live parts are accessible However if ambient conditions are un favourable or if the controller or power adapter is damaged this protection may no longer be ass...

Страница 34: ...of ba bies and infants Special masks may be obtained for treating babies and infants who are not yet able to inhale using the mouthpiece 1 6 Hygiene Observe the following hygiene instructions Before...

Страница 35: ...Controller 2 Nebuliser1 consisting of 2a Medication cap colour coded 2b Medication reservoir with 2 aerosol head colour coded 2c Aerosol chamber 3 Mouthpiece1 4 SMARTMASK Baby1 3 5 Power adapter 6 VE...

Страница 36: ...the respiratory tract e g Pseudomonas aeruginosa 2 4 Contraindications None 2 5 Product variants The VELOX is available in two different versions VELOX For treatment of the respiratory tract in adults...

Страница 37: ...liser is designed for 365 applications and 52 disinfections If the treatment of a disease necessitates more intensive use and or more frequent disinfections the life cycle of the device is shortened T...

Страница 38: ...e nebuliser On the other hand the power adapter should not be connected until just before starting the inhalation session Inserting and replacing batteries Open the battery compartment cover on the co...

Страница 39: ...o place Assembly Attach the medication reservoir to the aerosol chamber Check that the two valve vanes on the un derside of the medication reservoir are in the correct position Adjust them carefully i...

Страница 40: ...flush with the aerosol chamber and close the locking tabs Connect the nebuliser to the controller Insert the nebuliser in the controller Close the tab on the underside of the device Attach the mouthpi...

Страница 41: ...st 2 ml not more than 6 ml max 6 ml Screw the medication cover onto the nebuliser 3 2 Performing the inhalation Switching the VELOX on Operation with the power adapter Insert the USB connector of the...

Страница 42: ...ing with the mouthpiece Hold the VELOX horizontally Hold the mouthpiece between your teeth and enclose it with your lips Breathe in as slowly and deeply as possible through the mouthpiece and out agai...

Страница 43: ...snugly over the mouth and nose To minimise aerosol losses make sure that the mask is firmly in place Sick infants often struggle when the mask is pressed against their face and twist their head back...

Страница 44: ...ulised even after taking the residue into account The residue should be disposed of as soon as the inhalation session is finished to prevent it from being spilled Interrupting the inhalation session A...

Страница 45: ...battery LED flashes green Battery flat voltage too low LED flashes orange three times 1 beep The device switches itself off automatically The nebuliser is not connected to the controller LED flashes o...

Страница 46: ...he nebuliser Carefully pull the blue expiratory valve out of the slot in the mouthpiece The valve must still be attached to the mouthpiece Release the tab on the underside of the device Pull the nebul...

Страница 47: ...mpair the function of the device Cleaning The nebuliser the mouthpiece and the mask must be cleaned thoroughly after every application Place all parts in warm tap water with a little dishwashing liqui...

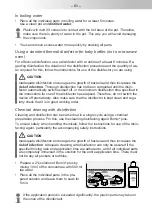
Страница 48: ...the VELOXcare Open the VELOXcare Place the medication reservoir in the bot tom part of the VELOXcare with the reser voir opening facing downwards Info The blue valve vanes must be upper most Close the...

Страница 49: ...Fill the VELOXcare with 2 5 ml isotonic sa line solution or distilled water max 2 5 ml Operation with the power adapter Insert the USB plug of the power adapter in the USB port on the controller Conn...

Страница 50: ...cation reservoir out Rinse the VELOXcare and the medication reservoir thoroughly with tap water The medication reservoir must always be disinfected immediately after rinsing in the VELOXcare If necess...

Страница 51: ...nfector has elapsed Therefore do not switch the device off prematurely Also make sure that the disinfector is kept clean and regu larly check that it is in good working order Chemical cleaning with di...

Страница 52: ...fter each cleaning and disinfection Replace any broken misshapen or seriously discoloured parts 4 4 Drying and storage Place all parts on a dry clean and absorbent surface and let them dry completely...

Страница 53: ...ion The maximum operating time of 15 minutes per application has elapsed Saline solution or medication has got into the plug area Rinse the nebuliser connector with tap water and shake it thoroughly t...

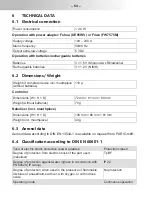
Страница 54: ...ht without batteries 70 g Nebuliser incl mouthpiece Dimensions W H D 139 mm 66 mm 61 mm Weight incl mouthpiece 40 g 6 3 Aerosol data Aerosol data according to DIN EN 13544 1 is available on request fr...

Страница 55: ...ri com under Technical Data on the respective product page 6 6 Recommended safety distances Recommended safety distances between portable and mobile high frequency HF telecommunication devices and the...

Страница 56: ...e not limited by the warranty or any claim under the warranty The warranty certificate stamped by the dealer serves as your proof of warranty and ownership What does the warranty cover If exceptionall...

Страница 57: ...ti ficate stamped by the dealer The warranty period begins on the date of purchase 7 4 Contact For all product information and in the event of defects or questions about usage please contact our Servi...

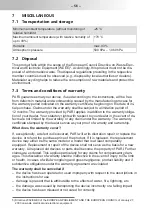
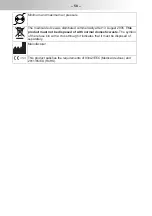
Страница 58: ...13 August 2005 This product must not be disposed of with normal domestic waste The symbol of the refuse bin with a cross through it indicates that it must be disposed of separately Manufacturer This...

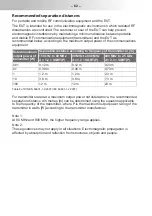
Страница 59: ...ormal operation in the configuration in which it will be used The EUT is intended for use in the electromagnetic environment specified below The customer or the user of the EUT must ensure that it is...

Страница 60: ...IEC 61000 4 11 5 UT 1 95 dip of UT for 1 2 cycle 40 UT 60 dip of UT for 5 cycles 70 UT 30 dip of UT for 25 cycles 5 UT 95 dip of UT for 5 s 5 UT 1 95 dip of UT for 1 2 cycle 40 UT 60 dip of UT for 5 c...

Страница 61: ...ion of the test level 2 Field strengths from fixed transmitters such as base stations for radio cellular cordless telephones and land mobile radios amateur radio AM and FM radio broadcast and TV broad...

Страница 62: ...150 kHz to 80 MHz d 1 2 SQRT P 80 MHz to 800 MHz d 1 2 SQRT P 800 MHz to 2 5 GHz d 2 3 SQRT P 0 01 0 12 m 0 12 m 0 23 m 0 1 0 38 m 0 38 m 0 73 m 1 1 2 m 1 2 m 2 3 m 10 3 8 m 3 8 m 7 3 m 100 12 m 12 m...

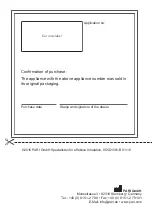
Страница 63: ...ICATE OF GUARANTEE We grant a 2 year guarantee on the control unit of the VELOX and a 6 month guarantee on the VELOXcare commencing on the date of purchase PARI GmbH Technical Service Dept Holzhofstr...

Страница 64: ...e 3 82319 Starnberg Germany Tel 49 0 81 51 2 79 0 Fax 49 0 81 51 2 79 101 E Mail info pari de www pari com Bar code label Application no Confirmation of purchase The appliance with the above appliance...

Отзывы: