background image

Before beginning assembly of this appliance, make sure all parts are present. 
Compare all parts with package contents list and hardware contents as listed on the previous page. If any part is 
missing or damaged, do not attempt to assemble this product. Contact customer service for replacement parts. 

Phillips screwdriver w/medium blade  

Slip joint/adjustable pliers

Adjustable wrench (2)

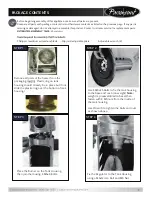
Remove all parts of the heater from the 
packaging. (

Plastic ring on tank 

housing should already be in place but if not, 
slide the plastic ring over the bottom of tank 
housing.)

STEP 3 

Place the Burner on the Tank Housing, 
then join them using 4 M5x8  Bolts.

STEP 4

Fix the Regulator to the Tank Housing 
using a M5x12mm  Bolt and M5 Nut.

STEP 1


STEP 2 

1¸g¿w¿uÒÇu¿ ”ŠÁ¸¿Á”¿ÚÒ¿Ág¿Á>‰¿”ɸƒy¿

to the base and cast iron weight( 

Note:

weight is preassembled to base),then 
fasten with 4 M5 nuts from the inside of 
the tank housing.

Use Wrench to tighten the bolts and nuts 
as shown above.

PACKAGE CONTENTS

Содержание PH-T-107-SS

Страница 1: ...ns who can understand and follow the instructions should use or service this heater Do not store or use gasoline or other vicinity of this or any other appliance An LP cylinder not connected for use s...

Страница 2: ...BEFORE YOU BEGIN BEFORE YOU BEGIN 8 Monday Friday a m p m ST c...

Страница 3: ...SAFETY INFORMATION DANGER r l t f WARNING CAUTION M CAUTION WARNING WARNING o r c c DANGER o k WARNING WARNING FOR OUTDOOR USE ONLY CARBON MONOXIDE HAZARD 3...

Страница 4: ...4 4 4 20 Hardware Package List QTY 3 Wing Nut 6mm Washer M5x25 Bolt M5x8 Bolt M5 Nut 60mm M5x8 SS Bolt Stud Wrench M5X12 Bolt 1 3 4 4 5 3 4 1 M4 self tapping screw M5x8mm Bolt M5X12mm Bolt M5 Nut M5X...

Страница 5: ...wrench 2 Remove all parts of the heater from the packaging Plastic ring on tank housing should already be in place but if not slide the plastic ring over the bottom of tank housing STEP 3 Place the B...

Страница 6: ...e the Emitter Screen on the Burner Use 4 to connect the Emitter Screen to the Burner Tighten the Bolts STEP 7 Lower the Guard over the Emitter Screen and insert the feet of the Guard into the holes ne...

Страница 7: ...ASSEMBLY...

Страница 8: ...OPERATING INSTRUCTIONS SAFETY FIRST...

Страница 9: ...all leak tests outdoors NEVER leak test when smoking Do not use heater until all connections have been leak tested and show no signs of leakage Your heater was designed and approved for Do NOT use it...

Страница 10: ...othing or other protective material should not be hung from the heater or placed on or near the heater Any guard or other protective device removed for servicing the heater must be replaced prior to o...

Страница 11: ...FF while depressing the knob urner make a slight popping noise when extinguished isconnect when heater is not in use Gas control knob is in OFF position Gas tank valve is OFF tore upright in a secure...

Страница 12: ...r Compressed air may help clear away smaller particles screen with warm soapy water if any carbon deposits develop Note In a salt air environment such as near an ocean corrosion occurs more quickly th...

Страница 13: ...supply system Purge air from lines Open gas lines and depress control knob for 2 3 minutes Loose connection Replace Pressure is low Replace LPG TROUBLESHOOTING 13 Questions problems missing parts 8 F...

Страница 14: ...his form Name Nom Street Adresse City Ville Province Province Postal Code Code postal Daytime Phone No t l phone jour Evening Phone No t l phone soir E Mail Address Courriel Product Produit Place of P...

Отзывы: