paramondo AuBenrollo - Senkrechtmarkise nach MaB Скачать руководство пользователя страница 17

www.paramondo.de

17

Sicherheitshinweise • Safety instructions

Care and maintenance

The awning basically does not require any 

maintenance. All aluminium components are 

coated with a high­quality powder coating 

and all screw connections are made from 

stainless steel. This protects these compo-

nents against corrosion. 
We recommend cleaning the aluminium 

components with a damp cloth every six 

weeks. 
Occasionally lubricate the joints of the 

awning brackets and the fabric roller bearing 

with a little silicone or Teflon spray (do not 

use oil or grease).
Regularly check the brackets to ensure that 

they are secure and free from wear and tear 

or damage.
The awning fabric has been impregnated 

with a high­quality waterproofing agent and 

can therefore be used outdoors.

IMPORTANT! Disposal

Do not dispose of the 

product and any bat-

teries required for its 

operation with the 

household rubbish!
Obtain information 

about local return and 

recycling options and 

dispose of the product 

at your existing local 

collection points.

Product features of awning coverings

We process exclusively high-quality polyester 

and acrylic fabrics in our awnings.
The polyester fabric is made out of short 

fibre.

For the acrylic fabric the yarn is spun-dyed.

A refinement of the surface ensures that the 

fabric contains water-repellent and dirt-re-

pellent properties as well as the prevention 

of mould formation.

Important user information

Awning fabrics are high-performance pro-

ducts. 
But even with today‘s state of technology 

and environmental requirements, there is a 

limit to their perfection.

They may contain certain marks in the cloth 

that sometimes get complained about that 

are impossible to prevent despite sophistica

-

ted production and processing technology. 

Such markings do not lessen the value and 

usability of the awning. 

To prevent irritation, we would like to point 

out the following characteristics within the 

scope of consumer information:
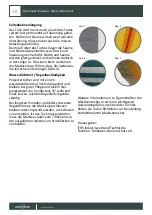
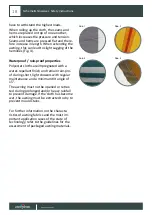
Kink folds

These folds are created through packing and 

folding the sun protection cloth. In the 

area of the fold, a dark line may be visible 

when backlit, especially on light colours. This 

is caused by the kinking of the fibre (light 

diffraction) (Fig. 1).

Waviness in the area of the seam and sheet
Waviness can occur along the hemlines in 

the area of the seams and in the middle of 

the sheets. The cloth is doubled up at the 

seams. This creates different diameters 

when rolling up the fabric. 

The tension created by the articulated bra

-

ckets and sagging of the winding shaft and/

or front profile can increase this effect. Wa

-

viness may also occur if water has collected 

during heavy rainfall (Fig. 2.3).

Elongation of the side sheets

The cloth is tensioned with an active spring 

system most of the time. Although seams 

and hems act as a reinforcement, they also 

i

i

i

Содержание AuBenrollo - Senkrechtmarkise nach MaB

Страница 1: ...paramondo Montageanleitung installation instructions Au enrollo Senkrechtmarkise nach Ma mit Pendelsicherung V2 01 01 2022...

Страница 2: ...Safety instructions 11 18 Verpackungsinhalt 19 Package content Empfohlenes Werkzeug 20 Recommended tools Hinweis zur Montage 21 22 Note on assembly Wandmontage 23 52 Wall assembly Deckenmontage 53 72...

Страница 3: ...glichen Ort aufzubewahren und muss bei einer eventuellen bertragung der Markise an Dritte an den neuen Besitzer weitergegeben werden Warnsymbole Sicherheitshinweise und wichtige Informatio nen sind an...

Страница 4: ...mt werden Bei Verwendung des als Montagezubeh r mitbestellten Befestigungsmaterials ber nehmen wir nicht gleichzeitig auch die Haf tung f r eine fachgerechte Montage Allein der Monteur haftet daf r da...

Страница 5: ...einen festen Stand haben und gen gend Halt bieten Verwenden Sie nur Aufstiegshilfen die eine ausreichend hohe Tragkraft haben Absturzsicherung Bei Arbeiten in gr eren H hen besteht Ab sturzgefahr Es...

Страница 6: ...und halten Sie Personen fern bis die Bewe gung beendet ist Verbieten Sie Kindern mit der Markise oder der Fernsteuerung zu spielen Schn re sind au er Reichweite von Kindern zu halten Schn re d rfen n...

Страница 7: ...ei die Vorschriften zur Installation von Steuereinheiten Schaltern Mindesth he Schutz vor Bedienung durch Kinder Bedie nung durch Personen mit k rperlichen Be eintr chtigungen etc Siehe DIN VDE 18015...

Страница 8: ...ehan ges k nnen Sch den am Motor oder an der Markise entstehen Installationseinrichtungen Abzweigdosen Klemmstellen etc m ssen leicht abnehm bar und zug nglich sein und d rfen nicht eingeputzt oder an...

Страница 9: ...ige Verbraucherinformation Markisent cher sind Hochleistungsprodukte Dennoch sind auch nach dem heutigen Stand der Technik und durch die Anforderungen des Umweltschutzes ihrer Perfektion Gren zen gese...

Страница 10: ...wassrabsto enden Finish impr gniert und bleiben bei guter Pflege und einem Nei gungswinkel von mindestens 15 w hrend eines kurzen leichten Regenfalls regenbe st ndig Bei l ngeren Perioden und oder sc...

Страница 11: ...at all times and hand it to the new owner in the case of the awning being sold to a third party Warning symbols Safety notices and important information are placed in the corresponding locations and...

Страница 12: ...s of the system and fitting base When using the fixing material ordered as fitting accessories we do not assume any liability for professional fitting The fitter is solely responsible to ensure that t...

Страница 13: ...climbing aids against or fix them to the awning They must stand firmly and provide sufficient support Only use climbing aids with sufficient load bearing capacity Fall protection There is a risk of fa...

Страница 14: ...t the case the fitting company must document the actual wind resistance class The user or fitter is responsible for the pro per functioning of wind monitoring systems and the ongoing testing of their...

Страница 15: ...ce or similarly qualified person to prevent hazards The same cable type supplied by the motor manufacturer must be used Install fixed controllers in a visible position that can be reached Comply with...

Страница 16: ...st be protected The winding shaft must be fitted in a hori zontal position If the fabric is wound askew the motor or awning may be damaged Installation equipment junction boxes terminals etc must be e...

Страница 17: ...ter repellent and dirt re pellent properties as well as the prevention of mould formation Important user information Awning fabrics are high performance pro ducts But even with today s state of techno...

Страница 18: ...es Polyester cloths are impregnated with a water repellant finish and remain rain pro of during short light showers with regular maintenance and a minimum tilt angle of 15 The awning must not be opene...

Страница 19: ...1 x 1 x 1 x 1 x 1 x 1 x 1 x 1 x 2 x 2 x 2 x 1 x 1 x 2 x optional optional 2 x 2 x 2 x 2 x 2 x oder or oder or oder or 2 x f r Deckenmontage for ceiling installation 2 x f r Deckenmontage for ceiling...

Страница 20: ...aramondo de Empfohlenes Werkzeug Recommended tools Bitte w hlen Sie Schrauben und D bel in Abh ngigkeit vom jeweiligen Montageuntergrund Please choose screws and plugs according to the mounting surfac...

Страница 21: ...erung A Motorbedienung B Kurbelbedienung geltend f r B1 und B2 B1 Kurbel Gelenk B2 Kardan Kurbelgelenk C Kugelketten Bedienung DE bertragung des Durchf hrungspunktes auf das Mauerwerk oder den Fenster...

Страница 22: ...labels on the pictures for easier orientation A Motor operation B Crank operation B1 Crank Joint B2 Cardan crank joint C Ball chain operation Transfer of the implementation point to the masonry or the...

Страница 23: ...non control side Achsstift und Halterung auf der Bedien seite bei Motor und Kurbel Axle pin and bracket on the operation side for motor and crank Achsstift und Halterung auf der Bedienseite bei der K...

Страница 24: ...24 www paramondo de A B C A B C A B C Wandmontage Wall assembly Nicht steuerbare Seite Bedienseite Non control side Operating side DE DE EN EN 1 2...

Страница 25: ...Messgrundlage aufgesetzt werden DE EN Please remember that your ordering width is including the side cover caps These must therefore be set up as a basis for measurement Wandmontage Wall assembly A W...

Страница 26: ...O O 6 mm Bestellbreite 3 mm Bestellbreite 3 mm Ordering width 3 mm 6 mm Ordering width 3 mm Wandmontage Wall assembly B L 64mm O O 6 mm Bestellbreite 3 mm Bestellbreite 3 mm Ordering width 3 mm 6 mm O...

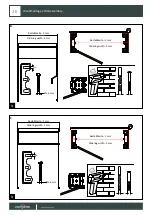
Страница 27: ...www paramondo de 27 Wandmontage Wall assembly A B C O O 4...

Страница 28: ...28 www paramondo de Wandmontage Wall assembly A B C Check 5...

Страница 29: ...hen den Haltern zu klein oder zu gro sein l sen Sie die Befestigungsschrauben eines Halters und stellen Sie den Versatz ein Attention The roller blind must be placed between the brackets from the fron...

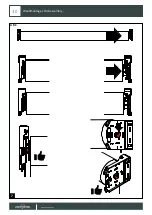
Страница 30: ...30 www paramondo de Wandmontage Wall assembly A B C 7...

Страница 31: ...Z 8mm A B C DE Sollten Sie sich f r die Bedienung mittels B2 Kardan Kurbelgelenk entschieden haben fahren Sie bitte mit den n chsten Seiten dieser Montageanleitung fort F r die Montageanleitung zu den...

Страница 32: ...ontage Wall assembly Wenn Sie die Wandhalter korrekt platziert haben entfernen Sie die Sicherung und den Rollostoff DE EN When you have placed the wall bracket correctly remove the safety pin and the...

Страница 33: ...s DE EN Remove the wall bracket on the side of the gearbox 21 mm 28 mm 13 mm Markieren Sie die Stelle an der der Kurbelantrieb auf die durch die Wand gef hrte Gewindestange treffen wird Mark the point...

Страница 34: ...34 www paramondo de Wandmontage Wall assembly 13 mm 90 90 Bohren Sie ein Loch durch das Mauerwerk bzw den Fenster T rrahmen DE EN Drill a hole through the brickwork or window door frame 12...

Страница 35: ...luft zu vermeiden kann es hilfreich sein um den inneren Teil des Kardan Kurbelgelenks eine Moosgummidichtung o zu wickeln DE Push the cardan crank joint with the threaded rod through the drill hole fr...

Страница 36: ...o de Wandmontage Wall assembly Die Gewindestange muss nun auf der Au enseite des Mauerwerks gek rzt werden nauf 6 mm DE The threaded rod must now be shortened to 6 mm on the outside of the masonry EN...

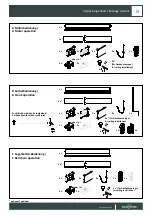
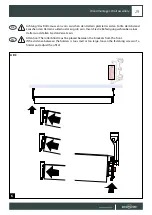
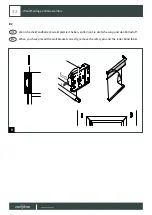
Страница 37: ...www paramondo de 37 Wandmontage Wall assembly Montieren Sie die Wandhalterung DE Install the wall bracket EN 16...

Страница 38: ...rbelantrieb befindlichen Kupplung aus so kann bei der Montage des Rollstoffes die Kupplung besser auf die Gewindestange gleiten DE You can determine the position of the threaded rod by turning the cra...

Страница 39: ...www paramondo de 39 Wandmontage Wall assembly Setzen Sie die am Kurbelantrieb befindliche Kupplung auf die Gewindestange DE Place the clutch of crank mechanism on the threaded rod EN 3 2 3 1 18...

Страница 40: ...Befestigen Sie den innenliegenden Halter an der Wandhalterung mittels der mitgelieferten Schraube Rollen Sie hierf r den Rollstoff ab DE Attach the inside bracket to the wall bracket using the screw p...

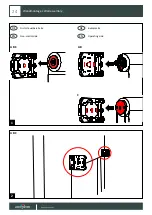
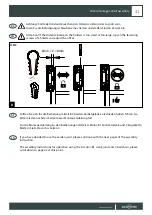
Страница 41: ...www paramondo de 41 Wandmontage Wall assembly Setzen Sie die Sicherung ein DE Insert the safety pin EN 20...

Страница 42: ...42 www paramondo de Wandmontage Wall assembly Click 6mm A B C 22 EN Optional Montieren Sie die Blende Optional Install the cover DE...

Страница 43: ...www paramondo de 43 Wandmontage Wall assembly CLICK OR A B C 23...

Страница 44: ...n Sie ein Rollo mit Motor haben fahren Sie bitte hier mit der Anleitung des Motors fort If you have a motorised awning please continue here with the motor instructions DE EN Wandmontage Wall assembly...

Страница 45: ...www paramondo de 45 Wandmontage Wall assembly A B C A B C 25...

Страница 46: ...46 www paramondo de O O 6 mm 6 Wandmontage Wall assembly Bestellh he Ordering Height A B C 26...

Страница 47: ...www paramondo de 47 Wandmontage Wall assembly O O 2mm 4 9 mm 4 9 mm A B C Bestellh he Ordering Height 27...

Страница 48: ...48 www paramondo de 2mm 2mm Bestellh he Ordering Height A B C Wandmontage Wall assembly 28...

Страница 49: ...www paramondo de 49 Wandmontage Wall assembly A B C A B C 29...

Страница 50: ...50 www paramondo de Wandmontage Wall assembly O O 4 mm 4 mm B 30...

Страница 51: ...www paramondo de 51 Wandmontage Wall assembly 4 mm O O 4 mm C 30...

Страница 52: ...52 www paramondo de Wandmontage Wall assembly A B C...

Страница 53: ...te Axle pin and bracket on the non control side Achsstift und Halterung auf der Bedien seite bei Motor und Kurbel Axle pin and bracket on the operation side for motor and crank Achsstift und Halterung...

Страница 54: ...54 www paramondo de Deckenmontage Ceiling Installation A B C A B C A B Nicht steuerbare Seite Bedienseite Non control side Operating side DE DE EN EN 1 2 C...

Страница 55: ...ion Dieser Halter ist auf der Ihnen abgewandten Seite hinten an der Rollohalterung anzubringen This holder is to be attached to the roller blind holder on the side facing away from you rear DE EN Link...

Страница 56: ...age Ceiling Installation A B O O L 59mm 6 mm O O L 64mm 6 mm Bestellbreite 3 mm Bestellbreite 3 mm Bestellbreite 3 mm Bestellbreite 3 mm Ordering width 3 mm Ordering width 3 mm 6 mm 6 mm Ordering widt...

Страница 57: ...www paramondo de 57 Deckenmontage Ceiling Installation C O O L 66mm 6 mm 6 mm Bestellbreite 3 mm Bestellbreite 3 mm Ordering width 3 mm Ordering width 3 mm 4...

Страница 58: ...58 www paramondo de Deckenmontage Ceiling Installation O O A B C 5...

Страница 59: ...www paramondo de 59 Deckenmontage Ceiling Installation A B C Check 6...

Страница 60: ...paramondo de Deckenmontage Ceiling Installation Achtung Das Rollo muss von unten zwischen den Haltern platziert werden Attention The roller blind must be placed between the brackets from below DE EN A...

Страница 61: ...www paramondo de 61 Deckenmontage Ceiling Installation A B C 8...

Страница 62: ...ischen den Haltern zu klein oder zu gro sein l sen Sie die Befestigungsschrauben eines Halters und stellen Sie den Versatz ein Attention If the distance between the holders is too small or too large l...

Страница 63: ...www paramondo de 63 Deckenmontage Ceiling Installation CLICK A B C 10...

Страница 64: ...ge Ceiling Installation Sollten Sie ein Rollo mit Motor haben fahren Sie bitte hier mit der Anleitung des Motors fort If you have a motorised awning please continue here with the motor instructions DE...

Страница 65: ...www paramondo de 65 Deckenmontage Ceiling Installation A B C A B C 12...

Страница 66: ...66 www paramondo de Deckenmontage Ceiling Installation O O 6 mm 6 Bestellh he Ordering Height A B C 13...

Страница 67: ...www paramondo de 67 Deckenmontage Ceiling Installation O O 2mm 4 9 mm 4 9 mm A B C Bestellh he Ordering Height 14...

Страница 68: ...68 www paramondo de Deckenmontage Ceiling Installation 2mm 2mm A B C 15...

Страница 69: ...www paramondo de 69 Deckenmontage Ceiling Installation A B C A B C 16...

Страница 70: ...70 www paramondo de Deckenmontage Ceiling Installation O O 4 mm 4 mm B 17...

Страница 71: ...www paramondo de 71 Deckenmontage Ceiling Installation 4 mm O O 4 mm C 17...

Страница 72: ...72 www paramondo de Deckenmontage Ceiling Installation A B C...

Страница 73: ...Windwiderstandsklasse Breite H he Au enrollo Senkrechtmarkise nach Ma mit Pendelsicherung 1000017267 300 cm 250 cm 3 EU Richtlinien EU Bauproduktenverordnung 305 2011 EU Zus tzlich bei Motorantrieb Ma...

Страница 74: ...aximum Dimensions Wind Resistance Class Width Height Au enrollo Senkrechtmarkise nach Ma mit Pendelsicherung 1000017267 300 cm 250 cm 3 EU Direc ves EU Construc on Products Regula on 305 2011 EU Addi...

Страница 75: ...www paramondo de 75 Notizen Notes...

Страница 76: ...paramondoist eine eingetragene Marke der Schoenberger Germany Enterprises GmbH Co KG Zechstra e 1 7 82069 Hohensch ftlarn info paramondo de www paramondo de...

Отзывы: