


www.paramondo.de
15
Sicherheitshinweise • Safety instructions
The power connection of the motor and all
work on electrical systems may only be carri-
ed out by a qualified electrician according to
the connection diagram for the motor and/
or controller.
Perform all fitting, connection and main-
tenance work when disconnected from the
mains.
Never use defective or damaged devices.
Check that the motor and mains cable are
intact.
WARNING!
The motor must be disconnected from its
power supply during cleaning, maintenance
and the replacement of components
After unpacking the product, compare the
motor type with the corresponding details
on the type label.
Incomplete devices or devices that do not
correspond with the specifications may not
be taken into operation.
ATTENTION!
Comply with fitting and connection referen-
ces at all times! Improper installation and
fitting can result in serious injury!
Lay the motor mains cable inside the empty
conduit to the junction box, under observati
-
on of the local electrical regulations.
Make sure that the mains cable does not
come into contact with movable system
components.
A 230 V / 50 Hz power connection with an
onsite activation device (fuse) must be
constantly available at the place of installati
-
on for electrical connection.
The mains cable must always be replaced
by the manufacturer, its customer service or
similarly qualified person to prevent hazards.
The same cable type, supplied by the motor
manufacturer, must be used.
Install fixed controllers in a visible position
that can be reached. Comply with the regu-
lations for the fitting of controllers / switches
(minimum height, protection against opera
-
tion by children, operation by persons with
physical disabilities, etc.).
See DIN VDE 18015 Equipment configurati
-
on.
Both rated torque and rated operating time
must match the properties of the operated
system.
The proper operation of the system can
only be ensured if it is installed, fitted
and maintained properly and has the correct
power supply.
Secure the system against unauthorised
operation.
Take safety precautions to prevent unintenti
-
onal switch-on.
All connection lines to be installed must be
disconnected from the mains and secured
against being accidentally switched on again
before working on the system.
Remove all unnecessary cables.
Disable all equipment not required for mo-
tordriven operation.
Attach the operating unit of a manual trigger
(manual emergency crank) at a height of less
than 1.8 m.
In accordance with DIN VDE 0700, each
phase of fixed devices must be separa
-
ted during installation.
Separators are switches with a minimum
contact opening width of 3 mm (e.g. circuit
breakers, fuses or FI switches).
ATTENTION!
You must adhere to the following installati-
on instructions!
Compare the information on mains voltage
/ frequency on the type label with those of
the local network before fitting.
The controller must have a minimum swit-
Содержание AuBenrollo - Senkrechtmarkise nach MaB
Страница 27: ...www paramondo de 27 Wandmontage Wall assembly A B C O O 4...
Страница 28: ...28 www paramondo de Wandmontage Wall assembly A B C Check 5...
Страница 30: ...30 www paramondo de Wandmontage Wall assembly A B C 7...
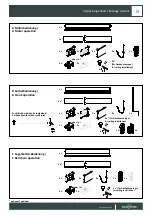
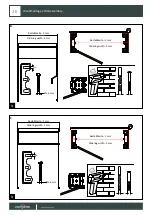
Страница 37: ...www paramondo de 37 Wandmontage Wall assembly Montieren Sie die Wandhalterung DE Install the wall bracket EN 16...
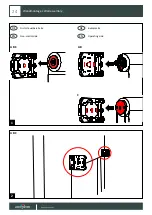
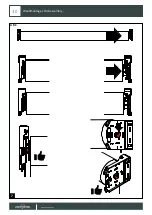
Страница 41: ...www paramondo de 41 Wandmontage Wall assembly Setzen Sie die Sicherung ein DE Insert the safety pin EN 20...
Страница 43: ...www paramondo de 43 Wandmontage Wall assembly CLICK OR A B C 23...
Страница 45: ...www paramondo de 45 Wandmontage Wall assembly A B C A B C 25...
Страница 46: ...46 www paramondo de O O 6 mm 6 Wandmontage Wall assembly Bestellh he Ordering Height A B C 26...
Страница 47: ...www paramondo de 47 Wandmontage Wall assembly O O 2mm 4 9 mm 4 9 mm A B C Bestellh he Ordering Height 27...
Страница 48: ...48 www paramondo de 2mm 2mm Bestellh he Ordering Height A B C Wandmontage Wall assembly 28...
Страница 49: ...www paramondo de 49 Wandmontage Wall assembly A B C A B C 29...
Страница 50: ...50 www paramondo de Wandmontage Wall assembly O O 4 mm 4 mm B 30...
Страница 51: ...www paramondo de 51 Wandmontage Wall assembly 4 mm O O 4 mm C 30...
Страница 52: ...52 www paramondo de Wandmontage Wall assembly A B C...
Страница 58: ...58 www paramondo de Deckenmontage Ceiling Installation O O A B C 5...
Страница 59: ...www paramondo de 59 Deckenmontage Ceiling Installation A B C Check 6...
Страница 61: ...www paramondo de 61 Deckenmontage Ceiling Installation A B C 8...
Страница 63: ...www paramondo de 63 Deckenmontage Ceiling Installation CLICK A B C 10...
Страница 65: ...www paramondo de 65 Deckenmontage Ceiling Installation A B C A B C 12...
Страница 66: ...66 www paramondo de Deckenmontage Ceiling Installation O O 6 mm 6 Bestellh he Ordering Height A B C 13...
Страница 68: ...68 www paramondo de Deckenmontage Ceiling Installation 2mm 2mm A B C 15...
Страница 69: ...www paramondo de 69 Deckenmontage Ceiling Installation A B C A B C 16...
Страница 70: ...70 www paramondo de Deckenmontage Ceiling Installation O O 4 mm 4 mm B 17...
Страница 71: ...www paramondo de 71 Deckenmontage Ceiling Installation 4 mm O O 4 mm C 17...
Страница 72: ...72 www paramondo de Deckenmontage Ceiling Installation A B C...
Страница 75: ...www paramondo de 75 Notizen Notes...


