20
21
English
English
BATTERY REPLACEMENT PROCEDURE
PLEASE READ THE CAUTIONS AND WARNINGS BEFORE ATTEMPTING
TO REPLACE THE BATTERIES
Hot-swappable batteries mean that the batteries can be replaced without
powering down the whole UPS system.
NOTE: If there is a power interruption while replacing the hot-swappable batte-
ries, with the UPS on, the load will not be backed up. To hot-swap the
batteries start with step number 6.
1. Turn off the equipment that is plugged into the output receptacles of the
UPS.
2. Press the OFF button to turn the UPS off. NOTE: The input circuit breaker
MUST be turned to the off position for the 208V models.
3. Unplug the UPS's AC power cord from the AC wall outlet.
4. Unplug the equipment from the output receptacles of the UPS.
5. Unplug the computer interface cable from the rear panel of the UPS.
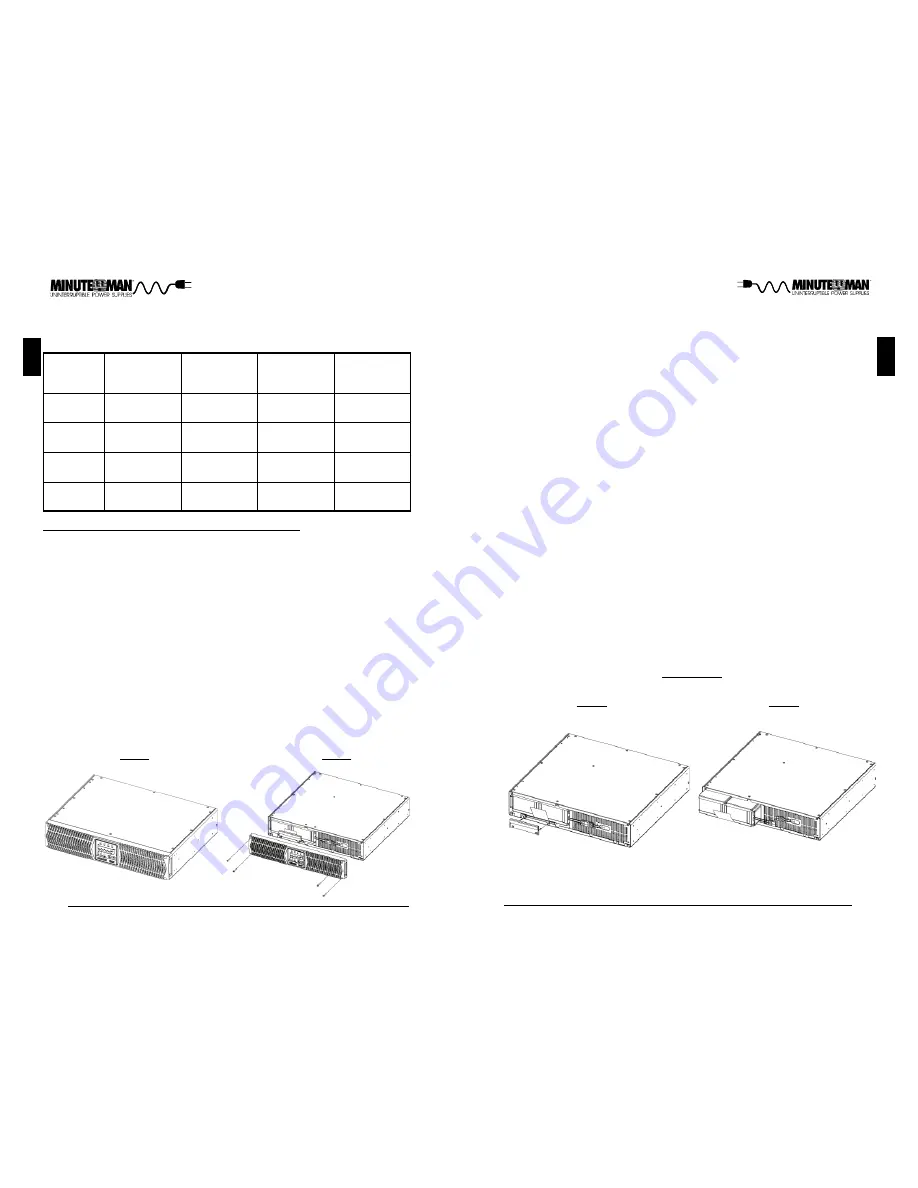
6. Remove the front panel retaining screws. (FIG. 2)
7. Lay the front panel on top of the UPS.
ED1000RM2U
ED1000RMT2U
ED1500RM2U
ED1500RMT2U
Battery
Qty/Rating
2-12V8.5Ah
4-12V7.2Ah
ED3000RM2U
ED3000RMT2U
6-12V8.5Ah
Model #
Replace batteries with the same number and type as originally
installed in the UPS. These batteries have pressure operated vents.
These UPSs contain sealed non-spillable maintenance-free lead
acid batteries.
CAUTION:
Panasonic
Part #
Yuasa
Part #
REW45-12
CSB
Part #
NP-7.2-12
REW45-12
LC-R129
LC-R127.2
LC-R129
HR 1234W F2
GP 1272 F2
HR 1234W F2
FIG. 1
FIG. 2
ED2000RM2U
ED2000RMT2U
4
-12V8.5Ah
REW45-12
LC-R129
HR 1234W F2
8. Remove the two retaining screws for the battery retaining bracket. (FIG. 3)
9. Remove the battery retaining bracket. (FIG. 3)
10. Disconnect the Battery connectors (red and black). (FIG. 4)
11. Grasp the battery pull tab and gently pull the battery module out of the UPS
and set on the floor. (FIG. 4)
NOTE: Use Caution, the battery module is heavy.
12. Disconnect the battery positive (red) wire.
13. Disconnect the battery negative (black) wire.
14. Remove the battery jumper wires.
15. Remove the old batteries from the battery module.
16. Install the new batteries into the battery module in the same position as the
original batteries.
17. Verify proper polarity. Re-install the battery jumper wires on the new batt-
eries.
18. Verify proper polarity. Reconnect the battery negative (black) wire.
19. Verify proper polarity. Reconnect the battery positive (red) wire.
20. Slide the battery module into the UPS.
21. Verify proper polarity. Reconnect the battery connectors (red and black).
NOTE: Some sparking might occur, this is normal.
22. Re-install the battery retaining bracket.
23. Re-install the two retaining screws for the battery retaining bracket.
24. Re-install the front panel on the UPS.
25. Re-install the front panel retaining screws.
26. Properly dispose of the old batteries at an appropriate recycling facility or
return them to the supplier in the packing material for the new batteries.
27. The UPS is now ready for the normal operation.
NOTE: If the UPS has a Weak/Bad Battery Alarm after replacing the batteries,
the user must initiate a self test to clear the Weak/Bad Battery Alarm. To
initiate a self test see section 4 "SELF TEST".
FIG. 3
FIG. 4
Содержание ED1000RM2U
Страница 17: ...30 English Notes...


