background image

PRINTER CLEANING INSTRUCTIONS 


65 

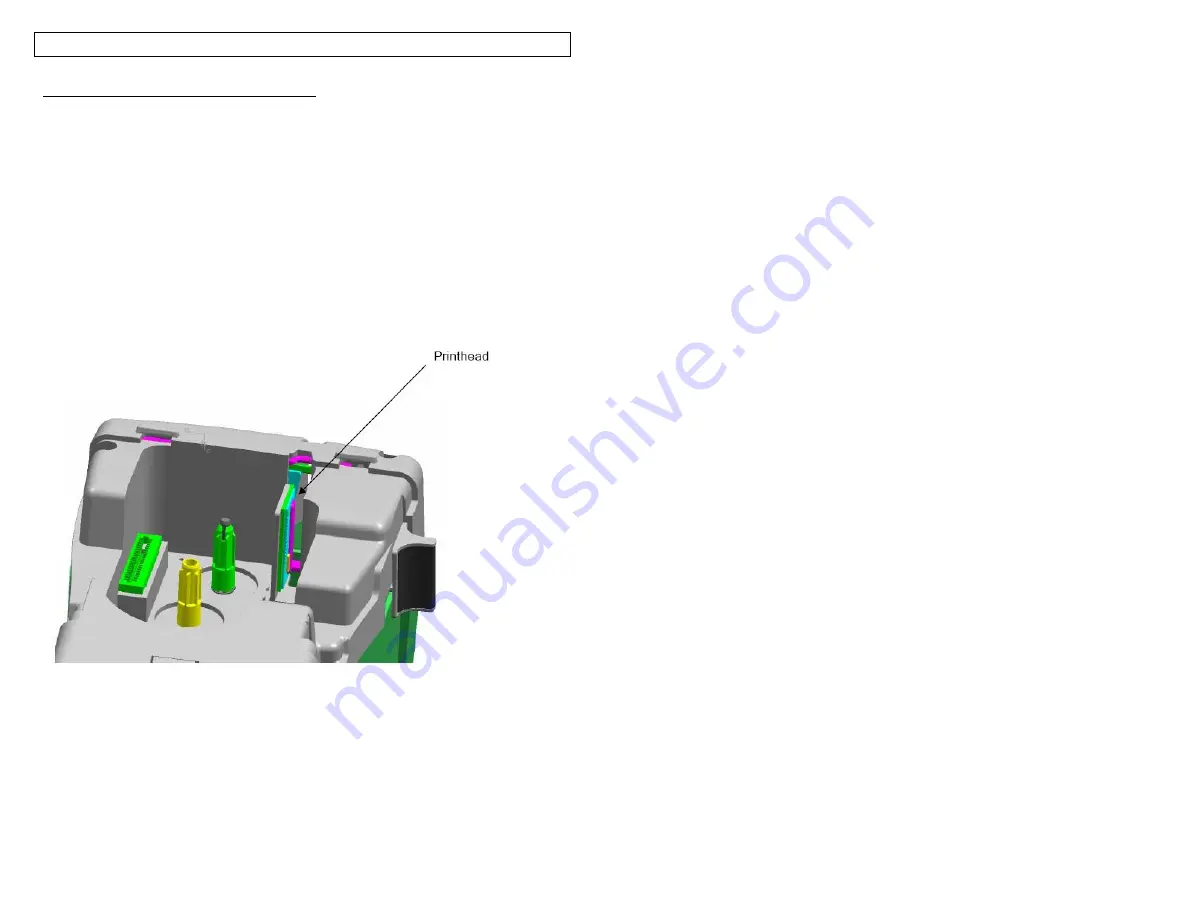
Cleaning the Print head and Drive Roller 

 
The LS8E printer is cleaned using the LS8-CLN cleaning kit. 
 
The print head should be cleaned regularly, and more often in harsh environments.  
The  print  head  should  be  cleaned  whenever  any  irregular  printing  results  occur.  
The  drive  roller  should  be  cleaned  whenever  foreign  matter,  such  as  dust  or 
adhesive, is present. 
 
1.  Turn 

OFF

 power to printer. 

2.  Remove the cassette door. 
3.  Unlock the print head latch. 
4.  Remove the label cassette from the printer 
5.  Rub a cotton swab with cleaning solution along the print head. 
6.  Repeat until no more residue is picked up by the swab. 


Содержание LS8-PCKIT

Страница 1: ...L TRANSFER PRINTER Operator s Manual Panduit Corp Identification Products Division 1819 Atlanta Highway Cumming GA 30040 USA Technical Support 1 866 871 4571 Customer Service 1 800 777 3300 www pandui...

Страница 2: ...mbols 20 22 Creating Data Lists 23 Creating Bar Codes 24 25 Creating a Date or Time Stamp 26 Creating Lines 27 28 Creating Frames 29 Using Pages 30 Using Special Functions 31 Setting up the PANTHER LS...

Страница 3: ...3 SECTION 1 GETTING STARTED...

Страница 4: ...nd troubleshooting of the PANTHER LS8E Hand held Thermal Transfer Printer If you have problems not covered herein contact your local Panduit Sales Representative call Panduit Technical Support at 866...

Страница 5: ...f not used in accordance with this instruction manual may cause harmful interference to radio communications Operation of this printer in a residential area is likely to cause interference in which ca...

Страница 6: ...ces except for home Printer Power Supply The PANTHER LS8E is supplied with 6 AA alkaline batteries These batteries are not re chargeable After the batteries have surpassed their useful life they must...

Страница 7: ...summarizes the most important and frequently used features of the PANTHER LS8E is included with your printer The Quick Reference Card has several label exercises to help familiarize you with LS8E fun...

Страница 8: ...Label Cassette System Large graphic display with backlight 59 button keypad Print head latch Durable plastic housing Die cut or continuous labels Ribbon included Cutter button with partial cut adjust...

Страница 9: ...s two possible settings Full Cut and Partial Cut Full Cut is used to cut entirely across a label and its liner This is the familiar cutting style used on other hand held printers Partial Cut is used t...

Страница 10: ...rity When Installing Batteries Replace All Six Batteries At The Same Time Loading a Label Cassette 1 Remove the cassette door from the back of the PANTHER LS8E printer 2 Install a label cassette Press...

Страница 11: ...ONS 11 Setup Power Delete Clear Feed Backlight Print Enter Rotate Space Accented Characters Shift Directional Arrows Numbers Letters Size Length Insert or Edit Tools Label Mode Caps Lock Special Funct...

Страница 12: ...text font style ALIGN Change the label justification LINE Add vertical and horizontal lines to a label FRAME Add a frame around a label PAGE Move to another page FILE Access the file manager INSERT In...

Страница 13: ...13 SECTION 2 WORKING WITH THE PANTHER LS8E...

Страница 14: ...tion Available styles include Normal no icon Normal Underline Bold and Bold Underline Text Line Indicates the current line Page 1 9 Indicates the current page There are 9 total pages Vertical or Horiz...

Страница 15: ...e cursor to any position and begin typing The character will be inserted at the cursor position Deleting Text To remove characters from the screen press the key Each press of the key will delete one c...

Страница 16: ...center justified and right justified The vertical justification options include top justified center justified and bottom justified The character A inside of the page shaped icon in the lower right ha...

Страница 17: ...bel Creating a Serialization The serialization tool should be accessed from the home screen To access the serialization tool 1 Press the INSERT key to enter the tools menu 2 Press the directional arro...

Страница 18: ...rameter will default to a value of 1 Enter the number of copies to print Press the key to accept the changes 2 The Collate parameter determines whether or not the copies of the serialization items wil...

Страница 19: ...a bar code is useful for asset management component manufacturing and quality control 2 The Place On option determines whether the serialization will print on consecutive labels or on consecutive page...

Страница 20: ...age for available symbols 5 Use the up or down directional arrow keys to increase or decrease the size of the symbol The default size of the symbol is chosen to match the text size on the current line...

Страница 21: ...d their assigned library numbers are listed below Additional symbols may be added to the PANTHER LS8E firmware in the future 1 2 3 4 5 6 7 8 9 10 11 12 13 14 15 16 17 18 19 20 21 22 23 24 25 26 27 28...

Страница 22: ...CREATING SYMBOLS 22 46 47 48 49 50 51 52 53 54 55 56 57 58 59 60 61 62 63 64 65 66 67 68 69 70 71 72 73 74 75 76 77 78 79 80 81 82...

Страница 23: ...an recall a previously saved data list or you can create a new list Creating a new list is similar to working on the home screen Use the PAGE function to move forward or backward through the 100 data...

Страница 24: ...directional arrow keys to change the bar code settings 8 Press the key to accept all of the changes and to return to the home screen Otherwise press the DEL key to return to the home screen without a...

Страница 25: ...ll display Yes Checksum Indicates whether the checksum digit is activated or not If activated checksum digit is turned on the setting will display Yes Checksum must be used for CODE 128 bar codes For...

Страница 26: ...n press the INSERT key The Time Tool The Time Tool allows the user to print a time stamp on a label The time printed on the label is defined by the internal clock of the PANTHER LS8E Creating a Time T...

Страница 27: ...ff independently NOTE The top bottom left and right sides of the label will rotate with the legend when a label is rotated 1 The Center Horizontal setting places a line through the center of the label...

Страница 28: ...Use the up or down directional arrow keys to select the desired line position 3 Use the right or left directional arrow keys to turn on or turn off the line tool at the selected position 4 Press the k...

Страница 29: ...The Box Off setting deactivates the frame Creating a Frame The frame menu should be accessed from the home screen To access the box tool 1 Press the SHIFT key and then press the LINE key to enter box...

Страница 30: ...ages function is also useful for creating text on patch panel labels or terminal block labels Using the Page Function The page number icon in the lower right hand corner of the display indicates the c...

Страница 31: ...tion o This wizard introduces new label legend creation tools including a text table format and TIA compliance guide See page 58 for a labeling example using this wizard F5 DIN Mode for European Termi...

Страница 32: ...u scroll up or down using the directional arrows Select the setting to adjust by pressing Once inside the setting use the arrow keys to select a parameter to change Press to accept the changes and ret...

Страница 33: ...pe marking Strip Repeats legend until label is filled and copies legend on two sides of middle perforation Wire and cable marking Network Places legends at port locations Data communications component...

Страница 34: ...aving a new file press the key to begin entering a file name Use the alphabetic or numeric keys to enter a file name After entering a file name press the key again to Save NOTE When renaming a previou...

Страница 35: ...sert the CD into a personal computer The installation program will begin automatically If it does not then 1 Click the Start menu button on your computer screen 2 Select Run 3 Select D 4 Click OK 5 Do...

Страница 36: ...PANTHERLINK 36 Click Next Click Next...

Страница 37: ...PANTHERLINK 37 Click Next Upon completion of the installation process the PANTHERLINK icon will appear on the computer desktop PANTHERLINK desktop icon...

Страница 38: ...PANTHERLINK 38...

Страница 39: ...PANTHERLINK 39...

Страница 40: ...PANTHERLINK 40...

Страница 41: ...etup menu 5 Use the up or down directional arrow keys to highlight PC Interface 6 Press the key 7 Use the up or down directional arrow keys to highlight Files Printing Symbol Transfer or Firmware Upgr...

Страница 42: ...ed as a line within the label A blank cell will be treated as a blank line A line is limited to 32 characters A blank row will be treated as a blank label 3 Select FILE then SAVE AS 4 In the SAVE AS w...

Страница 43: ...created by Excel 4 Select OPEN The file name will disappear so that you can rename and save the file as a DAT file 5 In the Select target DAT file window enter a file name for the data file 6 Browse t...

Страница 44: ...ady to send or receive files 4 Open PanTherLink software on your computer 5 Select Send a data file to the LS8E printer from the toolbar The icon shows DAT with an arrow pointing away from a computer...

Страница 45: ...rinter to end the PanTherLink session and return to the SETUP menu 13 Press SETUP to return to the home screen 14 To insert the data file into a label press INSERT and select DATA 15 Scroll right to s...

Страница 46: ...d your own graphic files All downloadable files must be must be saved as 150 X 150 pixels monochrome bitmap bmp files 4 To use the downloadable symbols function on your LS8E printer you must first hav...

Страница 47: ...on your printer are named Blank_ bmp All file locations on your printer with custom symbols saved in them are named Btmap_ bmp After a custom symbol has been saved on your printer and if you are in t...

Страница 48: ...PANTHERLINK 48...

Страница 49: ...PANTHERLINK 49 Library of Downloadable Symbols included in PanTherLink software 1 2 3 4 5 6 7 8 9...

Страница 50: ...PANTHERLINK 50 10 11 12 13 14 15 16 17 18 19 20 21 22 23 24 25 26 27 28 29 30 31 32 33 34 35 36 37 38 39 40 41 42 43 44 45 46 47 48 49 50 51 52 53 54...

Страница 51: ...r will show for this process 6 Click OK to continue after the firmware has been backed up 7 Select the model of the printer from the picture on the screen LS8E or LS8EQ Click on the picture of your mo...

Страница 52: ...PANTHERLINK 52...

Страница 53: ...face Select Files Printing 6 The LS8E printer is now ready to print from Easy Mark 7 In Easy Mark select File Print 8 Select PanTher LS8E from the printer list Each time you change the LS8E format tha...

Страница 54: ...PANTHERLINK 54...

Страница 55: ...nk File Save previous label if necessary Step 3 Type ABCD Step 4 Press PRINT Results 1234 1234 1234 Hint S100X150VAC defaults to 10 point font printed in Wire Marker Mode You can adjust the font size...

Страница 56: ...p 3 Type 220 VOLTS Step 4 Press PRINT Results Hint T100X000VUC BK defaults to 36 point font printed in Tape Mode with an Auto length setting You can adjust the font size by pressing the SIZE key You c...

Страница 57: ...w key Step 11 Type 3 for End value Step 12 Press twice Step 13 Press PRINT Results Hint The Serial tool allows numeric or alphabetic serializations You can choose any increment from 1 to 99 print mult...

Страница 58: ...sert a terminal block cassette T024X000FJC BK T031X000FJC BK or T038X000FJC BK Step 2 When prompted select New Blank File Save previous label if necessary Step 3 Enter the terminal spacing ie 0 25 Ste...

Страница 59: ...g data on the LS8E use the Page key to move to the next or to the previous terminal 8 lines are allowed per terminal Text for up to 100 terminals can be created in this way Press F5 to exit the data l...

Страница 60: ...f a DIN module label section is the Module Size multiplied by the Module Span For example a Module Size of 10 mm and Module Span of 2 equal a DIN label section of 20 mm DIN labeling allows you to prin...

Страница 61: ...the right arrow key and then pressing ENTER Step 6 Select SELF for self laminating labels THE OPTIMUM LABEL CASSETTE PART NUMBER FOR YOUR APPLICATION IS NOW DISPLAYED ON SCREEN INSERT THIS LABEL CASS...

Страница 62: ...Block Labeling PIPE Pipe Marking Network Applications CABLE Cable Marking PATCH Patch Panel Labeling BAKB Backbone Labeling GND Ground Labeling FACE Faceplate Labeling FIRE Firestop Labeling TIA EIA 6...

Страница 63: ...cluding copies in the table 10 Press Shift and then F10 to save the serialization and exit the Label Wizard 11 The TABLE that you have created is stored in a data file The data tool appears on the hom...

Страница 64: ...ENTER for the selected parameter An on screen window will appear 8 Type the value for the selected parameter in the on screen window 9 Press ENTER 10 Repeat steps 6 9 for each parameter 11 Press Shif...

Страница 65: ...rint head should be cleaned whenever any irregular printing results occur The drive roller should be cleaned whenever foreign matter such as dust or adhesive is present 1 Turn OFF power to printer 2 R...

Страница 66: ...er to printer 2 Remove the cassette door 3 Unlock the print head latch 4 Remove the label cassette from the printer 5 Push the cutter button in so that the cutter blade is exposed through the media op...

Страница 67: ...ed in the printer If problem persists replace batteries Plug in AC Adapter PRINTING Not printing Make sure printer 1 Is turned ON 2 Has label cassette loaded properly 3 Label media is fed beneath guid...

Страница 68: ...ted image areas where there is no print Print head elements or dots are dirty or obstructed Clean print head with soft stemmed swab and isopropyl alcohol part number LS8 CLN LABELS Labels not register...

Страница 69: ...ite tab from my label cassette Answer No this tab is meant to remain on the cassette It is used to help remove the cassette from your printer 4 Question How many files can be stored on the LS8E printe...

Страница 70: ...tter blade ever get dull and if so would the printer need to be repaired Answer The cutter blade is designed to maintain its sharpness throughout the life of a printer The cutter blade should be clean...

Страница 71: ...intended or unauthorized medical application buyer shall indemnify and hold Panduit harmless from any liability or damage whatsoever arising out of the use of Panduit products in such medical applicat...

Страница 72: ...ted cutter Display 4 line x 14 graphic LCD with backlight LCD Contrast Control Adjustable via keypad Operating System Panduit proprietary user upgradeable Power Supply 6 AA alkaline batteries AC Adapt...

Страница 73: ...ON 73 COUNTRY REGION TECHNICAL SUPPORT PHONE NUMBER Asia Pacific 65 6379 6700 Australia 61 3 9794 9020 Brazil 551136112434 Canada 866 871 4571 Europe 44 208 601 7200 Japan 81 3 376 77011 Latin America...

Отзывы: