No twis
�
ng
No gap
Bu
�
on to
start hea
�
ng
Lynx heater program runs
a fan to cool the sleeve
a
�
er hea
�
ng
Lightly maintaining
tension on
fi
ber
Right side
fi
rst
Then le
�
side
Lightly maintaining tension to
prevent bending
Le
�
side
fi
rst
Then right side
Lightly maintaining tension
to prevent bending
Place
fi
ber on
V-groove gently
If the posi
�
on of the
fi
ber
is wrong, set the
fi
ber or
stub again.
Sleeve and Spring
should be out of
the cover.
Protec
�
on
Sleeve
Spring
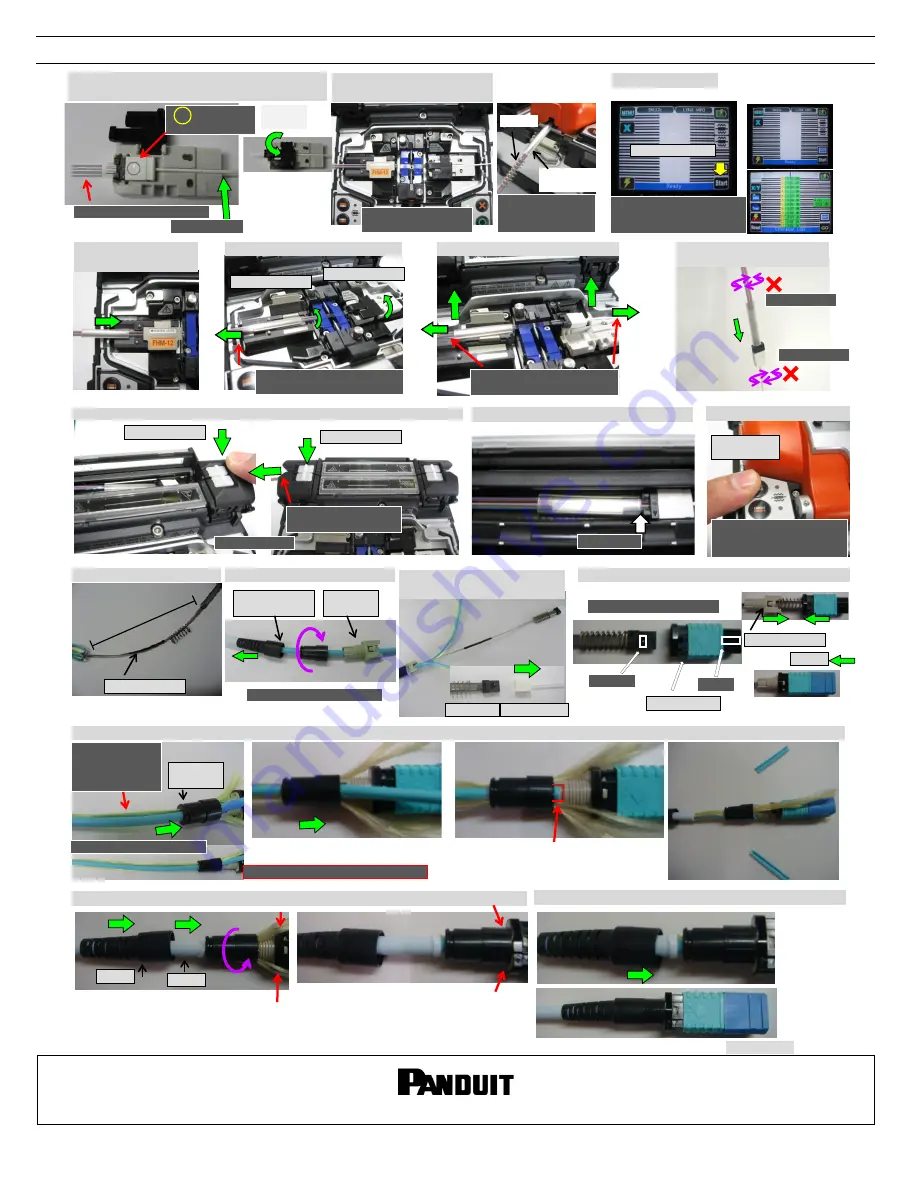
(21) Set Sleeve into the heater.
(22) Con
fi
rm the posi
�
on before hea
�
ng.
(23) Heat Protec
�
on Sleeve.
(27) Put Front Housing.
(17) Slide the sleeve to
the holder.
(19) Pick up the spliced
fi
ber.
No twis
�
ng
(20) Slide Protec
�
on Sleeve to
MT STUB.
No twis
�
ng
(18) Open the cover of the holder.
(24) Spiral & Pick up the cord.
Rotate counter-clockwise.
(25) Disassemble Rear Parts.
Rear
Stopper
Kevlar Stopper
and Boot
MT STUB Dummy CAP
(26) Slide Rear Parts and remove
Dummy Cap.
(28) Slide Kevlar Stopper. Trim the slit outer sheath.
No Thread
Get the parts/components closer
to each other and straighten the
fi
bers covered with the Kevlar in
the Sheath
Rotate Kevlar Stopper
with holding Kevlar on
Housing
Make sure that
the
fi
bers with
Kevlar are not
twisted.
Kevlar
Stopper
(29) Secure Kevlar by screwing of Kevlar Stopper & Cut excess Kevlar
Boot
(30) Put Boot.
Cut Kevlar here
Complete
UP
Grasp here
Do not touch bare
fi
ber
(14) Pick up MT STUB and set the stub on the plas
�
c
holder.
(15) Set stub holder on the
splicer (right side).
(16) Fusion Splice.
Push to
close
UP should be
upper side
Spiral Tube
Approximately
center posi
�
on
Don’t go over the thread.
Cut Sheath here
Do not bend
(
Fiber Kevlar Sheath
)
Touch Start icon
Window
Ridge
Align Window and Ridge
Front Parts
Rear Stopper
Cap
Tube
INSTALLATION INSTRUCTIONS
© Panduit Corp. 2019
FS148
E-mail:
Phone:
866-405-6654
For Instructions in Local Languages
and Technical Support:
www.panduit.com/resources/install_maintain.asp
www.panduit.com
Page 5 of 5


