Panduit Atlona AT-OCS-900N Скачать руководство пользователя страница 14

AT-OCS-900N

14

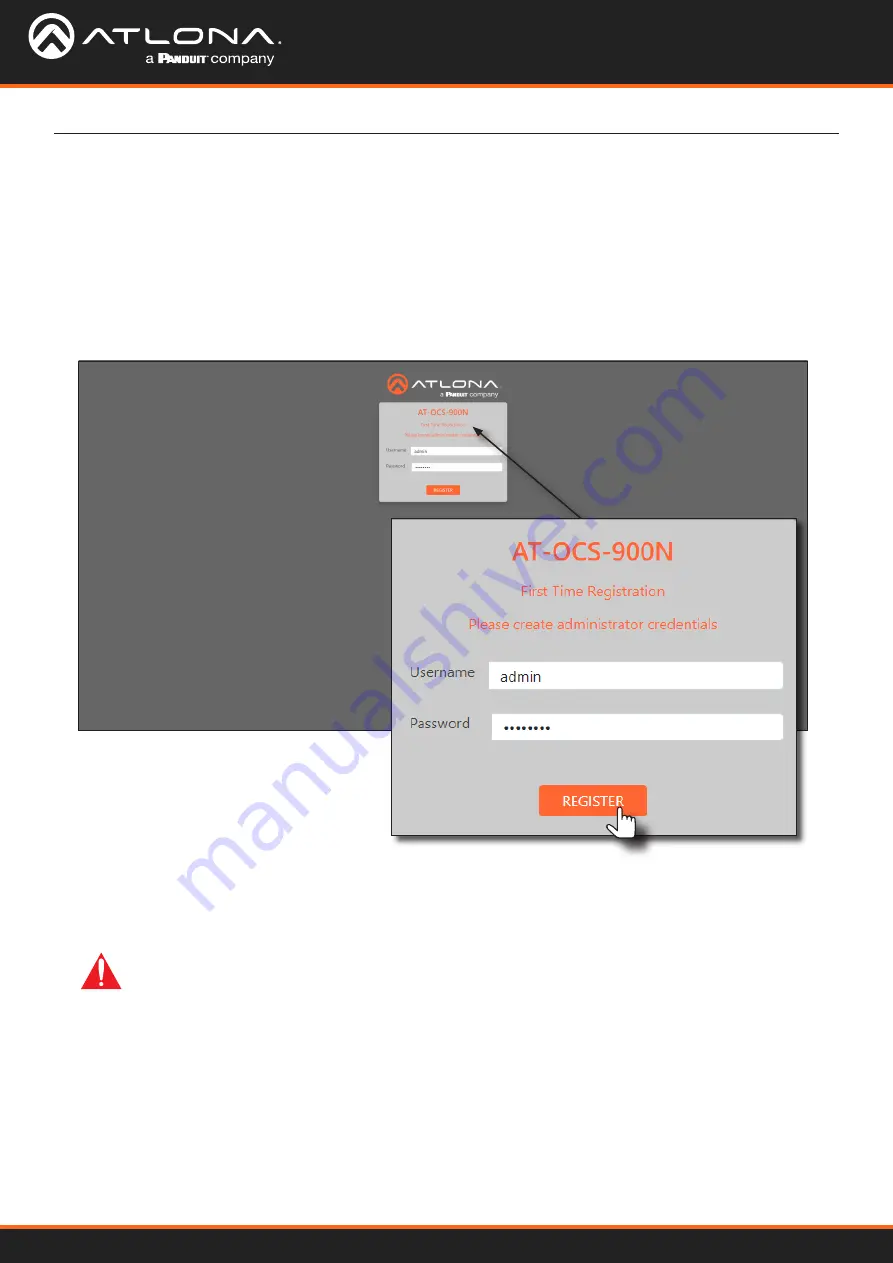
1.  Launch the desired web browser and enter the IP address of the AT-OCS-900N in the address bar.

2.  The AT-OCS-900N 

Login Registration

 page will be displayed.

Logging in to the Web Server

Most of the AT-OCS-900N operation is handled through the built-in web server.  In order to access the web server, 

the IP address of the unit must be known.

3.  Enter the desired username in the 

Username

 field.  In the example above, the username 

admin

 is used.

4.  Enter the desired password in the 

Password

 field.

IMPORTANT:


Both the username and password must be 5 - 16 characters in length.  Alphanumeric 

characters and symbols are permitted.  Note that the 

Password

 field will be masked when entering 

the password.

5.  Verify the password by entering it in the 

Confirm

 field.

6.  Click the 

Register

 button.

7.  The 

Dashboard

 screen will be displayed.  Refer to 

Dashboard page (page 36)

 for more information.

8. 

The login registration process is complete.

Login Registration

Device Operation

Содержание Atlona AT-OCS-900N

Страница 1: ...AtlonaManuals Automation AT OCS 900N Network Enabled Occupancy Sensor...

Страница 2: ...or higher must be used in order to integrate the OCS with Velocity Changed Interfacing with Velocity section to Integration with Velocity 3 Nov 2021 Replaced wiring diagram with diagram used on web A...

Страница 3: ...08 962 0515 US International Sales and Customer Service Hours Monday Friday 6 00 a m 4 30 p m PST http atlona com International Headquarters Atlona International AG To distrasse 18 8002 Zu rich Switze...

Страница 4: ...purchase by the end purchaser The date contained on the end purchaser s sales or delivery receipt is the proof purchase date Limited Product Warranty Terms New Products 3 year limited product warranty...

Страница 5: ...responsible for the direct special incidental or consequential damages resulting from any breach of warranty or condition or under any other legal theory Some countries districts or states do not allo...

Страница 6: ...era tional instructions in the literature accompanying the product Safety and Certification FCC Compliance FCC Compliance and Advisory Statement This hardware device complies with Part 15 of the FCC r...

Страница 7: ...s 22 Saving Configuration Files 22 Uploading Configuration Files 22 Resetting the AT OCS 900N 23 Using the Web Server 23 Using the Hardware Reset Button 23 Rebooting the AT OCS 900N 24 Configuring the...

Страница 8: ...n standard design allows sensor information to be communicated to third party ventilation lighting and other systems over TCP IP using common protocols such as UDP TCP WebSocket and MQTT Introduction...

Страница 9: ...coming light and directs the light to the infrared sensor 2 LED indicators These indicators provide lens illumination for device functionality and testing These LED indicators can be changed to differ...

Страница 10: ...return to the down position securing the unit in place C E I L I N G C E I L I N G Energy Mgmt Equip Motion Sensor Low Bay White Connect to LPS supply only Input 57V 1 4W Max Amb 50 C S N 210226 IDLM...

Страница 11: ...5 m 20 ft 6 1 m 15 ft 4 6 m 10 ft 3 0 m 5 ft 1 5 m 0 20 ft 6 1 m 30 ft 9 1 m 40 ft 12 2 m 40 ft 12 2 m 30 ft 9 1 m 20 ft 6 1 m 10 ft 3 0 m 0 10 ft 3 0 m 20 ft 6 1 m 30 ft 9 1 m 40 ft 12 2 m 0 The AT O...

Страница 12: ...Once the removed the wing clips will return to their normal position 4 Disconnect the Ethernet cable from the LAN port Removal Instructions The AT OCS 900N can be easily removed if necessary Refer to...

Страница 13: ...AT OCS 900N 13 Installation Connection Diagram...

Страница 14: ...e in the Username field In the example above the username admin is used 4 Enter the desired password in the Password field IMPORTANT Both the username and password must be 5 16 characters in length Al...

Страница 15: ...s of the AT OCS 900N in the address bar 2 Enter the correct username and password in the respective fields 3 Click the Login button Logging in after registration 4 The Dashboard page will be displayed...

Страница 16: ...this box click to remove the check mark This will disable DHCP and provide the option to specify a static IP address 5 Enter the desired address in the IP Address field Also enter the required informa...

Страница 17: ...address from a DHCP server Using DHCP to assign an IP address The AT OCS 900N is shipped with DHCP enabled Once connected to a network the DHCP server if available will automatically assign an IP add...

Страница 18: ...is enabled Uncheck this box to disable TLS Using Transport Layer Security TLS The AT OCS 900N provides Transport Layer Security TLS for added communication security over a non secure network TLS is e...

Страница 19: ...he MAC address However the host name can be changed to a more recognizable identifier 1 Open the desired web browser and enter the IP address of the AT OCS 900N 2 Login using the required credentials...

Страница 20: ...ogin using the required credentials 3 Click User in the side menu bar 4 In the Username field enter the desired user name 5 In the New Password field enter the desired password Log Out button NOTE Bot...

Страница 21: ...mation will be displayed under the Dashboard menu 1 Open the desired web browser and enter the IP address of the AT OCS 900N 2 Login using the required credentials 3 Click System in the side menu bar...

Страница 22: ...ate the Configure Settings window group and click the Download button 1 Follow steps 1 3 above 2 Locate the Configure Settings window group and click the Choose File button 3 The Open dialog will be d...

Страница 23: ...the web server is not available the AT OCS 900N provides a reset button on the unit 1 Open the desired web browser and enter the IP address of the AT OCS 900N 2 Login using the required credentials 3...

Страница 24: ...ed without losing any settings Following the procedure below 1 Open the desired web browser and enter the IP address of the AT OCS 900N 2 Login using the required credentials 3 Click System in the sid...

Страница 25: ...d credentials 3 Click Sensors in the side menu bar 4 Locate the Motion Sensors window group 5 In the Motion On Event field enter the period of continuous motion in seconds that is required before the...

Страница 26: ...center and three outer LED indicators as shown below Removing the lens cap will expose these LED indicators The color of each of these LED indicators can be changed to any color Note that when these...

Страница 27: ...es The valid range for each component is 0 to 255 If Hex is selected then the LED color will be represented by a singular hexadecimal value in the form of xxxxxx Valid range is 000000 to FFFFFF 7 Ente...

Страница 28: ...e menu bar 4 Locate the Ambient Light Sensor window group 5 Click the Sensitivity drop down list and select the desired setting For brighter environments set the sensitivity setting to a lower value F...

Страница 29: ...OCS 900N 2 Login using the required credentials 3 Click Sensors in the side menu bar 4 Locate the Ambient Temperature Sensor window group The current ambient temperature will be displayed 5 In the pro...

Страница 30: ...of a broker server and one or more clients For example in the Figure 1 2 the AT OCS 900N is connected to a LAN along with two other clients and a broker Client A and Client B will now subscribe to a...

Страница 31: ...enable the feature When enabled this toggle switch will be green 5 Under Connection Settings do the following a Enter the address of the broker in the Broker field b Enter the port number in the Port...

Страница 32: ...e message 2 Exactly once The highest level of service and guarantees that each message is received only once by the intended recipients The guarantee is provided by at least two request responses betw...

Страница 33: ...tions similar to the UDP protocol where there is no guarantee of delivery from the client to the broker The recipient does not acknowledge receipt of the message and the message is not stored and re t...

Страница 34: ...web server is launched for the first time Web Server First Time Registration page Username Enter the desired username in this field The username must be 5 16 characters in length and can be any combin...

Страница 35: ...terfaces This page is displayed when the IP address of the AT OCS 900N is entered in the address bar of a web browser Login page Username Enter the username in this field Password Enter the password i...

Страница 36: ...uct Hardware The hardware version Serial Number The serial number of the unit Firmware Version The version of firmware that the AT OCS 900N is running Always make sure to check the AT OCS 900N product...

Страница 37: ...it Gateway The default gateway router for the network Hostname The hostname of the unit MAC The Media Access Control MAC address of the AT OCS 900N DNS 1 DNS 2 The address of the DNS servers System In...

Страница 38: ...ed motion since the unit was powered on If there is constant motion being detected this clock will continue to run until movement is no longer detected Time format is in days hours minutes and seconds...

Страница 39: ...alues can be changed Refer to Setting the LED Color page 26 for more information UDP TCP WS MQTT Each of these toggle switches provide quick enabling disabling of these protocols If a protocol is enab...

Страница 40: ...seconds where continuous motion must be detected before the event is triggered Valid ranges are integers from 0 to 120 Motion Off Event Sets the time period in minutes where no motion must be detecte...

Страница 41: ...n RGB Uses RGB values to specify the motion state color Valid ranges for each RGB color component are 0 to 255 Hex Used hexadecimal values to specify the motion state color Valid range is 000000 to FF...

Страница 42: ...this drop down list to specify the sensitivity setting Valid ranges are 0 to 5 Events Sets the sensor communication threshold This is the minimum value required to trigger and event The communication...

Страница 43: ...le or disable subscription of the information in the row IP Address Port Motion Light Temp UDP Settings This section allows the sensor to process any incoming messages to port 9000 If UDP is disabled...

Страница 44: ...sable the feature When a feature is enable the checkbox will be checked Save Click this button to commit changes Save Click this button to commit changes TCP Settings Enabling TCP will allow the senso...

Страница 45: ...et to 0 zero then the keep alive mechanism is deactivated Clean Session When a client connects to a broker it can do so in one of two ways non persistent clean or persistent connection Check this box...

Страница 46: ...age is not stored and re transmitted by the sender 1 At least once Guarantees that a message is delivered at least once to the receiver The sender stores the message until it receives a PUBACK packet...

Страница 47: ...tting Description 0 At most once Guarantees a best effort delivery It functions similar to the UDP protocol where there is no guarantee of delivery from the client to the broker The recipient does not...

Страница 48: ...eld Refer to Changing the Hostname page 19 for more information Enable TLS Click this checkbox to enable or disable Transport Layer Security TLS This feature is enabled by default When enabled the che...

Страница 49: ...e changed when Enable DHCP is disabled Subnet Mask Enter the subnet mask in this field This field can only be changed when Enable DHCP is disabled Primary DNS Secondary DNS Enter the IP address of the...

Страница 50: ...ed Refer to Resetting Login Credentials page 20 for more information User Page Username Enter the desired user name in this field New Password Enter the desired password in this field Confirm New Pass...

Страница 51: ...evice Information page 21 for more information Location Enter the location of the AT OCS 900N in this field Save Click this button to commit changes Choose File Click this button to select the firmwar...

Страница 52: ...he desired json settings file to the AT OCS 900N Identify Device Click this button to identify the AT OCS 900N within the room During the identification procedure the LED indicators within the unit wi...

Страница 53: ...to Logging in to the Web Server page 14 3 Click System in the menu bar 4 Locate the Upgrade Firmware window group and click the Choose File button Requirements AT OCS 900N Firmware file Computer on th...

Страница 54: ...ser and enter the IP address of Velocity 2 Access the Configure Equipment window for the AT OCS 900N Refer to the Velocity User Manual if necessary 3 The following screen will be displayed Driver Conf...

Страница 55: ...box is checked then the room will be turned on when occupied When this feature is enabled a checkmark will appear in the box If the Turn room off when there is no motion box is checked then the room w...

Страница 56: ...Refer to the Velocity User Manual for more information on creating and using macros The AT OCS 900N sensors will report their current values and display them in this window as shown in the illustrati...

Страница 57: ...no E524557 UKCA Power Consumption 1 1 W PoE 802 3af Compliance NDAA 899 Yes Environmental Fahrenheit Celsius Operating 32 to 122 0 to 50 Storage 40 to 158 40 to 70 Humidity RH 90 maximum non condensin...

Страница 58: ...Toll free US International atlona com 877 536 3976 41 43 508 4321 35280 R6...

Отзывы: