background image

AT-OMNI-111-WP

66

Appendix

FEC, Latency, and Lip Sync

• 

In order for FEC to work, the matrix must be filled in order to calculate the FEC packets. This introduces some 

additional latency.  Due to high bitrates, this is not noticeable for video, but can be very significant for audio.


Therefore, Atlona recommends either leaving FEC disabled for audio or using a very small matrix.

• 

Latency calculations are complex.  The tables below provide some common working benchmarks.  In order to 

minimize lip sync issues, try to match the additional latencies for video and audio as closely as possible.


»

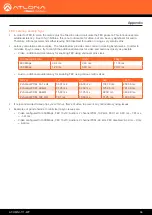
Video - additional video latency for enabling FEC using various matrix sizes.

• 

It is recommended to keep lip sync within ±1 frame of video to prevent any noticeable syncing issues.

•  Examples of good choices to minimize lip sync issues are:


»

Video configured for 450 Mbps, FEC 10x10; Audio is 2 channel PCM, 192 kHz, FEC 1x4: 6.40 ms – 7.81 ms 

= -1.41 ms


»

Video configured for 900 Mbps, FEC 10x10; Audio is 2 channel PCM, 48 kHz, FEC disabled: 6.40 ms – 0 ms 

= 6.40 ms


»

Audio - additional audio latency for enabling FEC using various matrix sizes.

Configured bit rate

4x4

10x10

20x20

900 Mbps

0.64 ms

3.20 ms

11.74 ms

450 Mbps

1.28 ms

6.40 ms

23.47 ms

Format

1x4

2x4

4x4

10x10

2 channel PCM, 44.1 kHz

34.01 ms

68.03 ms

136.10 ms

850.30 ms

2 channel PCM, 48 kHz

31.25 ms

62.50 ms

125.00 ms

781.30 ms

2 channel PCM, 96 kHz

15.63 ms

31.25 ms

62.50 ms

390.60 ms

2 channel PCM, 192 kHz

7.81 ms

15.63 ms

31.25 ms

195.30 ms

Содержание AT-OMNI-111-WP

Страница 1: ...AtlonaManuals NetworkedAV AT OMNI 111 WP Wallplate Networked AV Encoder OmniStream ...

Страница 2: ...AT OMNI 111 WP 2 Version Information Version Release Date Notes 1 Sep 2019 Initial release ...

Страница 3: ...tomer Support Welcome to Atlona Operating Notes IMPORTANT Visit http www atlona com product AT OMNI 111 WP for the latest firmware updates and User Manual Main Office Atlona Incorporated 70 Daggett Drive San Jose CA 95134 United States Office 1 877 536 3976 US Toll free Office 1 408 962 0515 US International Sales and Customer Service Hours Monday Friday 6 00 a m 4 30 p m PST http www atlona com I...

Страница 4: ...rms New Products 10 years from proof of purchase date for hardware electronics products purchased on or after June 1 2013 3 years from proof of purchase date for hardware electronics products purchased before June 1 2013 Lifetime Limited Product Warranty for all cable products Limited Product Warranty Terms Refurbished B Stock Products and Discontinued Products 3 years from proof of purchase date ...

Страница 5: ...cts or states do not allow the exclusion or limitation of relief special incidental consequential or indirect damages or the limitation of liability to specified amounts so the above limitations or exclusions may not apply to you Exclusive Remedy To the maximum extent permitted by law this limited product warranty and the remedies set forth above are exclusive and in lieu of all other warranties r...

Страница 6: ... 5 Do not use this product near water 6 Clean only with a dry cloth 7 Do not block any ventilation openings Install in accordance with the manufacturer s instructions 8 Do not install or place this product near any heat sources such as radiators heat registers stoves or other apparatus including amplifiers that produce heat 9 Do not defeat the safety purpose of a polarized or grounding type plug A...

Страница 7: ... 30 Selecting an EDID Preset 30 Using a Custom EDID 30 Copying an EDID from the Display 32 Encoder Grouping 35 Scrambling 37 Standard Method 37 Using the Virtual Matrix 38 Setting the Video Mode 39 Slate Logo Insertion 40 Adding Slates Logos 40 Deleting Slates Logos 43 Text Insertion 44 The AMS Interface 45 Device Info page 45 Input page 47 Serial page 50 Session page 51 Network page 54 Other page...

Страница 8: ... convenient installation wherever an aesthetically appealing or discreet AV source connection is required Introduction Features Package Contents 1 x AT OMNI 111 WP 1 x Black faceplate 1 x White Decora wallplate 1 x Black Decora wallplate 1 x 3 5 mm to DE 9 M F cable 4 x Spare screws 1 x Installation Guide Best in class AV over IP performance and reliability over Gigabit Ethernet US two gang enclos...

Страница 9: ...icator shows the input status 5 LINK This LED indicator is green when the link integrity between the AT OMNI 111 WP and the switch is good 6 RESET Press and release this button to reboot the AT OMNI 111 WP Note that this operation does not reset the unit to factory default settings 7 ETHERNET Connect an Ethernet cable from this port to the Local Area Network LAN 8 Fan This fan provides internal co...

Страница 10: ...NI 111 WP to the wall surface 4 Connect an HDMI cable from a HD UHD source to the HDMI IN port on the AT OMNI 111 WP 5 The PWR indicator on the front panel displays the power status When the AT OMNI 111 WP is powered the PWR LED initially turns red After a few moments it will turn amber and finally green 6 The AT OMNI 111 WP is now ready for operation IMPORTANT The venting holes surrounding the en...

Страница 11: ... HDMI AT OMNI 112 HDM I PWR LINK TM OMNI STREA M VOLU ME DISP LAY INPU T ID 1 2 1 2 AT OMNI 122 1 2 ID PWR LINK TM OMNI STREA M Display Display Display Display Display Laptop Media Player Camera LAN LAN AT OMNI 111 WP LAN HDMI HDMI AT OMNI 122 1 2 ID PWR LINK TM OMNI STREA M HDMI AT OMNI 121 1 2 ID PWR LINK TM OMNI STREA M HDM I IN AT OM NI 1 11 W P PWR HDM I LINK RES ET TM OMN ISTRE AM ...

Страница 12: ...twork Note that AMS will only be able to discover encoders if they are on the same VLAN In order for AMS to automatically assign multicast IP addresses to OmniStream encoders the destination IP addresses for the session streams must be cleared Configuration NOTE The following steps are required only if a pre existing multicast IP address is assigned to each session and if automatic assignment of t...

Страница 13: ...es from the fly out menu Configuration Arrow buttons 7 Click the Unassigned option 8 If the device isn t immediately listed click the left and right arrows at the bottom of the Unassigned list to scroll through all available devices ...

Страница 14: ... the computer that is running AMS located on the same subnet 169 254 xxx xxx subnet mask 255 255 0 0 Refer to Configuring a Static IP Address page 16 for more information on configuring an encoder in Auto IP mode If no OmniStream encoders are found then verify the following The computer that is running AMS must be on the same network as the OmniStream device Remove any network restrictions that ma...

Страница 15: ...lticast Unicast Address field Destination Multicast Unicast Address field 14 Locate the Audio section and delete the value in the Destination Multicast Unicast Address field SAVE button Destination Multicast Unicast Address field 15 Scroll down to the bottom of the page and click the SAVE button at the bottom of the Stream 1 window group ...

Страница 16: ...has AMS installed 3 Configure the PC to a static IP address that is on the same subnet as the encoder 4 Login to AMS Refer to Accessing Encoders in AMS page 12 for information on the login process 5 Locate the encoder under the Unassigned section within AMS 6 Click on the device 7 Under AMS click NETWORK in the menu bar 8 Click the DHCP Mode drop down list and select Static IMPORTANT Windows Befor...

Страница 17: ...0 Mbps The recommended bandwidth for 1080p60 video is also 450 Mbps Setting this field below these recommended values will result in lower quality video 4 Enter the bit depth from the Bit Depth drop down list 5 Select the chroma subsampling value from the Subsampling drop down list Available values are 4 2 0 4 2 2 and 4 4 4 6 Click the Force YUV toggle switch to enable or disable the use of YUV co...

Страница 18: ...from a source to an input on the encoder then the indicator will be green If no cable is connected then the indicator will be red Note that this indicator may also reflect the integrity of the cable if the cable is bad or does not maintain a secure connection then the Cable Present indicator may also be displayed as red If this is the case try a different HDMI cable ...

Страница 19: ...click the toggle switch so that it appears gray 5 Enter the destination multicast IP address in the Destination Multicast Unicast IP Address field within the range 224 0 0 0 through 239 255 255 255 6 Enter the port number in the Destination UDP Port field Session Configuration IMPORTANT AMS does not allow the same port numbers to be used on both video and audio Always specify unique ports for both...

Страница 20: ... PoE the PWR indicator will be green Check the Ethernet cable for possible damage or loose connections Red The encoder is booting Green The encoder is ready HDMI Red No source is connected to the input Check the HDMI cable for possible damage or loose connections Green The link integrity between the source and the encoder is good LINK Red Check the Ethernet cable for possible damage or loose conne...

Страница 21: ...ease the recessed button on the far right side of the unit using a small pointed object Rebooting the encoder does not reset the encoder to factory default settings Rebooting OmniStream Basic Operation RS 232 AT OMNI 111 WP PWR HDMI LINK RESET TM OMNISTREAM HDMI IN ...

Страница 22: ...arate single decoder HD MI IN AT OMNI 111 W P PW R HD MI LIN K RESET TM OMNISTREA M L A N 192 168 11 116 192 168 11 114 192 168 11 115 192 168 11 117 192 168 11 118 192 168 11 121 1 2 ID PW R LIN K TM OMN ISTRE AM 1 2 ID PW R LIN K TM OMN ISTRE AM 1 2 ID PW R LIN K TM OMN ISTRE AM E n c o d e r D e c o d e r D e c o d e r D e c o d e r HD MI IN AT OMNI 111 W P PW R HD MI LIN K RESET TM OMNISTREA M...

Страница 23: ...Decoder User Manual if necessary 6 Click IP INPUT from the menu 7 Remove the IP address from the Multicast Address field 8 Click the SAVE button to commit changes 9 Unicast setup is complete The decoder unit will now receive streams exclusively from the encoder containing the IP address of this decoder Field should be blank ...

Страница 24: ...y 2 The AMS Dashboard will be displayed 3 Click the icon in the upper left corner of the AMS Dashboard 4 Click Virtual Matrix from the fly out menu Refer to The Virtual Matrix page 60 if necessary 5 Locate the desired encoder in the Virtual Matrix as shown on the next page 6 Create a cross connection to the desired decoder When a cross connection is created AMS will automatically assign a multicas...

Страница 25: ...AT OMNI 111 WP 25 Basic Operation ...

Страница 26: ...e on both the OmniStream encoder and decoder Ethernet EAPOL EAP EAP Ethernet RADIUS Ethernet Normal traffic Supplicant Encoder or Decoder Authenticator Switch Extensible Authentication Protocol Authentication Server LAN HD MI PW R LIN K TM OMN ISTR EA M VO LU ME DIS PLA Y INP UT ID 1 2 1 2 Protocol Description none 802 1X protocol disabled PEAP MSCHAPv2 Protected EAP requires basic credentials in ad...

Страница 27: ...uired fields for that method will be displayed Enter the required information in each field For the PEAP MSCHAPv2 option the fields are described as follows 7 Click SAVE to commit changes Identity Enter the identity of the authentication server in this field PEAP uses this field to identify the correct authentication server which will process the credentials For example if foo authserv com is ente...

Страница 28: ... to collapse the options under both Network window groups Authentication Method Identity Password CA Certificate CA Certificate Client Private Certificate PEAP MSCHAPv2 EAP TLS 8 Refer to the table below for a list of available authentication methods An orange dot indicates that this field will be displayed as part of the method ...

Страница 29: ...cate the Audio section under the desired Stream and click the Enable AES67 toggle switch to enable this feature When enabled the toggle switch will be green 5 Select the type of downmixing from the Downmixing drop down list if desired Available options are None Mono or Stereo 6 Click the SAVE button within the Stream window group 7 Go to the decoder interface and click OTHER in the menu bar 8 Clic...

Страница 30: ...DID Name field Spaces and special character are valid entries Use a descriptive name for this field 4 Click the SAVE button to commit changes EDID Management OmniStream encoders provide EDID management for each input The encoder can be assigned one of several included EDID presets or can be assigned a custom EDID Raw EDID data can be copied from displays or other sink devices that are connected to...

Страница 31: ... that the available EDID selections will depend upon the current video mode Refer to Setting the Video Mode page 39 for more information Common EDID 2CH LPCM MCH LPCM DTS Dolby Dolby Digital DTS HD MA Dolby True HD 1080P 2CH Yes No No No No No No 1080P DD No No Yes Yes No No No 1080P MCH No Yes Yes Yes Yes Yes Yes PC application mode only EDID 2CH LPCM MCH LPCM DTS Dolby Dolby Digital DTS HD MA Do...

Страница 32: ...or Dolby True HD audio streams DTS X is carried with DTS HD MA audio streams 1 Login to AMS and access the desired decoder Refer to Accessing Encoders in AMS page 12 except instead of clicking on an encoder click on a decoder AT OMNI 121 AT OMNI 122 or AT OMNI 521 2 Make sure the display where the EDID will be fetched is connected to the decoder Select the desired decoder from within AMS 3 Click H...

Страница 33: ...select the data in this field then press CTRL C to copy the data Advanced Operation Display s EDID 5 Select the desired encoder within AMS 6 Click INPUT in the menu bar 7 Click the EDID drop down list in the desired HDMI Input window group 8 Scroll down to the bottom of the list and select Add Custom EDID Add Custom EDID ...

Страница 34: ...ies Use a descriptive name for this field 10 Paste the EDID data into the Raw EDID field by pressing CTRL V 11 Click the SUBMIT button to commit changes or click CANCEL to abort the addition of the custom EDID Once a custom EDID is created it will be added to the drop down list and can be selected without re entering the information ...

Страница 35: ... will be displayed by the decoder using either manual or automatic input selection based on the presence of a source signal Advanced Operation Group Name Encoder IP address 5 Under Members click the ADD button and enter the IP address of the encoder to be added to the group 6 Click the Interface drop down list to select the desired interface 7 Click the SUBMIT button to commit changes to the encod...

Страница 36: ...nable the input When set to manual click the Activate button to perform the input switching input connected Use this setting to allow the encoder group to use automatic input detection Once a new source is connected that source becomes the active source NOTE Setting Trigger to input connected should not be used when Slate Mode is set to Auto Doing so will cause the slate to be displayed when switc...

Страница 37: ... streams cannot be scrambled By default scrambling is disabled Scrambling 1 Login to AMS Refer to Accessing Encoders in AMS page 12 if necessary 2 Click SESSION in the menu bar 3 Under the desired Stream click the Scrambling toggle switch to enable it Once enabled the toggle switch will be green and the Key field will be displayed Standard Method 5 Click the Save button at the bottom of the page t...

Страница 38: ... displayed If the key icon for a decoder is clicked then the Descrambling dialog box will be displayed 4 Click the Enable toggle switch to enable scrambling for the desired session Key icon 5 Enter the desired scrambling key using one of the following methods Manual enter a user defined key in the Key field Click the icon to generate a random key using AMS Each time this icon is clicked a new scra...

Страница 39: ...e HDMI Input 1 window group 4 Click the Video Optimization drop down list to select the desired mode 4 Click the SAVE button within the Video Optimization window group to commit changes Note that switching between video modes may take a few moments to complete 5 Go to the decoder interface and repeat the process Refer to the OmniStream Single Channel Dual Channel A V Decoder User Manual if necessa...

Страница 40: ...image is unique to the specified HDMI output Refer to the OmniStream Single Channel Dual Channel A V Decoder User Manual for information on managing slate logo insertion on decoder units 1 Login to AMS Refer to Accessing Encoders in AMS page 12 if necessary 2 Click OTHER in the menu bar 3 Verify that Logo is selected near the upper left corner of the screen Logo is the default selection and applie...

Страница 41: ...n proceed with Steps 9 through 13 If the image will be used as a slate skip to Step 14 9 Under the HDMI Input Logo window group click the Select Logo drop down list and select the desired logo To prevent the image from being displayed select the Not used option Advanced Operation Image window group ...

Страница 42: ... Click INPUT in the menu bar then click the SHOW ADVANCED button 15 Click the Slate mode drop down list and select Off Manual or Auto 16 Click the Slate Logo drop down list and select the desired image Note that if Slate Mode is set to Off then this field will not be visible 17 Click the SAVE button to apply all changes Mode Description Off Disables the image from being displayed Manual The image ...

Страница 43: ... and the associated image will be deleted from the encoder If the DELETE button is disabled do the following a Locate the HDMI Input Logo window groups b Click the Select Logo drop down list and select Not Used c Click the SAVE button d Refresh the page e Click the DELETE button to remove the logo Follow the instructions below to remove a logo slate image Deleting Slates Logos ...

Страница 44: ...ation field Set this field to 0 zero to set the number of iterations to infinity 7 Click the Color drop down list to select the color of the text The Red Green and Blue fields can be changed to further modify the color of the text Adjust the Alpha field to control the transparency of the text A value of 255 is opaque and a value of 0 is transparent Numbers from 0 to 255 are valid for each of these...

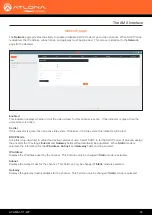
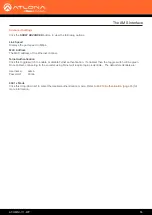
Страница 45: ...s Displays the IP address of the encoder MAC Address Displays the MAC address of the encoder Firmware version The version of firmware that the encoder is running Always make sure the latest version of firmware is installed FIRMWARE UPDATE Click this button to update the firmware Description Provides the option of assigning descriptive name to the unit Location Provides the option of assigning desc...

Страница 46: ...r any logs and alarms Buttons Disabling this feature will lock the ID button on the front panel This feature is enabled by default LEDs Disabling this feature will turn off all LED indicators on the front panel This is enabled by default Option Description None Checked Resets the encoder with no factory default settings Reset User Resets the encoder to factory default settings and resets custom us...

Страница 47: ... Click this drop down list to select the desired maximum chroma subsampling value Any input with a higher chroma subsampling will have their chroma scaled to the configured value using a very high quality chroma scaler to preserve quality Force YUV When this toggle switch is enabled green it will force the output of the decoder to output YUV regardless of whether the input to the encoder is RGB or...

Страница 48: ...x2160p30 with multichannel PCM audio ATL 2560x1600 2CH 2560x1600p60 with two channel PCM audio ATL 2560x1600 MCH 2560x1600p60 with multichannel PCM audio ATL 4K60 MCH 3840x2160p60 with multichannel PCM audio ATL 4K60 PCM_MCH 3840x2160p60 with two channel multichannel PCM audio ATL 720P DD 1280x720p60 with Dolby Digital audio ATL 720P 2CH 1280x720p60 with Dolby Digital two channel audio HDCP Encryp...

Страница 49: ... mode or select the desired slate to be used Refer to Slate Logo Insertion page 40 for more information Video Optimization Sets the output video mode Refer to Setting the Video Mode page 39 for more information Click the SHOW ADVANCED button to view the following options Advanced Settings ...

Страница 50: ...AT OMNI 111 WP 50 The AMS Interface Serial page IMPORTANT The AT OMNI 111 WP does not currently support serial RS 232 functionality However the page is listed within AMS ...

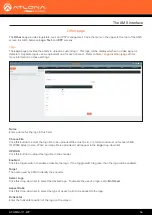
Страница 51: ...rt Not Used Ethernet interface is disabled SAP Click this switch to enable to disable the Session Announcement Protocol When enabled the toggle switch will be green Scrambling Click this toggle switch to enable green or disable scrambling Key This field is only displayed if the Scrambling toggle switch is enabled green Enter the scrambling key in this field The scrambling key must be ASCII and mus...

Страница 52: ... default value is 255 seconds Source Input Select the desired HDMI input from the Source drop down list Enable AES67 Click this toggle switch to enable AES67 When this feature is enabled the toggle switch will be green Downmixing This field will only be available when AES67 is enabled Enable Audio Click the toggle switch to enable the audio stream By default audio streaming is disabled Destination...

Страница 53: ... unreliable due to noise or other factors By default this feature is enabled Refer to FEC Details page 65 for more information FEC rows Specify the number of FEC rows in this field Refer to FEC Details page 65 for more information FEC Columns Specify the number of FEC columns in this field Refer to FEC Details page 65 for more information Group Name The name of the encoder group Enable Encoder Gro...

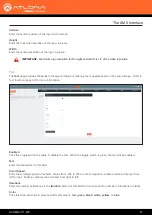
Страница 54: ...wise if no link exists this indicator will be red DHCP Mode Click this drop down list to select the desired network mode Select DHCP to let the DHCP server if present assign the encoder the IP settings Subnet and Gateway fields will automatically be populated When Static mode is selected the information for the IP Address Subnet and Gateway fields must be entered IP Address Displays the IP address...

Страница 55: ... Click this toggle switch to enable or disable Telnet authentication If enabled then the toggle switch will be green Once enbled connecting to the encoder using Telnet will require login credentials The default credentials are Username admin Password Atlona 802 1x Mode Click this drop down list to select the desired authentication mode Refer to 802 1X Authentication page 26 for more information Ad...

Страница 56: ... Click this button to select the logo file to be uploaded Files must be in png format and must not exceed 5 MB 5120000 bytes in size When an image file is uploaded it will appear in the Logo drop down list UPLOAD Click this button to upload the logo file to the encoder Enabled Click the toggle switch to enable or disable the logo If the toggle switch is green then the logo will be enabled Target T...

Страница 57: ...disable the text When the toggle switch is green the text will be enabled Text Enter the desired text in this field Scroll Speed Enter the scrolling speed in this field Values from 255 to 255 are valid Negative numbers will scroll the text from left to right Positive numbers will scroll text from right to left Iterations Enter the number of iterations in the Iteration field Set this field to 0 zer...

Страница 58: ...ese fields The AMS Interface Click the SHOW ADVANCED button to view the following options The PTP page provides options for adjust Precision Time Protocol PTP for AES 67 audio streams PTP is used by AES67 to keep all audio streams synchronized For a system utilizing PTP all devices undergo an automatic self election process to choose the interface to be used as the PTP grandmaster GM clock based o...

Страница 59: ...riority number in this field Is GM Present This indicator displays the existence of a grandmaster clock for the specified PTP domain number If the indicator is green then the grandmaster clock exists on this interface GM Identity The grandmaster clock identity If this field is blank then it means that this interface is the grandmaster clock Master Offset Displays the grandmaster clock offset ...

Страница 60: ... Refer to Accessing Encoders in AMS page 12 if necessary 2 Click the icon in the upper left corner of the AMS Dashboard 3 Click Virtual Matrix 4 The OmniStream Virtual Matrix page will be displayed The Virtual Matrix The AMS Interface ...

Страница 61: ...e displayed on HDMI 1 on the decoder This will create a cross connection which connects both the encoder and decoder together Creating a cross connection To route an input on an encoder to an output locate the row and column where an input and output intersect then click the square with the dots around it Removing a cross connection To remove a cross connection click on the desired circle icon wit...

Страница 62: ...s a dark blue circle with the letter D The icons in the upper left corner can also act as a filter This allows for a clear breakdown of where signals are being routed and is useful when several encoders and decoders are used on a network Symbol Description Video only Audio only Data only Connected not all signals are active Connected all streams are being used V A D IMPORTANT R Type and Pro compat...

Страница 63: ... 1 to 2 minutes For full functionality of OMNI 1 2 1 or later Velocity must be running at least 1 4 5 and AMS must be on firmware version 2 0 12 and above 1 Click DEVICE INFO in the menu bar 2 Click the UPDATE FIRMWARE button to display the Firmware Update dialog Drag firmware file here Uploaded firmware file 3 Click and drag the firmware file to the yellow box to upload the firmware to the device...

Страница 64: ...tes that a firmware update is in progress The progress bar for the update process will be displayed The update process should take a few seconds 7 Click the X to close out the progress bar window then click the CLOSE button to dismiss the Firmware Update message box 8 The firmware update process is complete 9 Clear the web browser cache and refresh the web page The new firmware version will appear...

Страница 65: ...nc as tight as possible FEC latency overhead is also inversely proportional to bitrate the higher the bitrate the less FEC latency is introduced For applications where lip sync is very critical using a higher audio sampling rate and thus a higher audio bitrate can result in more accurate lip sync The bitrate configured on the video encoder includes FEC overhead and will automatically adjust itself...

Страница 66: ...ng various matrix sizes It is recommended to keep lip sync within 1 frame of video to prevent any noticeable syncing issues Examples of good choices to minimize lip sync issues are Video configured for 450 Mbps FEC 10x10 Audio is 2 channel PCM 192 kHz FEC 1x4 6 40 ms 7 81 ms 1 41 ms Video configured for 900 Mbps FEC 10x10 Audio is 2 channel PCM 48 kHz FEC disabled 6 40 ms 0 ms 6 40 ms Audio additi...

Страница 67: ...between encoder and decoder 1 5 frames in Fast Switching mode e g 1080p 60 Hz latency is 24 ms between encoder and decoder Note Unusual network configurations may increase overall latency LPCM 2 0 LPCM 5 1 LPCM 7 1 Dolby Digital Dolby Digital Plus Dolby TrueHD Dolby Atmos DTS DTS HD Master Audio Video HDMI Specification HDMI 2 0b HDCP 2 2 UHD HD SD VESA 3 Virtual Reality 2160 1200 90 1 Hz HTC Vive...

Страница 68: ...table aspect ratio keep or stretch horizontal vertical size screen position slate mode can be set to off manual image always displayed superimposed on the source signal and will remain if source signal is lost auto image will only be displayed when source signal is lost Protocols Video Streaming RTP Audio Streaming RTP up to 7 1 channels AES67 up to LPCM 7 1 channels Addressing DHCP static Encrypt...

Страница 69: ...d names and trademarks or registered trademarks are the property of their respective owners Pricing specifications and availability subject to change without notice Actual products product images and online product images may vary from images shown here Toll free US International atlona com 877 536 3976 41 43 508 4321 ...

Отзывы: