background image

5

Getting Started

Charging the Battery

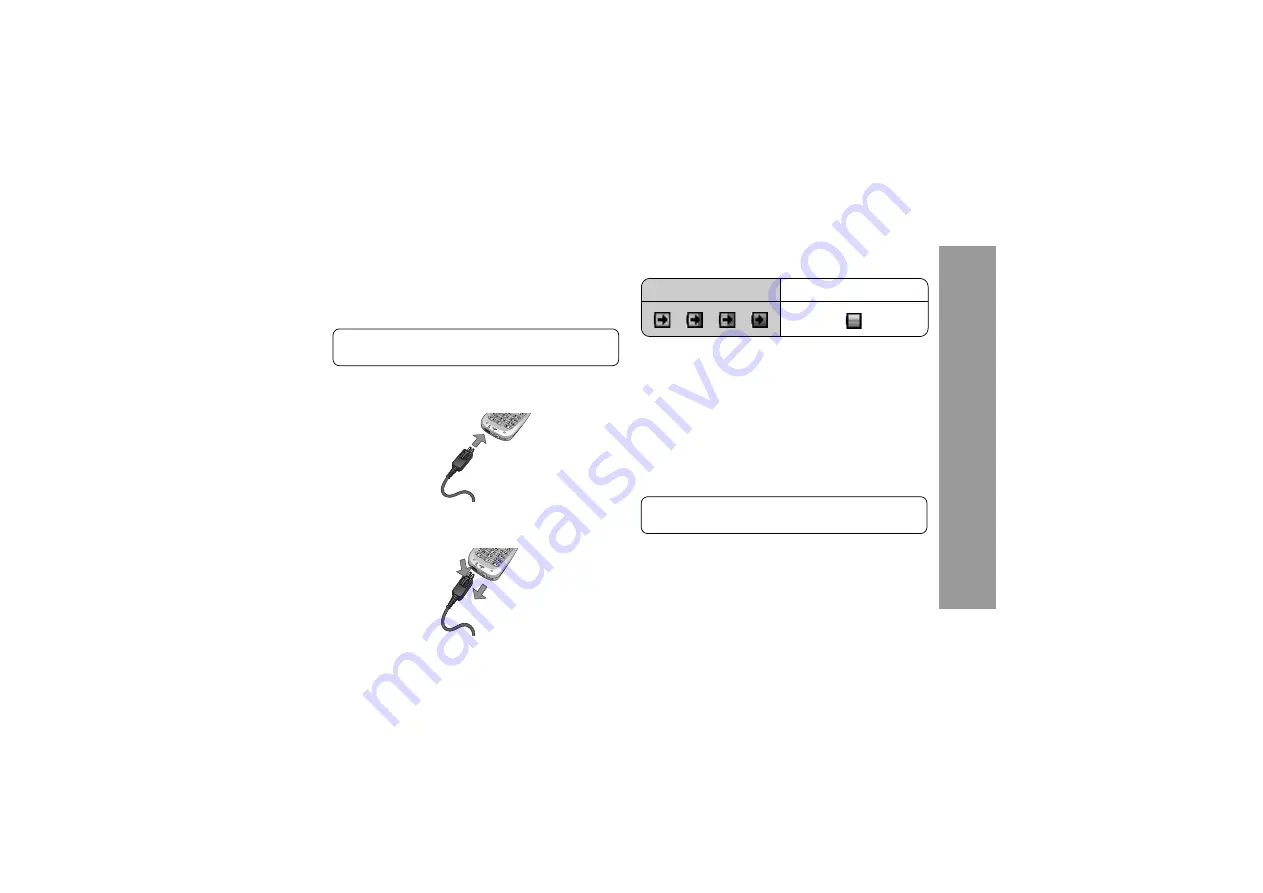
Connecting and disconnecting the Fast Travel Charger

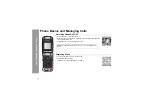
The battery must be attached in the phone before the charger is 
connected. Press the button on the top of the connector and 
insert it into the base of the phone.

Connect the charger to the mains power supply. When the 
phone is charging, the charging indicator will light and a 
scrolling icon will appear in the main display. 

When charging is complete switch off the mains power supply 
and disconnect the charger.

Operation of Battery Level Indicator

Charging Indicator will go out when charging is completed.

Low Battery Power Warning

When the battery power is low, a warning tone will sound and a 

Battery low

 message will be displayed. If this occurs during 

conversation, finish your call immediately. The power will 
automatically switch off after the warning tone. Fully recharge 
the battery. See “Charging the Battery”. (Calls can be made and 
received while the phone is charging.)

NOTE:

 Do not force the connector as this may damage the 

phone and/or the charger.

1

2

While charging

Charging complete

NOTE:

 Some settings may be lost if the battery is removed 

or remains discharged for more than 1.5 hours.

Содержание X66

Страница 1: ...Printed in Philippines www panasonicmobile com 15 03 04...

Страница 2: ...ne ON OFF 14 Displaying Menu 14 Making Calls 15 Answering Calls 17 Ending Rejecting Calls 17 Managing Calls 18 In Call Options 19 Call log 23 Explore the menus 25 Settings menu structure 26 Settings 2...

Страница 3: ...Options Set as bookmark 88 Browser Options Reload page 89 Browser Options Advanced 90 Browser Options Settings 93 Games 94 Selecting Games 94 Settings 96 Applications menu structure 97 Applications 9...

Страница 4: ...Ensure the voltage rating of the Fast Travel Charger is compatible with the area of use when travelling abroad A Fast Travel Charger EB CAX70xx is supplied with the Main Kit Other recommended equipme...

Страница 5: ...akers and hearing aids Do not leave the camera facing direct sunlight to avoid impairing the camera performance For most efficient use hold the phone as you would any normal phone To avoid deteriorati...

Страница 6: ...not leave the equipment in direct sunlight or a humid dusty or hot area Never throw a battery into a fire It may explode Keep metallic items that may accidentally touch the terminals away from the eq...

Страница 7: ...fore removing the battery ensure that the phone is switched off and the charger is disconnected from the phone Insert the SIM Remove the SIM NOTE If you are upgrading your phone and your previous phon...

Страница 8: ...e charger Operation of Battery Level Indicator Charging Indicator will go out when charging is completed Low Battery Power Warning When the battery power is low a warning tone will sound and a Battery...

Страница 9: ...f Earpiece Camera Lens Self Portrait Mirror Watch yourself when taking a self portrait Illumination Light Infrared Port Charging Connector Pause Key Quiet Mode Setting Key Multi Function Key Camera Sh...

Страница 10: ...ey Perform function displayed in lower left corner of the display From Idle press to open Messages Menu Right Soft Key Perform function displayed in lower right corner of the display Mainly used to ca...

Страница 11: ...ntering a phone number Asterisk Key During text entry mode press to switch between upper case and lower case letters Changes Input mode Hold Pause Key Press and hold to enter a pause P while entering...

Страница 12: ...enus Short press from Idle Long press from Idle Display With some operations the display automatically clears after 2 5 seconds or after pressing any key Main Display Key Function A or 7 Messages or 3...

Страница 13: ...Battery is charging GPRS is active Profile setup SMS message storage area is full MMS message storage area is full Java Suspended Unread SMS message Unread MMS message Icon Indicates Unread Wap push...

Страница 14: ...ne is opened or the Multi Function Key is pressed Mobile phone status Open LED goes out by pressing any key or if phone is closed Message notification SMS or MMS or WAP Push Green Mobile phone status...

Страница 15: ...ossibility of moving in any direction up down left and right on the display screen with the Navigation key 4 Shows possibility of moving up and down on the display screen with the Navigation key 2 Sho...

Страница 16: ...the centre of the Navigation key to open the main menu display The main menu display has 9 options Main menu Press to CANCEL EXIT or to perform function displayed in lower right corner Press to perfo...

Страница 17: ...the phone is switched on a greeting may be displayed and the phone then enters the Idle mode Press and hold D again to switch phone off Displaying Menu 1 To access the Menu press in Idle mode 2 The Me...

Страница 18: ...re network name and appear on the display Standard Dialling 1 Enter phone number 2 C Contacts Dialling 1 5 Contacts see Shortcuts on page 9 2 4 required contact C Recent Number Dialling Calls Made or...

Страница 19: ...gency Call To make an emergency call the antenna must be present If SIM is installed enter emergency number C If SIM is not installed 1 A 2 4 SOS 3 A NOTE Many countries regions include an initial 0 i...

Страница 20: ...17 Phone Basics and Managing Calls Answering Calls Press any key except D Ending Rejecting Calls D or fold the phone during an incoming call to reject the call or end a call in progress...

Страница 21: ...ears in lower part of the display or you receive an SMS notification depending on the local service remains on the display until you have listened to all your voice messages 2 Press and hold to automa...

Страница 22: ...ear Swapping Between Handsfree and Handheld Calls During a Handheld call A 4 Handsfree A During a Handsfree call A 4 Handheld A Option When A or is pressed Hold Call Put a call on hold To resume A 4 R...

Страница 23: ...es allowing the number to be dialled upon recall and the DTMF number to be sent automatically Send DTMF Tones During a Call Press digits Pause Dial Using pauses allows you to send DTMF tones automatic...

Страница 24: ...then press C A to answer the incoming call Making a Second Call During a call Enter second phone number and C or A for options and select required contact from Contact list and C The first call is pu...

Страница 25: ...u can select an individual from the multi party call and split the conversation allowing you to talk privately without the participation of the rest of the parties in the multi party call 1 During a m...

Страница 26: ...om stored numbers Viewing Call log 1 C 2 2 Dialled numbers Answered calls or Missed calls 3 4 required phone number Sending Messages 1 C 2 2 Dialled numbers Answered calls or Missed calls 3 4 required...

Страница 27: ...equired icon 8 Enter as appropriate If required repeat steps 7 and 8 9 A Options in Call log In each Call log list the following options are available For options A Option When A or is pressed Call Ca...

Страница 28: ...ers are SIM dependent E My Media Pictures Sounds Shortcuts Text templates Memory status Contacts Contacts list Add contact Call log Speed Dial list View groups Advanced Service numbers Camera Applicat...

Страница 29: ...al Quiet Meeting Outdoor Car Incoming Tone Message Tone Ring Volume Key Tone Key Volume Warning Tone Display language Input language New Search Select Network Search Mode PIN entry Change PIN2 Fixed D...

Страница 30: ...fferent environments for instance you might want to create a Quiet profile a Meeting profile with a ring tone appropriate for formal occasions and an Outdoor profile for loud environments Within each...

Страница 31: ...ad A 5 4 required data A Message Tone From Profiles menu 1 4 required profile A 2 4 Edit A 3 4 Message Tone A 4 4 Preinstalled My Media or Download A 5 4 required data A Ring Volume From Profiles menu...

Страница 32: ...me From Profiles menu 1 4 required profile A 2 4 Edit A 3 4 Key Volume A 4 4 2 adjust the volume level 0 4 A Warning Tone From Profiles menu 1 4 required profile A 2 4 Edit A 3 4 Warning Tone A 4 4 On...

Страница 33: ...nt ring tones assigned Changing Incoming Tone From Sound menu 1 4 Incoming Tone A 2 4 Preinstalled My Media or Download A 3 4 required data A Changing Message Tone From Sound menu 1 4 Message Tone A 2...

Страница 34: ...Tone From Sound menu 1 4 Key Tone A 2 4 required tone A Setting Key Volume From Sound menu 1 4 Key Volume A 2 4 2 adjust the volume level 0 4 A Setting Warning Tone From Sound menu 1 4 Warning Tone A...

Страница 35: ...32 Settings Vibration Alert Vibration Alert Setting Vibration Alert can be set to indicate an incoming call and a received message From Vibration Alert menu 4 On or Off A Settings Vibration Alert...

Страница 36: ...ss A Setting Display Colour Theme From Display menu 1 4 Colour Theme A 2 4 required colour A Setting Display Contrast From Display menu 1 4 Contrast A 2 4 adjust the contrast level 5 5 A Setting Backl...

Страница 37: ...one uses for display messages and or text entry From Language menu 1 4 Display language or Input language A 2 4 required language A Data connections GPRS settings and CSD settings are stored in the Da...

Страница 38: ...M network menu 1 4 New Search A 2 4 required network A Select Network View available networks From GSM network menu 1 4 Select Network A 2 4 required network A 3 4 required option see page 36 A GSM ne...

Страница 39: ...ly or manually search for the other networks when roaming From GSM network menu 1 4 Search Mode A 2 4 Automatic or Manual A When the Search Mode is set to Manual the phone will only use a selected net...

Страница 40: ...u select Direct input enter phone number to divert If you select A after entering phone number 4 Ok A OR When you select From Contacts 4 required contact from contact list A Request of Call divert wil...

Страница 41: ...atus of Call Diverts the phone must be registered with a network F Call Divert settings Calls Settings Settings Explanation All calls Divert all incoming voice calls When busy Divert incoming voice ca...

Страница 42: ...my number It is possible to set whether or not to transmit your phone number to another phone Caller ID From Calls menu 1 4 Send my number A 2 4 Network set On or Off A Call Duration Displays the dura...

Страница 43: ...lls made Price Unit This is the cost that the service Provider charges for one unit of call time Max Cost Allows you to preset the maximum cost of calls made NOTE The duration of one unit may vary dur...

Страница 44: ...PIN2 From Security menu 1 4 Change PIN2 A 2 Enter the current code A 3 Enter the new code A 4 To verify the new code A Security Settings If PIN is entered incorrectly 3 times the phone will be locked...

Страница 45: ...ialled phone numbers must match a number already in the Fixed Dial Store If you store edit or delete a phone number you have to enter your PIN2 From Security menu 1 4 Fixed Dial A 2 4 Enable or Disabl...

Страница 46: ...elect enter password 4 digits A 3 4 On Off or Status A 4 When you select On or Off enter password 4 digits A Security Settings NOTE You can skip the following steps if you enter your password in step...

Страница 47: ...u 1 4 Time A 2 to enter the time using 24 hour clock A 3 4 Date A 4 to enter the date A Time and date Settings Time and date can be shown on the top of the display when in Idle mode NOTE Some settings...

Страница 48: ...e Adjust the brightness level While view finder is active you can adjust the brightness 3 to increase the brightness 7 to decrease the brightness Picture brightness indicators min 5 Lux Camera You can...

Страница 49: ...full pictures cannot be stored until some are deleted first Incoming Calls during Camera Operation If an incoming call etc is received during camera operation the phone will exit the camera mode and s...

Страница 50: ...sed image compression format JPEG image files can be viewed with most general image viewers and editors as well as with an Internet browser NOTE Do not leave the phone with the Camera facing direct su...

Страница 51: ...acter list 1 A B C 2 a b c 2 A B C 2 a b c 2 2 D E F 3 d e f 3 D E F 3 d e f 3 3 G H I 4 g h i 4 G H I 4 g h i 4 4 J K L 5 j k l 5 J K L 5 j k l 5 5 M N O 6 m n o 6 M N O 6 m n o 6 6 P Q R S 7 p q r s...

Страница 52: ...as upper case and subsequent letters as lower case Input mode indicator changes to abc or T9 If these characters Period or or are input the next character is input as upper case Input mode indicator...

Страница 53: ...a new message press and hold CLEAR to delete previous text if necessary 2 Press SHIFT to change letter case if necessary 3 Press Call is displayed Note that the displayed words change as you type alw...

Страница 54: ...nu structure Messages Create new Inbox Archive Settings Voicemail Cell Broadcast Memory status MMS SMS MMS SMS MMS SMS MMS SMS Call Mailbox Web mail SIM dependent Set Mailbox number On Off Read messag...

Страница 55: ...can be sent to another mobile phone with MMS capability or to an email address When you receive an MMS message a notice will inform you that you have received a message See page 57 An MMS profile may...

Страница 56: ...pictures Download Take new picture and insert it into the MMS message Add text Create text and add to MMS message Add sound Select sound stored in Stored sounds Download Record new sound and add to MM...

Страница 57: ...Add sound A then select a picture or sound or enter a text 3 4 Slides Slide option Press A to select option while Slides is highlighted Create new Messages Option When A or is pressed Add new Add sli...

Страница 58: ...y 7 4 Send Before sending a message the following options are available For options A Messages Create new Option When A or is pressed Add subject Add recipient Add subject to MMS message Add recipient...

Страница 59: ...est read Ask if the other party read the message Request delivery Check if your message has been delivered to the other party Validity Period Duration for which your message is stored at the message c...

Страница 60: ...with a tone illumination and or vibration From Inbox menu 1 4 MMS A 2 4 required message A Press A for the following options Messages Inbox Option When A or is pressed Receive Receive new message Rej...

Страница 61: ...he following options are available Messages Inbox Option When A or is pressed Reply Create Reply Message Reply to all Create Reply Message to the sender and all recipients of the message Forward Forwa...

Страница 62: ...ptions A Options list Archive Messages MMS Drafts Messages that are saved in the MMS mode are saved in Drafts If the transmission of an MMS message fails the message is stored in Unsent together with...

Страница 63: ...rom Settings menu Message server 1 4 MMS A 2 4 Advanced A 3 4 Message server A 4 4 required message server 5 Enter URL if you need From Settings menu Profile 1 4 MMS A 2 4 Advanced A 3 4 Profile A 4 4...

Страница 64: ...alidity Period Duration that your message is stored at the message centre Delivery attempts will be repeated until the message has been delivered or Validity Period 1 day 7 days or Maximum expires Aut...

Страница 65: ...sage Creating a Text Message From Create new menu 1 4 SMS A 2 Create text message max 459 characters see Text Entry on page 48 3 Enter destination number To send a message see page 63 When creating te...

Страница 66: ...Sending a Message When you have created your message see page 62 press A 1 4 Send A 2 Enter the destination phone number If you wish to select from Contacts 1 4 Send A 2 A 3 4 From Contacts A 4 4 requ...

Страница 67: ...Inbox Messages Option When A or is pressed Reply Create reply message to sender Forward Forward SMS messages Call Call sender s number Add to contacts Store sender s number to Contacts Use detail Call...

Страница 68: ...S Drafts The last message you edit in the SMS mode is saved in the Drafts Draft Option When A or is pressed Send Send text as SMS Sendtomany Send text to many recipients Templates Access to text templ...

Страница 69: ...nal Dialling on page 16 Setting Options From Settings menu 4 SMS A The following options can be set Settings Messages NOTE When the Message Centre number has been pre installed please do not change th...

Страница 70: ...From Voicemail menu 4 Call Mailbox A Stored mailbox number is dialled and you can listen to voice messages Connecting to Internet Mail From Voicemail menu 4 Web mail A Your phone is connected to the...

Страница 71: ...you are It s the fun way to chat on line More information on this service may be obtained by contacting your service provider Viewing Chat From Chat menu 4 Follow the screen contents Chat Messages It...

Страница 72: ...roadcast menu 1 4 On Off A 2 4 On or Off A Reading a Received Message From Cell Broadcast menu 1 4 Read messages A 2 4 required message A Options You can add edit and delete topics and languages From...

Страница 73: ...ry status From Messages menu 1 4 Memory status A 2 4 MMS A The current percentage of MMS saved in Phone are displayed Viewing SMS memory status From Messages menu 1 4 Memory status A 2 4 SMS A The cur...

Страница 74: ...one SIM Speed dial Search Group My Number Group Settings Memory status Copy from SIM Contacts Call log Dialled numbers Answered calls Missed calls NOTE When your phone is installed SIM compatible with...

Страница 75: ...ontacts Browsing Contacts You can search Contacts by name When browsing by name pressing a letter key will take you to the first entry starting with that letter From Contacts list menu 4 required cont...

Страница 76: ...l Call Contact Send message Send MMS SMS to the selected contact from Contacts list Edit Edit Contact Add contact Add Contact to Contacts list Copy to SIM Phone Copy Contact to SIM or Phone Speed dial...

Страница 77: ...n 3 Enter the name 4 4 phone icon 5 Enter the phone number A 6 A Options in SIM Contacts When the name is being entered the following options are available For Options list A Phone numbers can be stor...

Страница 78: ...one number A 6 4 telephone icon 7 Enter the telephone number A 8 4 email icon 9 Enter email address 104 picture icon 110 required picture from My Media or preinstalled pictures A 124 group icon 134 re...

Страница 79: ...ed calls or Missed calls 2 4 required phone number Dialling from Call log From Call log menu 1 2 Dialled numbers Answered calls or Missed calls 2 4 required phone number 3 C to call Sending Messages F...

Страница 80: ...icon 7 Enter as appropriate If required repeat steps 6 and 7 8 A Options in Call log In each Call log list the following options are available For options A Contacts Call log Option When A or is press...

Страница 81: ...Setting Speed Dial From Speed Dial list menu 1 4 required list When you select a phone number from Contacts press A instead of 2 Enter phone number A Viewing Stored Numbers In Idle Mode press and hol...

Страница 82: ...ups to identify them See Group settings on page 82 Viewing groups From View groups menu 4 required group A For options list A Contacts View groups Option When A or is pressed Call Call Contact Send me...

Страница 83: ...rofile or SIM Profile A 3 When My number is empty press A then go to step 5 When My number is already stored in SIM profile press A 4 4 Create A 5 4 name icon 6 Enter the name 7 4 phone icon 8 Enter t...

Страница 84: ...ons are available Advanced Contacts Mobile Profile View Display Option When A or is pressed Edit Transit to Edit screen Delete Delete profile Send by Infrared Send profile by Infrared SIM Profile View...

Страница 85: ...Advanced menu 1 4 Group Settings A 2 4 required group 3 Press and hold to remove the current name 4 Enter new group name Attaching a Sound to a Group From Advanced menu 1 4 Group Settings A 2 4 requi...

Страница 86: ...emory status shows how many locations are available in the contacts From Advanced menu 4 Memory status A Copy from SIM It is possible to copy SIM Contacts to Phone Contacts From Advanced menu 4 Copy f...

Страница 87: ...ns GPRS and CSD setting Those configuration Options will be given by Network service provider Once completing the entry press A Save then press or select Activate after A Options is pressed The first...

Страница 88: ...85 Browser Viewing the Contents From Browser menu Select menu In each list these options are available see page 86 For options A Browser...

Страница 89: ...s is saved in My Media Set as bookmark The displayed URL will be saved in Bookmarks Reload page Reload this page Advanced Go to home page clear the cache go to Service Inbox view URL or view WAP infor...

Страница 90: ...e URL A to select options Browser Options Enter address The URL can be displayed by entering the address From Browser menu or Content 1 A Options 2 4 Enter address A 3 Enter URL Browser From embedded...

Страница 91: ...s can be saved in My Media From Content 1 A Options 2 4 Save image A 3 4 to see whole image 4 A to save Browser Options Set as bookmark Favourite URLs can be saved in bookmarks From Content 1 A Option...

Страница 92: ...89 Browser Browser Options Reload page Current Page can be reloaded From Content 1 A Options 2 4 Reload page A to reload this page Browser...

Страница 93: ...rowser 1 A Options 2 4 Advanced A Browser Options Advanced Home Phone jumps to the set up Homepage From Advanced menu 1 4 Home 2 A to jump to home page Browser Options Advanced Clear cache Cache is cl...

Страница 94: ...d menu 1 4 Service Inbox A 2 to load the URL A to select option When text and URL are delivered from your service provider the following options are available Go to page Jump to the URL page View mess...

Страница 95: ...u or Content Browser 1 A Options 2 4 Advanced A Browser Options Advanced View address View URL of the contents From Advanced menu 1 4 View address A Browser Options Advanced WAP information View WAP i...

Страница 96: ...up From Settings menu 1 4 WAP profiles A 2 4 required profile 3 to activate A to select options Browser Options Settings Push access Push access is set up From Settings menu 1 4 Push access A 2 4 On o...

Страница 97: ...to move the tile to the open space in each direction When you collect an item spring or stopwatch on a tile the item becomes available and can be used by the and The spring enables you to jump skippi...

Страница 98: ...hey are all face up green within a specified time limit Key Operation 0 or and to move the character or to turn over four tatami mats above below or on the left right of the character MobileGolf This...

Страница 99: ...changed From Settings menu 4 required setting A Games Settings Settings Explanation Sound volume Volume setting for game applications Backlight ON OFF setting of Backlight in game applications Reset...

Страница 100: ...97 Applications menu structure Applications menu structure Infrared Calculator Sound recorder Alarm Applications SIM Tool Kit NOTE SIM Tool Kit is SIM dependent E The menu name will be changed...

Страница 101: ...or Weekend A 4 4 sound set up icon 4 Preinstalled My Media or Download A 4 required ring type A When you select My Media to select required ring type 5 4 volume icon 0 adjust the volume A 6 A to save...

Страница 102: ...unction lets the alarm repeat 5 times if you do not press A after stopping the alarm or press D to stop the alarm To stop Snooze Function Phone on Press A Ok when Stop snooze appears in the display If...

Страница 103: ...S you can access the MMS menu To play a sound after step 2 To stop playback A Calculator The four function calculator enables the user to perform simple arithmetic calculations addition subtraction mu...

Страница 104: ...unicating devices The infrared ports of both devices must point at each other If you use a PC you need to set up an infrared connection on the PC Example Start Settings Control Panel Infrared Options...

Страница 105: ...Infrared menu to activate Sending Pictures and Sounds From Idle display 1 2 0 My Media A 3 4 Pictures or Sounds A 4 4 required item A 5 4 select data to send A 6 4 Send by Infrared A Applications If...

Страница 106: ...s A 3 4 Contacts list A 4 4 select contact to send A 5 4 Send by Infrared A Receiving Data via Infrared Port You need to activate infrared before receiving data Data received message is displayed then...

Страница 107: ...rom Calendar menu 0 will display recent and future calendars For options list A Calendar Option When A or is pressed Go to date Jump to the required date Week starts on With the calendar it is possibl...

Страница 108: ...My Media menu structure Memory status Pictures Stored pictures Download Take new picture Stored sounds Download Record new sound Create MMS Inbox MMS Create SMS Inbox SMS Profiles Alarm Shortcuts Tex...

Страница 109: ...Downloading Picture Image File From Pictures menu 1 4 Download A 2 The picture image file download site will be displayed Taking a Picture From Pictures menu 1 4 Take new picture A 2 The phone switche...

Страница 110: ...ures Option When A or is pressed Send MMS Attach pictures to MMS Messages see MMS Message Send by Infrared Send pictures to another device by Infrared As wallpaper Use pictures as Wallpaper Add to con...

Страница 111: ...itches to Sound recorder mode see page 100 Options in Sound File Stored Sounds When a sound is selected the following options are available For options list A My Media Sounds Option When A or is press...

Страница 112: ...d content In shortcuts menu the following options are available For options A My Media Shortcuts Option When A or is pressed Edit Overwrite the present Shortcut with a new one Move Move Shortcut to an...

Страница 113: ...d text as templates Editing the Text templates From Text templates menu 4 required template The display will turn back to Editing display For options list A My Media Text templates Option When A or is...

Страница 114: ...dia Memory status Memory status You can see how much data is stored in the individual folders in My Media My Media Memory status NOTE The memory in My Media is separate from the MMS storage and JavaTM...

Страница 115: ...nformation Setting No 2 Provisioning Information Setting No 3 Provisioning Information Setting No 4 Provisioning Information Setting No 5 Profile name Homepage Gateway Port Non secure Secure Data conn...

Страница 116: ...en charging The battery is not attached to the phone or when the battery has been deeply discharged the phone will take a short time until the indicator lights Leave the phone charging the battery for...

Страница 117: ...alls are barred Disable the incoming call barring The phone is not registered to a network Move to a coverage area and operate your phone after it has registered with a network Emergency calls cannot...

Страница 118: ...and then back on if the message is still displayed contact your service provider Invalid SIM The SIM has failed one or more of the SIM personalisation checks contact your service provider Function una...

Страница 119: ...ock code verification of the new code is incorrect retry changing the lock code with correct verification Incorrect Code Disabling or enabling the lock code has failed due to incorrect entry of the lo...

Страница 120: ...r than setting up a continuous channel It makes very efficient use of available radio spectrum and users pay only for volume of data sent and received GSM Global System for Mobile communications The n...

Страница 121: ...e ability to use your phone on networks other than your Home network Service Provider The organization responsible for providing access to the GSM network SIM Subscriber Identity Module A small smart...

Страница 122: ...M Type 3 V only or 3V 5V Contacts Size 300 entries SIM Sound Recorder Each max record size 15 seconds Varies depending on My Media Games Pre Installed Games 5 Backlight Colours 1 White Ring Tones 10 F...

Страница 123: ...JbedTM ME Jbed JavaTM VM is the registered trademark of esmertec Inc T9 Text Input T9 is a trademark of Tegic Communications Inc T9 Text Input is licenced under one or more of the following U S Pat No...

Страница 124: ...121 Notes Notes...

Страница 125: ...9 Browser Options Save image 88 Browser Options Set as bookmark 88 Browser Options Settings Push access 93 Browser Options Settings Security 93 Browser Options Settings WAP profiles 93 Browser Options...

Страница 126: ...Input mode change 49 Inserting and Removing the SIM 4 International Dialling 16 International Dialling Prefix Key 8 K Keep Input mode 49 Key Tone 29 31 Key Volume 29 31 Keys 7 Keys Displays 6 L Langua...

Страница 127: ...tings 41 Select Network 35 Selecting Games 94 Self portrait 47 Send Key 7 Send my number 39 Sending a Message MMS 55 Sending a Message SMS 63 Sending Contacts Infrared 103 Sending Data Infrared 101 Se...

Страница 128: ...eshooting 113 truck 94 U Use and Save Pictures 46 V Vibration Alert 29 Vibration Alert Setting 32 Viewing Calendar 104 Viewing Call log 23 76 Viewing Chat 68 Viewing groups 79 Viewing Message Lists MM...

Страница 129: ...umber can be found on the outside of the phone under the battery For your convenience we recommend that you note the following details as a record of your purchase Part Number Serial Number Dealer Nam...

Отзывы: