background image

q

w

e

r

t y

i

!0

u

o

!1

ALC

BLC

OFF ON

ELC

ALC NC ELC

ALC

BLC

OFF ON

ELC

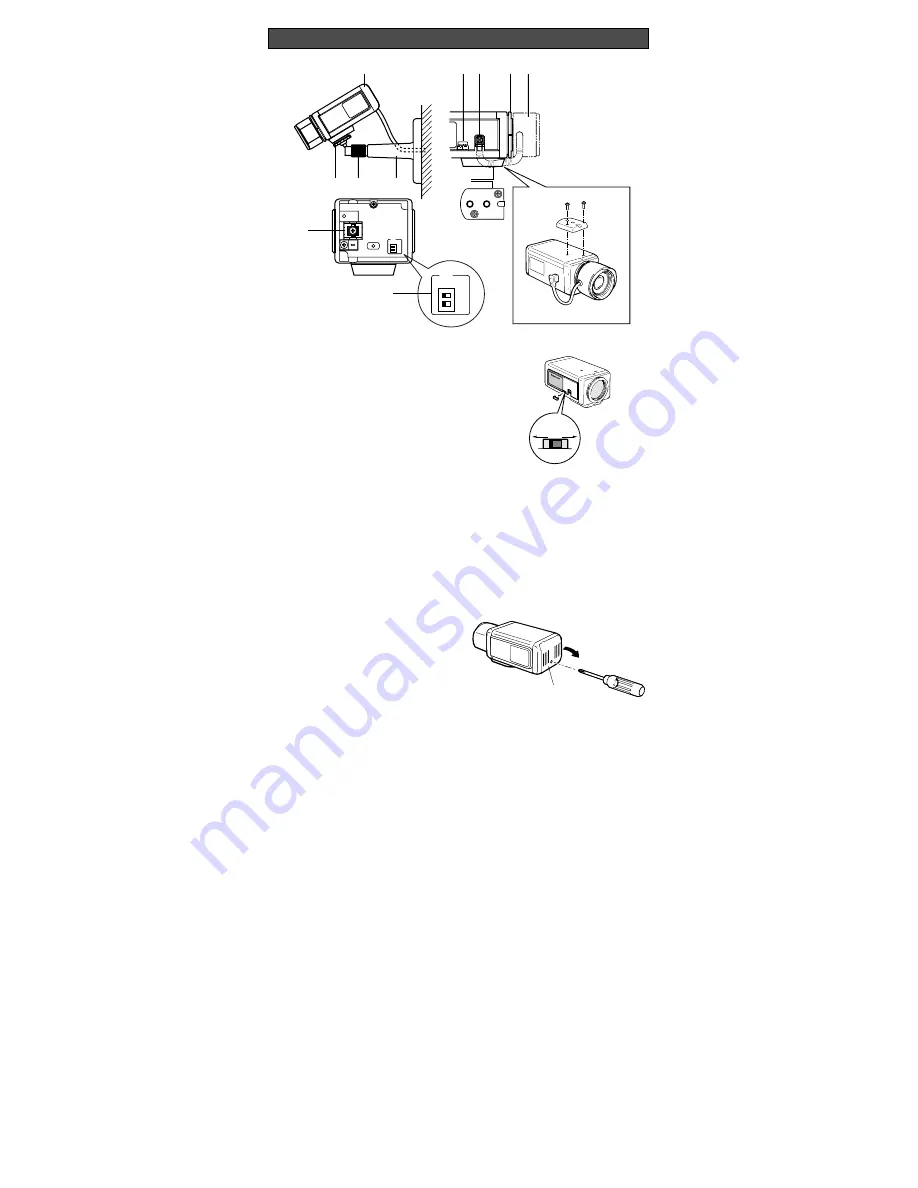
MAJOR OPERATING CONTROLS AND THEIR FUNCTIONS

q

Camera Mounting Bracket 

Install on the wall or ceiling. See INSTALLING
PROCEDURE below.

w

Pan Fixing Ring 

Tighten after adjusting the pan angle.

e

Pan Head 

Attach the camera on this.

r

Auto Iris Lens Connector

Supplies power and DC control signals to an
auto iris lens (not supplied).

t

Flange-back Adjusting Ring

This ring adjusts the back-focal distance or
picture focus.

y

Lens (option)

u

Camera Mounting Adapter

There is a hole for mounting the camera onto
a mounting bracket.  The camera is originally
designed to be mounted from the bottom, but
a top-mounting type is also available. To
mount from the top, remove the mount
adapter from the bottom of the camera by
removing two fixing screws. Attach the mount
adapter to the top as shown in the diagram,
then mount the camera on the mounting
bracket. Make sure that two original screws
are used when mounting the mount adapter;
longer type screws may damage inner com-
ponents.

i

Lens Selector

Detach the cover from the camera and select
the mode according to the lens type that is
mounted on this camera.

ALC:

Select this mode when an auto iris lens

(ALC lens) is mounted on this camera.

NC:

Not used.

ELC:

Select this mode when a fixed iris lens

or manual iris lens is mounted on this
camera.

!1

Back Light Compensation Mode Selector
(BLC ON, OFF)

Select the mode according to the position of
the object and light conditions.
When the ALC lens is mounted on this cam-
era, select the mode with upper selector.
When the fixed iris or manual iris lens is
mounted, select with the lower selector.

ON:

Select this mode when a strong light

such as a spotlight is in the background.

OFF:

Normal picture.

o

Coaxial Cable Connector

Connect a coaxial cable (to be procured
locally) between this connector and the CAM-
ERA IN connector of the specific monitor (or
Camera Drive Unit).
Monitor supplies power to the camera, and
the camera supplies the video output to the
monitor through the coaxial cable.

!0

Rear Cover

The rear cover can be removed to gain
access to the switches.

ALC NC ELC

Rear Cover

Содержание WV-BP50E

Страница 1: ... alert the user to the presence of important operating and mainte nance servicing instructions in the literature accompanying the appli ance The lightning flash with arrowhead symbol within an equilateral trian gle is interned to alert the user to the presence of uninsulated dan gerous voltage within the product s enclosure that may be of sufficient magnitude to constitute a risk of electric shock...

Страница 2: ...mounting the mount adapter longer type screws may damage inner com ponents i Lens Selector Detach the cover from the camera and select the mode according to the lens type that is mounted on this camera ALC Select this mode when an auto iris lens ALC lens is mounted on this camera NC Not used ELC Select this mode when a fixed iris lens or manual iris lens is mounted on this camera 1 Back Light Comp...

Страница 3: ... ing connections the camera does not func tion due to protect circuit from misconnec tion Basic System Connect the single coaxial cables between the Camera and Camera Input Terminal of Specified monitor or Camera Drive Unit The approx maximum cable length is as Coaxial Maximum DC R 1 000 ft Cable Cable of Inner Type Length Conductor RG 59 U 200 m 660 ft Less than 30 Ω RG 6 U 500 m 1 650 ft Less th...

Страница 4: ... 0 47 kg 1 03 lbs Weights and dimensions indicated are approximate Specifications are subject to change without notice SPECIFICATIONS STANDARD ACCESSORIES Body Cap 1 pc Camera Mounting Bracket 1 pc OPTIONAL ACCESSORIES Lenses WV LA2R8C3B WV LA4R5C3B WV LA9C3B WV LA210C3 WV LA408C3 WV LA908C3 WV LZ61 10 WV LZ62 2 WV LZ62 8 WV LF4R5C3A WV LF9C3A WV LFY3C3 WV LFY45C3 WV LFY9C3 Lens Mount Converter C ...

Страница 5: ...face des objectifs photo ou d un cotontige imprégné d éthanol pour faire le nettoyage 6 Ne jamais diriger la caméra vidéo directement vers le soleil La caméra vidéo ne doit jamais être dirigée vers des sources lumineuses intenses Que la caméra soit mise en service ou non il ne faut jamais la diriger directement vers le soleil En effet cette pratique peut entraîner la formation d un traînage ou d u...

Страница 6: ...e panoramique a été déterminé e Tête de balayage panoramique Monter la caméra vidéo dessus r Connecteur de cordon d objectif à dia phragme automatique Fourni l alimentation et les signaux de com mande à courant continu à un objectif à dia phragme automatique non fourni avec la caméra vidéo t Bague de réglage de foyer arrière Cette bague permet d effectuer un réglage du foyer arrière ou de la mise ...

Страница 7: ... CAMERA IN VIDEO OUT AUDIO OUT VD SYNC IN VD SYNC OUT SIGNAL GND CAUTION USE WITH SPECIFIED EQUIPMENT SEE ITS MANUAL BEFORE CONECTING Caméra vidéo de surveillance Moniteur vidéo Vidéo Son Unité de commande de caméra vidéo de surveillance WV PS11B Attention La monture intermédiaire d objectif monture intermédiaire de type C WV AD20 doit être utilisée avec cette caméra vidéo pour pouvoir utiliser un...

Страница 8: ...le continue située entre 1 50 e et 1 80 000 e de seconde Éclairement minimum 0 08 lx à F1 4 Monture d objectif Monture CS Température ambiante de service 10 C à 50 C Humidité Moins de 90 Source d alimentationt Assuré par WV PS11B WV PS104C Dimensions sans l objectif 71 L x 65 H x 125 5 P mm Poids sans l objectif 0 47 kg Les poids et dimensions indiqués sont approximatifs Sous réserve de modificati...

Отзывы: