background image

2

CONTENTS

Preface ............................................................................................................................ 3

Features ...................................................................................................................... 3
About these Operating Instructions  ............................................................................. 4
System Requirements for a PC ................................................................................... 4
Trademarks and Registered Trademarks  ................................................................... 4
Abbreviations .............................................................................................................. 5
Terms Used in these Operating Instructions  ............................................................... 5

Operations Flow  .............................................................................................................. 7
Performing the Network Settings ..................................................................................... 8

Performing the Network Settings of this Unit  .............................................................. 8
Performing the Network Settings of a PC  ................................................................... 10

About the Network Security of this Unit ........................................................................... 13

Equipped Security Functions  ...................................................................................... 13
For Enhanced Security ................................................................................................ 13

Display the Operation Window  ........................................................................................ 14
About the Operation Window  .......................................................................................... 16

Top Page ..................................................................................................................... 16
[Control] Tab  ............................................................................................................... 17
[Cam Select] Tab  ........................................................................................................ 18
[Setup] Tab (Quick)  ..................................................................................................... 19
[Setup] Tab (Advanced)  .............................................................................................. 20
Status Display Area ..................................................................................................... 21
Playback Point Operation Area  ................................................................................... 23
[HDD] Tab  ................................................................................................................... 23
[CAM] Tab  ................................................................................................................... 25

Setup Menu (Quick)  ........................................................................................................ 26

Setup Menu (Quick) Chart  .......................................................................................... 26
Basic Operation with the Setup Menu (Quick)  ............................................................ 26
Display/System Settings [Display Setup]  .................................................................... 28
Camera Network Settings and Group Settings [Camera Setup]  ................................. 30
[Rec & Event Setup]  .................................................................................................... 31
Perform the Settings for Network [Network Setup]  ..................................................... 35

Setup Menu (Advanced) Chart ........................................................................................ 37

Setup Menu (Advanced) Item List  ............................................................................... 37
Basic Operation with the Setup Menu (Advanced)  ..................................................... 40
Perform the Settings for the System [System]  ............................................................ 42
Functions for Recording [Recording] ........................................................................... 46
Functions for Events [Event]  ....................................................................................... 49
Settings for the Recording/Event Schedule [Schedule]  .............................................. 53
Settings Relating to Cameras [Camera] ...................................................................... 60
Settings for Communication with other Devices [Comm]  ............................................ 64
Settings Relating to the User Authentication [User Mng.]  ........................................... 75
Settings for Maintenance [Maintenance]  ..................................................................... 82

About the Hard Disk Drives  ............................................................................................. 89

Summary of the RAID 5 function (Redundant Arrays for Independent Disks, 
independent data disks with distributed parity blocks)  ................................................ 89
Display the HDD DISK MENU ..................................................................................... 90
Initialize the Hard Disk Drive [Format] ......................................................................... 92
Remove the Hard Disk Drive from the System Logically [Remove]  ............................ 96

Troubleshooting ............................................................................................................... 97

Содержание WJ-ND300A/G

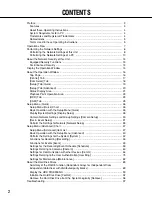
Страница 1: ...ve this manual for future use The model number is abbreviated in some descriptions in this manual Network Disk Recorder Setup Instructions Model No WJ ND300A WJ ND300A G ALARM ALARM SUSPENDED ERROR TIMER REC OPERATE 1 LINK ACT 2 HDD 1 HDD 2 HDD 3 ESC PULL Network Disc Recorder WJ ND300 300A SET HDD 4 ...

Страница 2: ...uick 26 Display System Settings Display Setup 28 Camera Network Settings and Group Settings Camera Setup 30 Rec Event Setup 31 Perform the Settings for Network Network Setup 35 Setup Menu Advanced Chart 37 Setup Menu Advanced Item List 37 Basic Operation with the Setup Menu Advanced 40 Perform the Settings for the System System 42 Functions for Recording Recording 46 Functions for Events Event 49 ...

Страница 3: ...rgency emergency recordings will be given a higher priority than other recording modes by operating an external switch External timer recording It is possible to perform recording automatically using an external timer Event recording At an event occurrence such as an alarm signal is supplied the recording mode quality and recording rate can be changed to high quality to record pictures Downloading...

Страница 4: ...Windows Vista 32 bit Microsoft Windows XP Home Edition SP2 Microsoft Windows XP Professional SP2 OS Language English French Spanish German Italian Russian Chinese CPU Pentium 4 3 0 GHz or faster Memory 512 MB or more A minimum of 1 GB memory is required when using Microsoft Windows Vista Monitor Resolution 1 024 x 768 pixels or more Color 24 bit True color or better Network interface 10 100 Mbps E...

Страница 5: ...ds 720 x 480 M JPEG A video codec that compresses video fields from the camera into independent JPEG images sequentially by query from the unit Network load will be reduced comparing with the method that obtains JPEG images independently from the camera However the transmission rate will fluctuate depending on the state of the camera Some cameras phrase this video codec as just JPEG Manual recordi...

Страница 6: ...he picture electronically in the unit and displays it Camera control Camera control refers to controlling the functions of the combination cameras connected to the unit These functions include Pan Tilt Zoom Focus Brightness Preset Operations moving the camera to a preset horizontal vertical position and Auto for example automatic panning A B repeat playback Function for playing back repeatedly bet...

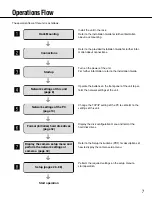
Страница 7: ... page 8 Operate the buttons on the front panel of the unit to per form the network settings of the unit v Network settings of the PC page 10 Change the TCP IP setting of the PC to conform to the settings of this unit b Format initialize hard disk drives page 92 Display the disk configuration menu and format the hard disk drives n Display the camera setup menu and perform the network settings of ca...

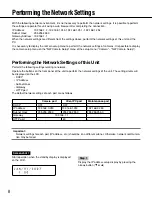
Страница 8: ...ay the camera setup menu to perform the network settings of cameras It is possible to display the camera setup menu on the NW Camera Setup menu of the setup menu Camera NW Camera Setup Performing the Network Settings of this Unit Perform the following settings relating to network Operate the buttons on the front panel of the unit to perform the network settings of the unit The settings items will ...

Страница 9: ...t values Press the arrows button C or D Step 7 After setting the value press the ESC button to move the cursor on l and finalize the setting Step 8 To set the next item press the arrows button C or D to change the menu screen Step 9 Repeat steps 5 7 to set other items Step 3 Select the desired network port by pressing the arrows button A or B PT 1 Camera port PT 2 Client PC port PT 3 Maintenance p...

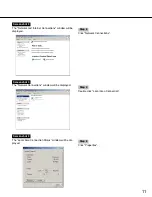
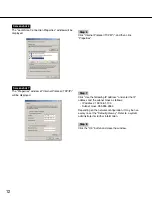
Страница 10: ...t In these operating instructions the settings are performed on Windows XP as examples Refer to the operating instructions of the respective OS for further information Screenshot 1 Start just after the PC is started up Important Log in to the PC as an administrator Step 1 On the taskbar click Start and then click the Control Panel Screenshot 2 The control panel will be displayed Step 2 Click the N...

Страница 11: ...indow will be displayed Step 3 Click Network Connections Screenshot 4 The Network Connections window will be displayed Step 4 Double click Local Area Connection Screenshot 5 The Local Area Connection Status window will be dis played Step 5 Click Properties ...

Страница 12: ...Internet Protocol TCP IP will be displayed Step 7 Click Use the following IP address and enter the IP address and the subnet mask as follows IP address 192 168 1 100 Subnet mask 255 255 255 0 Depending on the network configuration it may be nec essary to set the Default gateway Refer to a system administrator for further information Step 8 Click the OK button and close the window ...

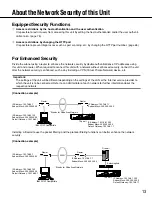
Страница 13: ...h network for further information about the respective network Connection example Installing a firewall to use the packet filtering and the protocol filtering functions can better enhance the network security Connection example About the Network Security of this Unit WAN Router Router IP Address 192 168 0 100 Subnet Mask 255 255 255 0 Default Gateway 192 168 0 1 IP Address 192 168 1 250 Subnet Mas...

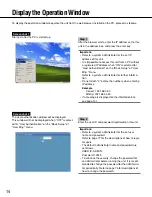
Страница 14: ...s when entering IP address Example Correct 192 168 0 50 Wrong 192 168 0 050 If a message is displayed on the information bar see page 101 Screenshot 2 The user authentication window will be displayed This window will not be displayed when OFF is select ed for User Authentication on the Basic Setup of User Mng menu Step 2 Enter the user ID and password registered on this unit Important Refer to a s...

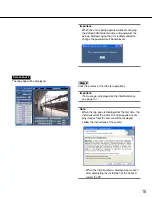
Страница 15: ...ll wizard of the ActiveX control required to dis play images from the camera will be displayed Follow the instructions of the wizard When the install wizard is displayed again even after completing the installation of the ActiveX restart the PC Important When the unit is being operated without changing the default administrator name and password the pop up window saying that it is recommended to c...

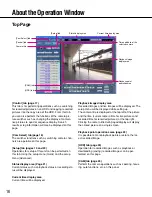
Страница 16: ...this unit can be performed on this tab Using the setup menu Quick and the setup menu Advanced Status display area Page 21 Current status such as playback status or recording sta tus will be displayed Current time display area Current time will be displayed Playback image display area Recorded images and live images will be displayed The setup menu will be displayed while setting up The camera titl...

Страница 17: ...yed in list form in the log display area Refer to the Operating Instructions PDF Disk Select button The disk select win dow will be displayed Use this button to select a disk to be played searched Refer to the Operating Instructions PDF Copy box The copy window will be displayed by clicking this but ton This window is used to copy recorded images into the copy area of the HDD Log box Error Log but...

Страница 18: ...x Sequence button Camera images to be displayed will be switched by clicking this button Camera images will be displayed sequentially according to the settings performed in advance EL Zoom box Camera images will be displayed in the proportion of the clicked zoom ratio button 1x 2x 4x Cam Select box Clicking the camera title will display a list of cameras connected to the unit Images from the selec...

Страница 19: ...tings and group settings Refer to page 30 for further informa tion Rec Event Setup Performs the basic settings for recording operation and for event action Refer to page 31 for further informa tion Network Setup Settings for a network can be performed Refer to page 35 for further information Registration button Applies the settings to this unit Click this button to com plete the setting after edit...

Страница 20: ...ule button The menu for the settings of the recording schedule performs recording event action by designating the time and a day of the week will be displayed Refer to page 53 for further information Camera This button is for performing camera network settings group settings and sequence operation settings Refer to page 60 for further information Comm button The menu for basic network settings wil...

Страница 21: ...D Indicates that download of the playback images has ended Step 1 Step 7 Indicates the playback speed Step 1 Normal playback speed Step 2 Approx 4x playback speed Step 3 Approx 8x playback speed Step 4 Approx 16x playback speed Step 5 Approx 32x playback speed Step 6 Approx 48x playback speed Step 7 Approx 96x playback speed SEQ Indicates that the sequence display is currently being performed HDD ...

Страница 22: ...USPEND Clicking this button will temporarily disable alarm detection Refer to the Operating Instructions PDF ALARM SUSPEND This indication will be displayed while an alarm is being suspended ALARM RESET Indicates an event occurrence The alarm display action will be canceled by clicking this button Refer to the Operating Instructions PDF ALARM RESET Indicates no event occurrence ERROR Indicates an ...

Страница 23: ...ked Step2 Approx 4x Step3 Approx 8x Step4 Approx 16x Step5 Approx 32x Step6 Approx 48x Step7 Approx 96x PREV RECORD button Skips to the previous recorded image and plays it REV PLAY button Reverse playback of a recorded image will be per formed PLAY button Playback of a recorded image will be performed NEXT RECORD button Skips to the next recorded image and plays it FF button Fast playback will be...

Страница 24: ...SD are displayed in blue the unit will check if there is any recorded image on the SD memory card or not When a recorded image is found the letters SD on the SD memory data obtain button will turn red Recording button Starts manual recording Recording stop button Stops manual recording Important To display the recording button and the recording stop button hold down the button until they are displ...

Страница 25: ...e clicked direction Clicking inside the control pad also can adjust the vertical hori zontal position pan tilt of the displayed image Panning tilting speed will be faster if a clicked point gets farther from the center point of the control pad Brightness box The brightness can be adjusted by clicking the Close button or the Open button It is possible to reset the set brightness by clicking the Res...

Страница 26: ...rming each setting item on the setup menu should be completed in advance to operate this unit The setup menu operations are performed from the Setup tab Using the setup menu Quick and the setup menu Advanced First check the settings items of the setup menu Quick and perform the settings When more detailed settings are required perform the settings on the setup menu Advanced Refer to page 37 for fu...

Страница 27: ...ettings for each item Click the SET button after completing the settings When the CLEAR button is clicked the contents of the settings will be cleared Step 4 To complete the settings click the Registration button The settings will be applied Important If the settings are applied all login users will be forcibly logged out The settings will not be applied by clicking the SET button in step 3 To app...

Страница 28: ... time Refer to pages 44 and 45 for the descriptions of how to perform the settings Sequence Setup Perform the settings for the sequential display of live images The following window will be displayed when the SETUP button is clicked Display System Settings Display Setup Perform the time and date display settings such as the time and date display the camera title display the sequen tial display and...

Страница 29: ...ng Skips the selected step CAM1 32 Displays an image from the selected cam era channel on a single screen 4A 4H Switches the images of the preset camera groups A H of 4 channels in sequence on a 4 Screen starting from A Camera groups can be set from System Basic Setup Monitor Display on the setup menu Advanced page 42 PRESET Enter a camera preset position blank 1 to 256 When no position is entered...

Страница 30: ...nd the port number The following win dow will be displayed when the SETUP button is clicked Click the SET button after completing the settings and close the window by clicking the button at the top right of the window Manufacturer Select the manufacturer of the camera MODEL COMPRESSION Select a camera number and image compression method ADDRESS Enter an IP address Enter up to 255 alphanumeric char...

Страница 31: ...ayed when the SETUP button is clicked Click the SET button after completing the settings and close the window by clicking the button at the top right of the window Displays the group title of the camera Enter up to 16 alphanumeric characters except the following _ Available characters are the same as for the camera title Rec Event Setup Perform the settings for the basic recording and the settings...

Страница 32: ...ram When QUICK is selected MPEG 4 live image will not be displayed and recording will not be performed Submenu Time Table Setup items Status FTP SEND BY PERIODIC TIMER Disabled WARNING REPORT MAIL Disabled FTP ALARM SENDING Disabled ALARM MESSAGE Functions normally Fixed to ON Panasonic Alarm Protocol Disabled ALARM MAIL Disabled Program Special Days Program 1 4 The settings performed on the setup...

Страница 33: ...e for MANUAL REC SCHEDULE REC and EVENT REC 2 Operation using 2 PCs with a web browser or operation using a single PC with the dedicated software option Notes Click the Measurement button after setting the recording rate transmission rate by clicking the SET button Do not change the settings in the process of the measurement In the process of the measurement recording playback live image display a...

Страница 34: ...rforms recording preset function and writing an event log at an event occurrence Other event actions will not be per formed ALM Alarm Mode Performs recording preset func tion and writing an event log supplying the alarm output and sounding the buzzer according to the set tings for Event Setup OFF Performs only recording of the event log Other event actions will not be performed EVENT SETUP Perform...

Страница 35: ...e HTTP port number to be used to send images from the unit A number from 1 65535 is avail able It is unnecessary to change it for normal use Notes Depending on the network settings of the LAN or Internet service provider network communication may not be established if the http port number has been changed In this case refer to the administra tor of the network The following port numbers and the po...

Страница 36: ...n when OFF is selected for DHCP Gateway Enter the IP address of the gateway according to the network environment when OFF is selected for DHCP Line Speed The following are available for Line Speed AUTO Line speed will be applied automatically 10 HALF 10 Mbps semi duplex 10 FULL 10 Mbps full duplex 100 HALF 100 Mbps semi duplex 100 FULL 100 Mbps full duplex Note When the setup menu is closed after ...

Страница 37: ...such as the recording time and recording rate can be performed on this menu Event Basic Setup Settings for an event action can be performed with this menu Terminal Setup Set event actions to be performed at a terminal alarm occur rence Site Alarm Setup Set event actions to be performed at a site alarm occurrence Command Alarm Set event actions to be performed at a command alarm occur rence Schedul...

Страница 38: ...nected to this unit to a designated FTP server periodically can be performed with the FTP Setup menu Mail Setup Perform the settings to send e mails to addresses registered in advance at an event or error occurrence Panasonic Alarm protocol It is possible to send a message to addresses registered in advance using Panasonic Alarm Protocol when an event or a problem occurs To receive messages using ...

Страница 39: ...d Network Information Network information such as IP addresses of the connected devices network line speed the maximum network speed will be displayed Disk End Mode Perform the settings for action when running out of hard disk space HDD Capacity Warning If the available hard disk capacity reaches a specified level a warning will be displayed Data Delete Data on the hard disk external recording dev...

Страница 40: ...hot 2 The setup menu Advanced will be displayed Step 2 Click the desired setup menu Advanced Note When QUICK is selected for REC Type of Rec Event Setup page 32 the setup menu Quick will be displayed by clicking the Setup tab In this case it is possible to display the setup menu Advanced by clicking Advanced Setup Menu Main menu ...

Страница 41: ... settings for each item Click the SET button after completing the settings When the CLEAR button is clicked the contents of the settings will be cleared Step 5 To complete the settings click the Registration button The settings will be applied Important If the settings are applied all login users will be forcibly logged out The settings will not be applied by clicking the SET button in step 4 yet ...

Страница 42: ...ord to be used to release the key lock when setting the key lock When the key lock is set once the buttons on the front panel will be locked automatically if no operation is per formed for around one minute even after the key lock is released ON Turn on the key lock function OFF Turn off the key lock function Enter up to 5 numbers for the password Default password 12345 Important Only the LV1 user...

Страница 43: ...e settings for each item Step 2 Click the SET button after completing the settings Buzzer Error Perform the settings for sounding a buzzer at an error occurrence OFF A buzzer will not sound at an error occurrence 1 s 30 s in 1 second intervals 40 s 50 s 1 min 3 min 4 min 5 min in 1 minute intervals The buzzer that started sounding at an error occur rence will sound for the selected period EXT The ...

Страница 44: ...RM CONTROL con nector on the rear panel signal to the other connect ed devices and the other devices will adjust their clocks with reference to the clock of this unit Time When MASTER is selected for Auto Adjust Time set the clock for a signal to be supplied from the ALARM CONTROL connector time adjustment I O pin no 20 of the ALARM CONTROL connector on the rear panel of the unit When SLAVE is sel...

Страница 45: ... when the SETUP button is clicked Click the SET button after completing the settings and close the window by click ing the button at the top right of the window Enter the start time and date and the end time and date of summer time Enter the last 2 digits of the year Up to 10 times and dates for switching to summer time can be set ...

Страница 46: ...tep 1 Perform the settings for each item Refer to the following for further information about the settings for each item Step 2 Click the SET button after completing the settings Setup items REC Type Select QUICK or ADVANCED for validation of the recording settings QUICK The recording settings set on the setup menu Quick will be validated when recording ADVANCED The recording settings set on the s...

Страница 47: ... OFF to record or not record OFF No recording will be performed ON Recording will be performed Important When OFF is selected for this setting no recordings will be performed Select ON for normal use except when required to stop recording forcibly such as when a problem occurred with the unit Power ON Manual REC Select ON or OFF to determine whether or not to start recording when the power is turn...

Страница 48: ...will not be recorded OFF 1 ips 2 ips 3 ips 5 ips 10 ips 15 ips ALL I Frame Note The available value differs depending on the select ed image compression method The compression method can be set on the MODEL COMPRES SION setting of the setup menu Camera NW Camera Setup MODEL COMPRESSION SD MEMORY REC Set the recording rate for the SD memory recording for each channel Refer to page 55 for further in...

Страница 49: ...tings for each item Alarm Output Select the alarm output duration The following are available for alarm output duration OFF No alarm output is supplied 1 s 30 s in 1 second intervals 40 s 50 s 1 min 2 min 3 min 4 min 5 min EXT The alarm output will continue until the ALARM RESET button is clicked REC The alarm output will be supplied during recording is being performed Buzzer Select ON or OFF to s...

Страница 50: ...h ter minal alarm channel REC CAM Performs the settings for a camera channel used for recording PRESET Enter a preset position blank 1 256 to which the cam era will move at a terminal alarm occurrence for each terminal When no position is entered blank the camera does not move to any preset position Output Terminal Select the output terminal TRM1 TRM16 that out puts alarm signals at a terminal ala...

Страница 51: ...e or invalidate the site alarm ON Validates the site alarm OFF Invalidates the site alarm Port Number from Camera Designate the port number to be used for receiving the site alarm Site Alarm Setup Perform the settings for the following items for each camera channel REC CAM Performs the settings for a camera channel currently used for recording PRESET Enter a preset position blank 1 256 to which th...

Страница 52: ...ng items for each command alarm channel REC CAM Performs the settings for a camera channel used for recording PRESET Enter a preset position blank 1 256 to which the cam era will move at an alarm occurrence When no position is entered blank the camera does not move to any preset position Output Terminal Select the output terminal TRM1 TRM16 that out puts alarm signals at an alarm occurrence When i...

Страница 53: ...ram of another day of the week can be switched to a special day s program automatically Flowchart on how to create a schedule Follow the procedures below to create schedules Creating a recording program Program Up to 4 recording programs can be created by performing the settings for each camera such as resolution image quality bandwidth control etc Screenshot 1 Click the Schedule button in the set...

Страница 54: ...Frame OFF Manual recording will not be performed SCHEDULE REC Select the recording rate for schedule recording from the following OFF 0 1 ips 0 2 ips 0 3 ips 0 5 ips 1 ips 2 ips 3 ips 5 ips 10 ips 15 ips ALL I Frame OFF Schedule recording will not be performed EVENT REC Performs the settings for the recording rate and record ing duration for pre event recording and post event recording The followi...

Страница 55: ...ule recording of this unit For example when 0 1 ips is selected for the record ing rate for SD MEMORY REC images will be record ed on the SD memory card on the camera if no request image inquiry is made from the unit to the camera in the period of 10 seconds equivalent to 0 1 ips or more during the time range set for a schedule The start time of the SD memory recording differs depending on the set...

Страница 56: ...indication When the result value is beyond the maximum network speed of the unit 50 Mbps as indication Example 50 Mbps 60 Mbps result value When the result value is beyond the maximum network speed of the unit 50 Mbps as indication refer each rate for LIVE VIDEO MANUAL REC SCHEDULE REC and EVENT REC Then lower the higher rate among them or lower image quality to diminish the net work traffic from ...

Страница 57: ...ording to the external record ing timetable while the signal input continues Screenshot 2 The timetable of the selected day of the week will be displayed Step 2 Perform the settings for each item Refer to the following for further information about the settings for each item Step 3 Click the SET button after completing the settings Screenshot 3 The Time Table window will be displayed again Step 4 ...

Страница 58: ...ol Select ON or OFF to determine whether or not to notify of an alarm occurrence or error information to a PC according to the Panasonic Alarm protocol of the setup menu Comm Panasonic Alarm protocol page 74 To receive a notification or error information and dis play the contents of the notification the optional soft ware is necessary ALARM MAIL Select ON or OFF to determine whether or not to send...

Страница 59: ...le button in the setup menu Advanced and then click Special Days to display the Special Days window Step 1 Click the i button and select date to be set as special day and the day of the week of the recording program to be assigned to the special day Step 2 Click the SET button after completing the settings Note When two or more created programs programs for each day of the week daily and special d...

Страница 60: ...ck NW Camera Setup to display the NW Camera Setup window Step 1 To perform the network settings of the camera click the SETUP button of NW Camera Setup Note To make this unit detectable by the IP Quick Setup Tool click the Available button of IP Quick Setup Tool The unit will be detectable by the IP Quick Setup Tool for 20 minutes after the Available button is clicked Screenshot 2 The detailed set...

Страница 61: ...elect the desired group G1 G8 to which the camera is to be belonged CAM TITLE Set the camera title displayed on the Cam Select tab etc Enter up to 16 alphanumeric characters except the following _ USER ID Set the user ID to be used to access and log in the cam era Enter up to 32 alphanumeric characters Password Set the password to be used to access and log in the camera Enter up to 32 alphanumeric...

Страница 62: ...tion about the settings for each item Step 2 Click the SET button after completing the settings Settings of the title of the camera group Group Setup Set the title of the camera group Screenshot 1 Click the Camera button in the setup menu Advanced and then click Group Setup to display the Group Setup window Step 1 Displays the group title of the camera Enter up to 16 alphanumeric characters except...

Страница 63: ...camera image to be displayed at each step from the following Skips the selected step CAM1 32 Displays an image from the selected cam era channel on a single screen SPOT 4A 4H Images of the camera group A H consisted from 4 camera channels in advance will be switched and displayed sequentially on a 4 Screen The camera group settings can be performed on the Monitor Display settings of the setup menu...

Страница 64: ...down detection Select ON or OFF to enable or disable the network line disconnection detection for the CAMERA client PC port on the rear of the unit ON Detects if the disconnection of the network line connected to the CAMERA client PC port occurs OFF Does not detect the network line disconnection NW Bandwidth Control Select a rate for transmission to the FTP server from the following Unlimited 32 k...

Страница 65: ...5 10001 10002 10003 10004 10005 10006 10007 Port Setup Perform the settings for the following items for each port camera port client PC port and maintenance port DHCP Select ON or OFF to determine whether or not to use the DHCP server Select ON to obtain an IP address a subnet mask and a gateway address from the DHCP server Set to OFF when entering the addresses above manually ON Uses the DHCP ser...

Страница 66: ...ng the DNS Selecting AUTO is available only when ON is select ed for DHCP using the DHCP server Selecting MANUAL is available regardless of the set ting for DHCP with or without using the DHCP serv er When MANUAL is selected for the DNS enter the DNS server addresses in Primary and Secondary Enter 4 units from the decimal numbers 0 254 Domain Name Enter the domain name of this unit Enter up to 255...

Страница 67: ... Enter a user name registered in the DDNS Enter up to 32 alphanumeric characters User Password Enter a password respective to the entered user name Enter up to 32 alphanumeric characters Note The following alphanumeric characters can be entered A B C D E F G H I J K L M N O P Q R S T U V W X Y Z a b c d e f g h i j k l m n o p q r s t u v w x y z 0 1 2 3 4 5 6 7 8 9 _ Access Interval Select an int...

Страница 68: ... server When ON is selected perform the following settings Server Address Enter a proxy server address Enter up to 255 alphanu meric characters including hyphens and periods Port Number Enter a port number of a proxy server Exceptions Perform the settings for cameras who does not use the proxy server Enter the set address of the network camera Enter up to 128 alphanumeric characters including aste...

Страница 69: ...arac ters CONTACT Enter the mail address of an administrator of this unit Enter up to 255 alphanumeric characters SYSTEM NAME Enter a system name in alphanumeric characters to manage this unit by the SNMP system for example No1 Enter up to 255 alphanumeric characters LOCATION Enter a location name location where this unit is installed in alphanumeric characters for example 2F Enter up to 255 alpha...

Страница 70: ...update the clock at the designated time Refresh Interval Select an interval of time inquiry to the NTP server from the following 1h 2h 6h 12h 24h Default 1h Refresh Time When selecting Periodic for Time Adjustment Method determine the time for the time inquiry Step 2 Click the SET button after completing the settings Notes The clock will be adjusted using the NTP server when the clock of the unit ...

Страница 71: ...ric characters including hyphens and periods User Name Enter a user name login name to access the FTP serv er Enter up to 32 alphanumeric characters The avail able characters are the characters listed below except and blank space User Password It is necessary to register a password when sending images to the FTP server Enter up to 32 alphanumeric characters on the next page An entered character fo...

Страница 72: ...orded by pre event recording to be transmitted from the following OFF 1 s 10 s in 1 second interval Important Images recorded by pre event recording will not be transmitted when pre event recording is not to be performed Perform pre event recording to transmit images recorded by pre event recording Refer to page 54 for further information about pre event recording settings Duration Post Select the...

Страница 73: ...ted for the recording rate of the event recording Mail Server Address Enter an IP address or a name of the SMTP server to send e mails to To enter an SMTP server name it is necessary to select MANUAL or AUTO for DNS Enter up to 255 alphanumeric characters including hyphens and periods POP before SMTP Select ON or OFF to determine whether to enable or disable the POP server authentication before se...

Страница 74: ... w x y z 0 1 2 3 4 5 6 7 8 9 _ Settings relating to Panasonic Protocol Panasonic Alarm protocol Perform the settings to notify a PC of event error occurrence To receive a notification or error information and display the contents of the notification the optional software is necessary Screenshot 1 Click the Comm button in the setup menu Advanced and then click Panasonic Alarm protocol to display th...

Страница 75: ...ost authentication Basic Setup Select ON or OFF to determine whether or not to authenticate the user host PCs Screenshot 1 Click the User Mng button in the setup menu Advanced and then click Basic Setup The Basic Setup window will be displayed Step 1 Perform the settings for the following items User Authentication Select ON or OFF to determine whether or not to authenticate the user Host Authentic...

Страница 76: ...rational level of the user The user level of the administrators is LV1 and it is impossible to change it Operable functions for LV1 can be set in the User Level menu page 80 Priority Display the settings to assign priorities to operate this unit in case two or more users access this unit simulta neously The priority of the administrators is 0 and it is impossi ble to change it Default Screen Selec...

Страница 77: ... Screen The camera group settings can be performed on the Monitor Display settings of the setup menu Advanced System Basic Setup Monitor Display Refer to page 42 for further information SEQ Images will be displayed in the sequential display The operational settings of the sequential display can be performed on the Sequence Setup setting of the setup menu Camera Sequence Setup Camera Partitioning S...

Страница 78: ...orma tion of the registered user Edit user information in the same way as the user registration page 77 Click the DELETE button to delete the selected user Registration of a PC host accessible to this unit Host Regist Register information of a PC host that accesses this unit via a network such as a LAN Up to 32 hosts can be regis tered Screenshot 1 Click the User Mng button in the setup menu Advan...

Страница 79: ... be displayed in the sequential display The operational settings of the sequential display can be performed on the Sequence Setup setting of the setup menu Camera Sequence Setup Camera Partitioning Select a controllable range for each camera channel from the following View Operate Both displaying live images and control ling cameras are possible View Neither displaying live images nor controlling ...

Страница 80: ...a user from operating certain functions do not check the respective function Refer to page 81 for further information about each function Step 2 Click the SET button after completing the settings Note Each parameter of user level is as follows LV1 Possible to perform all the operations Administrators LV2 Possible to refer to the settings of the unit and the access log and to perform the alarm rese...

Страница 81: ...cess Log Status It is possible to browse event logs Refer to the Operating Instructions PDF Error Log Status It is possible to browse error logs Refer to the Operating Instructions PDF Network Log Status It is possible to browse network logs Refer to the Operating Instructions PDF Alarm Reset An event action can be canceled Refer to the Operating Instructions PDF Alarm Suspend An event action can ...

Страница 82: ...n Versions of the software the hardware this unit MAC address temperature inside the unit and software version of the connected extension unit will be displayed Screenshot 1 Click the Maintenance button in the setup menu Advanced and then click Product Information The Product Information window will be displayed Step 1 Versions of the software the hardware this unit MAC address temperature inside ...

Страница 83: ...vanced and then click Disk Information The Disk Information window will be displayed Step 1 When the View button on the Disk Information menu is clicked the following window will be displayed and the disk size and the available capacity of each hard disk drive and the time range of the images recorded on the hard disk will be displayed The following settings are also available on this menu Warning...

Страница 84: ...d the pre recording areas on the built in hard disk will be displayed Screenshot 1 Click the Maintenance button in the setup menu Advanced and then click Partition Information The Product Information window will be displayed Step 1 The available capacity of the normal area the event area the copy area and the pre recording areas on the built in hard disk will be displayed ...

Страница 85: ...n the Network Information menu is clicked the following window will be displayed and the IP addresses of the devices connected to each port and cameras network line speed and the maximum transmission rate will be displayed It is also possible to display the number of the currently accessing user and their user IDs user level and the access time by clicking the Detail button of Login User Screensho...

Страница 86: ...de setting for the normal area is CONTINUE and it is impossible to change it Step 2 Click the SET button after completing the settings Warning settings for the available hard disk space HDD Capacity Warning Select a level of the available disk space to issue a warning when the available disk space of the built in hard disk event area copy area reaches a specified level Important When CONTINUE is s...

Страница 87: ...When OFF is selected auto deletion will not be performed OFF 1 DAY 2 DAYS 3 DAYS 4 DAYS 5 DAYS 6 DAYS 7 DAYS 8 DAYS 9 DAYS 10 DAYS 14 DAYS 30 DAYS 1 MONTH 45 DAYS 60 DAYS 90 DAYS 120 DAYS 150 DAYS 180 DAYS Manual Delete for Normal Recording Area By setting the time and date images in the normal recording area of the hard disk that were recorded up until a day before the set time and date will be d...

Страница 88: ...number Port Setup Maintenance Port Setup Even when the settings are loaded by clicking the LOAD button the settings will not be applied until the Registration button is clicked Note When the DHCP setting of the loaded settings is ON and the IP address setting is different between the current setting and the saved setting the dis played IP address and the current IP address will not match In this c...

Страница 89: ...uted parity blocks It is possible to use the RAID 5 function with the optional RAID board WJ NDB301 RAID level 5 regards 3 or more drives as one drive and it is possible to read data by attaching error correction data even though one of the drives is broken automatically It is impossible to recover data if two drives are simultane ously damaged or the second drive data fails during the data recove...

Страница 90: ...ions including recording and playback except the HDD DISK MENU operation will stop When exiting from the HDD DISK MENU be sure to click the Main button Do not click the close button at the top right of the window otherwise it may cause malfunction Screenshot 1 Click the Maintenance button on the setup menu Advanced to display the Product Information menu Step 1 Click Config on the Product Informat...

Страница 91: ...rd disk drives of the unit or the con nected extension unit will be displayed To display the available disk space of each recording area click Partition Information Screenshot 4 The Partition Information menu will be displayed Step 4 The available disk size of each recording area on the hard disk drive will be displayed ...

Страница 92: ...ick the close button at the top right of the window otherwise it may cause malfunction Initialize the normal recording area event recording area copy area Format Initialize format the normal recording area event recording area copy area as follows Screenshot 1 Click the Format button on the top menu Connection Information of the HDD DISK MENU to display the Format window Step 1 Select the desired ...

Страница 93: ...ze to be allocated for each recording area Number of hard disks to be initialized x 30 GB When it is unnecessary to set the capacity enter 0 Step 4 Click the Format button after completing the settings Screenshot 3 The deletion confirmation window will be displayed Step 5 Click the OK button Screenshot 4 When completing the initialization the result will be dis played Step 6 When the OK button is ...

Страница 94: ... configured and images from it cannot be displayed images to be recorded for the designated duration by the pre event recording may sometimes not be recorded Screenshot 1 Click Pre Recording areas Format on the top menu Connection Information of the HDD DISK MENU to display the Pre Recording areas Format window Step 1 Select the desired hard disk drive to be initialized Only a single hard disk dri...

Страница 95: ... window will be displayed Step 5 Click the OK button Important When the following settings for the camera channels to which pre event recording area is assigned are configured using the Administrator Console of WJ ND300 series or the IP Quick Setup Tool format the pre event recording areas again Image compres sion method of the camera IP address of the cam era user name password recording rate and...

Страница 96: ...the HDD DISK MENU be sure to click the Main button Do not click the close button at the top right of the window otherwise it may cause malfunction Screenshot 1 Click Remove on the top menu Connection Information of the HDD DISK MENU to display the Remove window Step 1 Click the EXECUTE button to remove the hard disk drive indicated with or LOST on the HDD DISK MENU Note Asterisks will be displayed...

Страница 97: ... 10 100BASE T port lit When it is not lit connection to a LAN is not estab lished or a network is not working correctly Confirm that the connection indicator of the 10 100BASE T port is lit Refer to a system administrator if it is not lit Reference pages Cause solution Is the Ethernet cable firmly connected to the 10 100 BASE T port Confirm the cable is firmly connected Symptom Cannot access from ...

Страница 98: ...button 3 Click the Troubleshoot tab and disable the DirectDraw acceleration by adjusting the level of Hardware acceleration Reference pages Cause solution Symptom Reload the contents by pressing the F5 key Some contents are not dis played on the browser When displaying MPEG 4 images on a multi screen images from two cameras or more are displayed in sequence on a single area d Depending on the traf...

Страница 99: ...via Internet images may not be displayed MPEG 4 image display via Internet is affected by the configurations of the network devices such as a router Refer to the net work administrator for further information The message Please Wait remains on the screen No live image is displayed 60 54 8 101 Are the settings of the setup menu configured correct ly Check the settings of the setup menu Schedule Pro...

Страница 100: ...mes occurs Network performance is poor Image file downloaded from the FTP server is faulty The setup menu of the cam era is not displayed even though the SETUP button on the NW Camera Setup menu of the setup menu advanced is clicked 60 34 48 55 60 Change the port number for the camera and then click the SETUP button again The line speed settings may be not the same between the unit and the hub for...

Страница 101: ...on bar Pop up blocked To see this pop up or additional options click here Reference pages Solutions Symptom Information Bar The following message is displayed on the information bar This site might require the following Active X con trol WebVideo cab from Panasonic Corporation Click here to install Unnecessary status bar or scroll bar is displayed on the pop up window Click the information bar and...

Страница 102: ... Secaucus New Jersey 07094 U S A Panasonic Canada Inc 5770 Ambler Drive Mississauga Ontario L4W 2T3 Canada 905 624 5010 www panasonic ca Panasonic System Networks Co Ltd 2012 N0811 1012 3TR006003DDB Printed in China For Europe and other countries http panasonic net Importer s name and address to follow EU rules Panasonic Testing Centre Panasonic Marketing Europe GmbH Winsbergring 15 22525 Hamburg ...

Отзывы: