22
9. Disassembly Instructions
9.1 Replacing the Heating Element
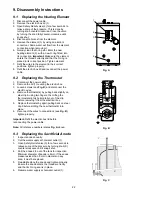
1. Disconnect the power cable.
2. Remove the electric box lid (1).
3. Open Safety Relief valve (2) for a few seconds to
relieve some of the pressure. This is done by
turning knob counter-clockwise. Close the valve
by turning the knob fully counter-clockwise until
snaps shut.
4. Disconnect all wires from the element.
5. Remove the element (3) by using an element
socket tool. Some water will flow from the element
connection when removing it.
6. Quickly clean the O-ring slot. Enter the new
heating element (3), with a new O-ring fitted, into
its connection.
Important:
Make sure the element
enters the thread correctly and that the O-ring is
placed in its correct position. Tighten element.
7. Refit the wires to the element in their correct
positions, tighten property.
8. Refit the electric box lid and reconnect the power
cable.
1
3
4
2
Fig. A
9.2 Replacing the Thermostat
1. Disconnect the power cable.
2. Remove the lid (1) covering the electric box.
3. Loosen screws (see
Fig. B
) and disconnect the
electric wires.
4. Remove thermostat (4) by pulling back slightly on
steel clip S using two fingers, then lifting the
thermostat slightly horizontally out of the clip
before removing it from the electrical box.
5. Replace thermostat by again pulling back on steel
clip S before slotting the new thermostat into
place.
6. Reconnect the wires to connections (see
Fig. B
),
tighten property.
Important:
Refit the electric box lid before
reconnecting the power cable.
Note:
All reference numbers relates
Fig. A
above.
Fig. B
9.3 Replacing the Sacrificial Anode
1. Inspect anode annually.
2. Cut the water supply at hot water outlet (1).
3. Open Safety Relief valve (3) for a few seconds to
relieve some of the pressure by turning knob (K)
counter-clockwise until it snaps shut.
4. Pull the anode 2/3 out of the tank for inspection.
Minimum diameter of anode is 8mm. If the anode
measures less than 8 mm in diameter in any
area, it must be replaced.
5. Reinstall/replace the anode and tighten properly.
Ensure the anode enters the threads correctly
and that its O-ring seal is in place.
6. Resume water supply at hot water outlet (1).
Fig. C


