background image

Retuning from Setup Menu

45

6

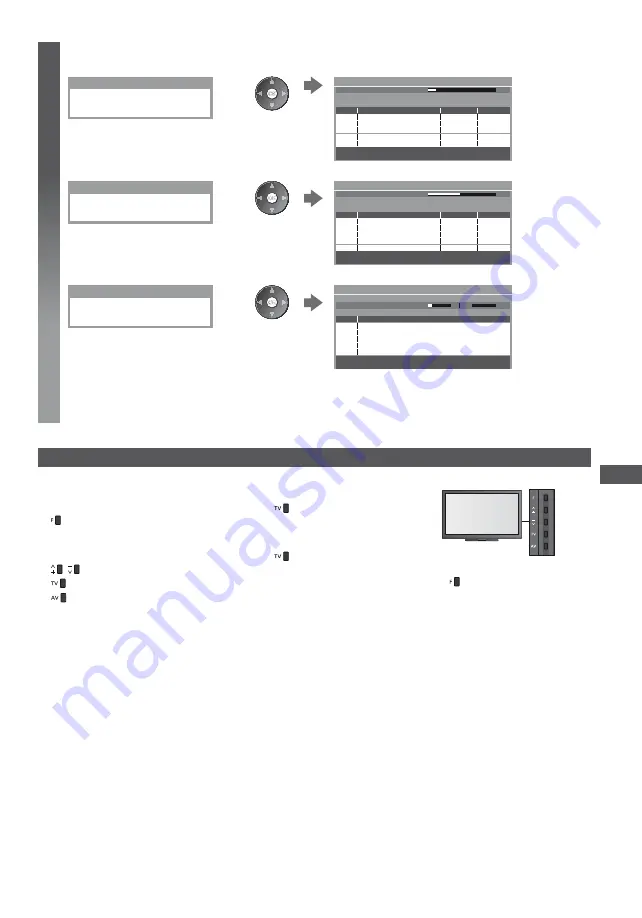
Start Auto Setup 

(Settings are made automatically)

DVB-C:

DVB-C Auto Setup

All DVB-C tuning data will be erased

0%

100%

1
2
3

100
100

CBBC Channel
BBC Radio Wales
E4

100

Searching

DVB-C Auto Setup

Progress

This will take about 3 minutes.

No.

Channel Name

Type

Free TV
Free TV
Free TV

Quality

Free TV: 3

Pay TV: 0

Radio: 0

DVB-T:

DVB-T Auto Setup

All DVB-T tuning data will be erased

CH 5

69

62
62
62

100
100

CBBC Channel
BBC Radio Wales
E4

100

62

100

Cartoon Nwk

Searching

CH

Channel Name

Type

Free TV
Free TV
Free TV
Free TV

Quality

Free TV: 4

Pay TV: 0

Radio: 0

DVB-T Auto Setup

Progress

This will take about 3 minutes.

Analogue:

Analogue Auto Setup

All analogue tuning data will be erased

CH 29
CH 33

BBC1

CH 2

78

41

CC 1

Searching

CH

Channel Name

Analogue: 2

Analogue Auto Setup

Scan
This will take about 3 minutes.

The channel, language and country / region settings are downloaded to Q-Link or VIERA Link compatible 
equipment connected to the TV.

When the operation is completed, the channel at the lowest position will be displayed.

Auto setup using the buttons on the TV

For Auto Setup, using the buttons on the TV (p. 10)

1


Press the F button repeatedly until [Auto 
Setup] appears

2


Access [Auto Setup]

To return to TV

Control panel OSD appears 
when pressing the control 
panel button.

3


Set the search mode and scan mode 
(DVB-C)

4


Start [Auto Setup]


 (select the item)

 (set)

 (store)

Содержание Viera TX-L37ET5EW

Страница 1: ...his product and retain them for future reference The images shown in this manual are for illustrative purposes only Please refer to Pan European Guarantee Card if you need to contact your local Panaso...

Страница 2: ...e signal which does not meet the standards of DVB T or DVB C Not all the features are available depending on the country area broadcaster service provider and network environment Not all CI modules wo...

Страница 3: ...y other manufacturers and we disclaim any liability or damage arising from operation and or performance from usage of such other maker s peripheral devices This product is licensed under the AVC paten...

Страница 4: ...epaired at your local Panasonic dealer Do not expose the TV to direct sunlight and other sources of heat Avoid exposing the TV to direct sunlight and other sources of heat To prevent the spread of fir...

Страница 5: ...table cloths and curtains We recommend that a gap of at least 10 cm is left all around this TV even when placed inside a cabinet or between shelves When using the pedestal keep the space between the b...

Страница 6: ...del minimum 10 mm maximum 14 mm 60 inches model minimum 8 mm maximum 10 mm Diameter M6 b View from the side Screw for fixing the TV onto the wall hanging bracket not supplied with the TV 42 47 55 60 i...

Страница 7: ...sonal injury may result Do not use the pedestal if it becomes warped or physically damaged If you use the pedestal while it is physically damaged personal injury may result Contact your local Panasoni...

Страница 8: ...al from the TV Be sure to remove the pedestal in the following way when using the wall hanging bracket or repacking the TV 1 Remove the assembly screws from the TV 2 Pull out the pedestal from the TV...

Страница 9: ...navigation and operation of various functions 11 Teletext p 26 Switches to teletext mode 12 Subtitles p 20 Displays subtitles 13 Numeric buttons Changes channel and teletext pages Sets characters Whe...

Страница 10: ...performed for the period selected in Auto Standby p 40 This function does not affect the recording of Timer Programming and Direct TV Recording 1 Remote control signal receiver Do not place any object...

Страница 11: ...USB 1 3 port p 60 87 4 HDMI1 4 p 12 87 5 Headphone jack p 88 6 ETHERNET p 13 7 Terrestrial cable terminal see below 8 DIGITAL AUDIO OUT p 87 9 PC terminal p 87 10 AV1 SCART p 12 11 AV2 COMPONENT VIDE...

Страница 12: ...strial aerial RF cable RF Cable Supplied with this TV Note Connect to the TV s AV1 for a DVD Recorder VCR supporting Q Link p 81 Q Link and VIERA Link connection p 79 80 Please also read the manual of...

Страница 13: ...et environment LAN cable Shielded Use the Shielded Twist Pair STP LAN cable Wireless connection Internet environment Access point Built in wireless LAN Built in wireless LAN 32 37 42 47 55 inches mode...

Страница 14: ...t set 3 Select your country Country Germany Denmark Poland Austria Sweden Czech France Norway Hungary Italy Finland Slovakia Spain Luxembourg Slovenia Portugal Belgium Croatia Switzerland Netherlands...

Страница 15: ...patible recorder is connected channel language and country region settings are automatically downloaded to the recorder 0 100 Sending Preset Data Please wait Remote control unavailable If downloading...

Страница 16: ...lected access point is not encrypted the confirmation screen will be displayed It is recommended to select the encrypted access point 3 Enter the encryption key of the access point A B C D E F G H I J...

Страница 17: ...set each item For details p 72 4 Go to the next step Press twice 7 Select Home Select Home viewing environment to use in your home environment Please select your viewing environment Home Shop select s...

Страница 18: ...hile to read all the data Messages might be displayed before VIERA Connect home screen Please read these instructions carefully and follow the on screen instructions Example VIERA Connect home screen...

Страница 19: ...ction menu is not displayed press the TV button to switch the mode 3 Select a channel up down or To select a more than two digit channel position number e g 399 To select from the Channel List 6 Carto...

Страница 20: ...Dolby Digital Plus Dolby Digital or HE AAC audio track Subtitle service available Teletext service available Multiple audio available Multiple video available Multiple audio and video available Stere...

Страница 21: ...e Language DVB Selects the language in which subtitles should appear if available Teletext Character Set Sets the teletext language font p 42 Teletext Language DVB Selects between alternative language...

Страница 22: ...the screen 14 9 Zoom1 Displays the image at the standard 14 9 without distortion Displays a 16 9 letterbox or 4 3 image without distortion Just Zoom2 Displays a 4 3 image full screen Stretching is onl...

Страница 23: ...21 00 21 00 22 00 22 00 23 00 23 00 23 30 Das Erste DIY SOS The Bill Red Cap Live junction POP 100 D BBC ONE 1 D BBC THREE 7 D E4 14 D BBC FOUR 70 TV Guide Portrait Wed 26 10 2011 10 46 Wed 26 10 2011...

Страница 24: ...lect the programme 2 View details Press again to return to TV Guide View advertisement Depending on the country you select this TV supports the GUIDE Plus system in DVB T or Analogue mode The postcode...

Страница 25: ...timer programming event To return to TV Guide Timer Programming p 50 52 If you select the current programme A confirmation screen asking whether you want to watch or record the programme appears Sele...

Страница 26: ...ject within the subject block After the last subject it moves to the next subject block yellow What is List mode In List mode four differently coloured page numbers are situated at the bottom of the s...

Страница 27: ...on you want to change View sub page View sub page Only when Teletext is more than one page Appears at top of the screen The number of sub pages varies depending on the broadcasters up to 79 pages It m...

Страница 28: ...ion menu 3 Select the input mode connected to the equipment Input Selection AV2 AV1 PC SD Card USB TV HDMI4 HDMI3 HDMI2 HDMI1 select watch You can also select the input using the AV button on the remo...

Страница 29: ...use Resume DVD Press and hold to play at slow speed Channel Up Down Select channel Direct TV Rec p 81 83 How to change the code Each type of the Panasonic equipment has its own remote control code To...

Страница 30: ...istake As the images are in 3D the distance between the user and screen may be mistaken causing the user to strike the screen which may result in injury When using the 3D Eyewear make sure your eyes a...

Страница 31: ...isplayed when you first watch the 3D image Select Yes or No to continue to view 3D images If you select Yes this message will be displayed again in the same condition after Mains power On Off switch i...

Страница 32: ...to 3D Please note the 3D images appear slightly different from the originals Using this function for profit making purposes or publically showing images converted from 2D to 3D in places such as shops...

Страница 33: ...ecaution message will appear Read it carefully and press the BACK RETURN button to go to Effect setting Effect Adjusts the 3D depth according to the contents or to your preference Edge Smoother Set to...

Страница 34: ...ons of each feature VIERA Link p 83 86 Photo p 62 Video p 66 Music p 68 VIERA Connect p 18 78 Media Server p 75 When two or more available devices are connected a selection screen will be displayed Pl...

Страница 35: ...ed change store Go to the next screen Child Lock Access Displays the next screen access To return to TV at any time To return to the previous screen To change menu pages up down Enter characters by fr...

Страница 36: ...Setup Menu is set to On p 43 You can set Viewing Mode in 2D and 3D mode for each Contrast Brightness Colour Sharpness Adjusts the levels of these options according to your personal preference Tint Ad...

Страница 37: ...tion for movie images Off On This function is available for the interlaced signal except in the mode of PC VIERA Connect or when Viewing Mode is set to Game 16 9 Overscan Selects the screen area displ...

Страница 38: ...e sound raise the level of the higher frequency To reset the levels of each frequency to the default settings select Reset to Defaults by using the cursor button and then press the OK button Balance A...

Страница 39: ...mpaired Set to Visual Impaired to activate the narration sound track when available on the broadcast For DVB mode SPDIF Selection SPDIF A standard audio transfer file format Selects the initial settin...

Страница 40: ...tandby mode Setup Eco Navigation Automatically sets the TV to the most suitable energy saving mode If you press the OK button the following items are set as below Eco Mode VIERA Link Power off Link St...

Страница 41: ...p 44 45 Manual Tuning Searches for the channels manually p 48 Update Channel List Updates the channel list while keeping your settings p 49 For DVB mode Favourite Network Selects your favourite networ...

Страница 42: ...uide Electronic Programme Guide EPG is available To use EPG p 23 Channel List The channel list will appear instead of EPG Input Labels Accesses the input labels list to select the label of each input...

Страница 43: ...s p 24 Postcode Sets your postcode to display advertisements in the GUIDE Plus system only available in some countries p 24 System Information Displays the system information of the GUIDE Plus system...

Страница 44: ...ess 3 Select DVB C Tuning Menu DVB T Tuning Menu or Analogue Tuning Menu DVB C Tuning Menu Access DVB T Tuning Menu Access Analogue Tuning Menu Access select access 4 Select Auto Setup Auto Setup Acce...

Страница 45: ...o Setup Progress This will take about 3 minutes Analogue Analogue Auto Setup All analogue tuning data will be erased CH 29 CH 33 BBC1 CH 2 78 41 CC 1 Searching CH Channel Name Analogue 2 Analogue Auto...

Страница 46: ...rite DVB channels Favourites Edit Create your favourite channel lists from various broadcasters up to 4 Favourites 1 to 4 The DVB Favourites lists are available from Category in the Information banner...

Страница 47: ...BC Channel 72 Cartoon Nwk 105 BBCi 719 BBC Radio Wales 720 BBC Radio Cymru 1 BBC ONE Wales 7 BBC THREE All DVB C Channels Sorting 123 select Reveal Hide To reveal all channels yellow Reveal Hide skip...

Страница 48: ...Manual Tuning Frequency Signal Quality Signal Strength No Channel Name Type New select channel adjust frequency Set where the level of Signal Quality becomes the maximum Set Analogue channel manually...

Страница 49: ...to give a notification message when a new DVB channel is found New channels found Press OK to update channel list Press EXIT to ignore Selecting OK will perform Update Channel List Check DVB signal Si...

Страница 50: ...mme may not be possible When recording programmes to the external recorder be sure to make the proper settings on the recorder connected to the TV If a recorder compatible with Q Link VIERA Link or si...

Страница 51: ...e order of 1 to 4 select the item set 1 3 and 4 can also be entered with numeric buttons D 7 BBC7 17 00 18 30 D 1 BBC1 STTL 18 00 20 00 C 3 ITV1 21 30 22 30 Timer Programming Function No Date Start En...

Страница 52: ...ccurs You press the OK button to view the programme or the EXIT button to cancel the reminder The timer programming event that the reminder is set for ends identifies that two or more timer programmin...

Страница 53: ...14 E4C VCR 1 BBC1 2 AV1 AV Child Lock List TV and AV Sorting 123 Name Input DVB C DVB T DVB T Analogue Analogue Analogue External Type Free TV Free TV Free TV Analogue Analogue Analogue Lock Appears w...

Страница 54: ...l 1 Select DVB C or DVB T p 19 2 Display the menu and select Setup Setup select access 3 Select Display Settings Access Display Settings select access 4 Select Data Service Application and set to Auto...

Страница 55: ...card reader then insert the view card into the card reader Insert the module in the correct direction Remove the CI module from the TV when placing the TV facing upward This may cause damages to the C...

Страница 56: ...ess 2 Select System Menu System Menu Access select access 3 Select Shipping Condition System Menu Shipping Condition Access select access Restore Settings Shipping Condition 1 Check the message and in...

Страница 57: ...rms a search in Standby and downloads an update if any software updates are available The automatic updating is performed under the following conditions Standby TV turned off with the remote control R...

Страница 58: ...wide view VGA 640 480 pixels WVGA 852 480 pixels XGA 1 024 768 pixels WXGA 1 280 768 pixels 1 366 768 pixels Options change depending on signals Clock Set to the minimum level if noise occurs H pos Ad...

Страница 59: ...t is available when Viewing Mode in the Picture Menu is set to True Cinema Menu Item Adjustments Configurations alternatives Picture Advanced Settings White Balance R Gain G Gain B Gain Adjusts the wh...

Страница 60: ...record of the date is shown The picture may not appear correctly on this TV depending on the recording equipment used Display may take some time when there are many files and folders Partly degraded f...

Страница 61: ...lideshow View Select Drive Select Contents Select Info View Option Menu SD Card Media Player Photo All photos Selected device name To display the information of the highlighted content 1 48 p1010001 J...

Страница 62: ...r Photo All photos To change the size of photos on a thumbnail screen select Change Size change Error display Single view Photos are displayed one at a time Select the file from the thumbnail of photo...

Страница 63: ...t is recommended to take a photo for L and then move your camera to the right about 5 cm and take another photo for R To view the created 3D photo with 3D effect you need the 3D Eyewear Standard acces...

Страница 64: ...played at a random position and random scale Drift calendar Drift Photos are displayed like flow images You can select to display the calendar or not The month of calendar is turned by pressing the le...

Страница 65: ...to Motion Repeat Slideshow repeat Off On Back Ground Music Selects the back ground music during Photo mode Off Type1 Type2 Type3 Type4 Type5 User Auto Type1 5 are the fixed music each installed in th...

Страница 66: ...3 Nature4 Nature5 Nature6 2011_9 Media Player Video Title view EXIT Video Setup p 67 Playback from the selected scene in the title SD Video or AVCHD 1 Select the title 2 Select the scene 3 Start playb...

Страница 67: ...ternatives Video Setup Video Preview Off On Multi Audio Dual Mono Audio Subtitle Subtitle Text Aspect Change Aspect1 Aspect2 Original Repeat Off On Title Audio output Settings see above 1 Display the...

Страница 68: ...Folder view EXIT Playback from File view 1 Select the folder 2 Select the file 3 Start playback How to operate in the playback My Song_9 My Favourite My Music_1 00 02 43 00 05 44 EXIT Music Setup 1 D...

Страница 69: ...edia server is the product of PacketVideo Corporation To obtain the Installation Guides for installing and setting TwonkyMedia server visit the website of TwonkyMedia Additional fees may be charged to...

Страница 70: ...cable for this connection If your modem has no broadband router functions use a broadband router If your modem has broadband router functions but there are no vacant ports use a hub Ensure that the br...

Страница 71: ...ntrol DLNA Remote Volume Network Link Settings Network Remote Control On On On select access store Menu Item Adjustments Configurations alternatives Network Link Settings VIERA Name Sets your favourit...

Страница 72: ...ire DNS Address DNS Address Proxy Settings IP DNS Settings Auto The available settings are displayed automatically Manual settings IP Address Subnet Mask Default Gateway DNS Address select access stor...

Страница 73: ...ccess store 2 Select Wireless Network Settings Connection Test Network Connection Wireless Network Settings IP DNS Settings Network Link Settings Software Update Wireless New Software Message Network...

Страница 74: ...PIN Enter the PIN code to the access point and then select Connect Please register the following PIN codes on the wireless access point PIN code 12345678 Select Connect after entering and saving the s...

Страница 75: ...2012 01 28 14 48 2012 02 09 19 58 P000135 P000180 P000214 P000251 P000276 P000293 V100025 V100042 M10054 M10078 3648x2736 JPEG Info Select Pixel Media Server Format EXIT RETURN View Slideshow Option...

Страница 76: ...skip forward about 30 seconds Stop To change aspect For music file Playback Playback will start Example Playback My Song_9 My Favourite My Music_1 00 02 43 00 05 44 EXIT RETURN Operation guide To disp...

Страница 77: ...ground music during Photo mode Off Type1 Type2 Type3 Type4 Type5 Video Setup Video Preview Sets to start the preview of the title or scene in the thumbnail screen Off On Image may not be displayed fo...

Страница 78: ...ormation of the TV you entered on VIERA Connect Lock Sets to restrict access to some services Restrictions Sets to restrict reveal of the restricted services Beep Sets beep sound On or Off when operat...

Страница 79: ...k Power off link Direct TV Recording Connection SCART cable DVD Recorder VCR with Q Link function Use fully wired SCART cable Connect the DVD Recorder VCR supporting Q Link to the TV s AV1 terminal vi...

Страница 80: ...tor in the Setup Menu p 40 Use the optical digital audio cable or SCART cable for audio output from the TV 1 Available with the equipment which has HDAVI Control 2 or later function 2 Available with t...

Страница 81: ...corder s tuner AV Recorder s tuner AV watching recorder s external input AV Recorder s external input AV watching TV s external input AV TV monitor out When Direct TV Recording is performed the record...

Страница 82: ...d the manual of the equipment For optimal recording the settings of the recorder may need to be changed For details read the manual of the recorder Download preset channel language and country region...

Страница 83: ...to standby This function may not work properly depending on the connected equipment If required set to Off Direct TV Recording What you see is What you record Direct TV Rec Records the current program...

Страница 84: ...ed on HDD from where it was paused If the paused TV picture disappears after a few minutes press OPTION button to restore the pause picture Follow the operation guide to operate Pause Live TV function...

Страница 85: ...other manufacturers equipment is accessed Setup Contents Selection menu may be displayed Available VIERA remote control buttons depend on the connected equipment Note Some operations may not be avail...

Страница 86: ...speakers is mute When the equipment is turned off TV speakers will be active TV TV speakers are active Multi channel sound If you want to enjoy the multi channel sound e g Dolby Digital 5 1ch via an A...

Страница 87: ...MPONENT VIDEO adaptor supplied AV2 COMPONENT VIDEO adaptor supplied To watch DVDs DVD Player Listening Viewing USB devices Communication Camera HDMI equipment Fully wired HDMI compliant cable Recorder...

Страница 88: ...h 3D contents Blu ray Disc Player To watch satellite broadcasts Set top box 2 To watch DVDs DVD Player To watch camcorder images Video camera To play games Game equipment To use amplifier with speaker...

Страница 89: ...76 50i 50p 750 720 60p 50p 1 125 1 080 60i 50i HDMI1 HDMI2 HDMI3 HDMI4 525 480 60i 60p 625 576 50i 50p 750 720 60p 50p 1 125 1 080 60i 50i 1 125 1 080 60p 50p 24p Auto mode Auto mode determines the be...

Страница 90: ...OV mov qt DivX3 DivX4 DivX5 DivX6 H 264 BP MP HP Motion JPEG MPEG1 MPEG2 MPEG4 SP ASP AAC Dolby Digital Dolby Digital Plus DTS core HE AAC LPCM MPEG Audio MP3 This TV supports Motion JPEG recorded by...

Страница 91: ...P ASP AAC HE AAC PS mpg mpeg vob vro H 264 2 MPEG1 MPEG2 VC 1 2 AAC 2 Dolby Digital Dolby Digital Plus 2 HE AAC 2 LPCM MPEG Audio MP3 2 2 This codec can be played back only in Media Player TS m2ts tp...

Страница 92: ...OUT DIVX VIDEO ON DEMAND This DivX Certified device must be registered in order to play purchased DivX Video on Demand VOD movies To obtain your registration code locate the DivX VOD section in the Se...

Страница 93: ...rect direction Otherwise this can damage device or TV Electrical interference static electricity or erroneous operation may damage the data or device Back up the recorded data at regular intervals in...

Страница 94: ...io to 16 9 These HDMI connectors are type A These HDMI connectors are compatible with HDCP High Bandwidth Digital Content Protection copyright protection Equipment having no digital output terminal ma...

Страница 95: ...ncy kHz Vertical frequency Hz 640 480 60 Hz 31 47 59 94 800 600 60 Hz 37 88 60 32 852 480 60 Hz 31 44 59 89 1 024 768 60 Hz 48 36 60 00 1 280 768 60 Hz 47 70 60 00 1 280 1 024 60 Hz 63 98 60 02 1 366...

Страница 96: ...1 _ d e f 3 D E F g h i 4 G H I j k l 5 J K L m n o 6 M N O p q r s 7 P Q R S t u v 8 T U V w x y z 9 W X Y Z Space 0 a b c 2 A B C Numeric buttons Numeric buttons Characters Characters SCART and HDM...

Страница 97: ...l dealer Neither image nor sound is produced Check the TV is turned on Check the mains lead is plugged into the TV and the socket outlet Check the TV is in AV mode Check the correct input mode is sele...

Страница 98: ...to correct your eyesight before use There is something wrong with the 3D images Check the setting of Edge Smoother p 33 HDMI Sound is unusual Set the sound setting of the connected equipment to 2ch L...

Страница 99: ...mote control signal receiver Parts of the TV become hot Even when the temperature of parts of the front top and rear panels has risen these temperature rises do not cause any problems in terms of perf...

Страница 100: ...ion and Sony Corporation DivX DivX Certified DivX Plus HD and associated logos are trademarks of Rovi Corporation or its subsidiaries and are used under license QuickTime and the QuickTime logo are tr...

Страница 101: ...no more than our cost of physically performing source code distribution a complete machine readable copy of the corresponding source code covered under LGPL Contact Information cdrequest am linux jp...

Страница 102: ...m stereo mini Jack 1 Receiving systems Band name Check the latest information on the available services at the following website English only http panasonic jp support global cs tv PAL B G H I SECAM B...

Страница 103: ...00 GHz 5 580 GHz 5 660 GHz 5 700 GHz IEEE802 11b g n 2 412 GHz 2 472 GHz Security WPA2 PSK TKIP AES WPA PSK TKIP AES WEP 64 bit 128 bit The frequency and channel differ depending on the country 3D Eye...

Страница 104: ...ervice or the point of sale where you purchased the items Penalties may be applicable for incorrect disposal of this waste in accordance with national legislation For business users in the European Un...

Отзывы: