background image

6

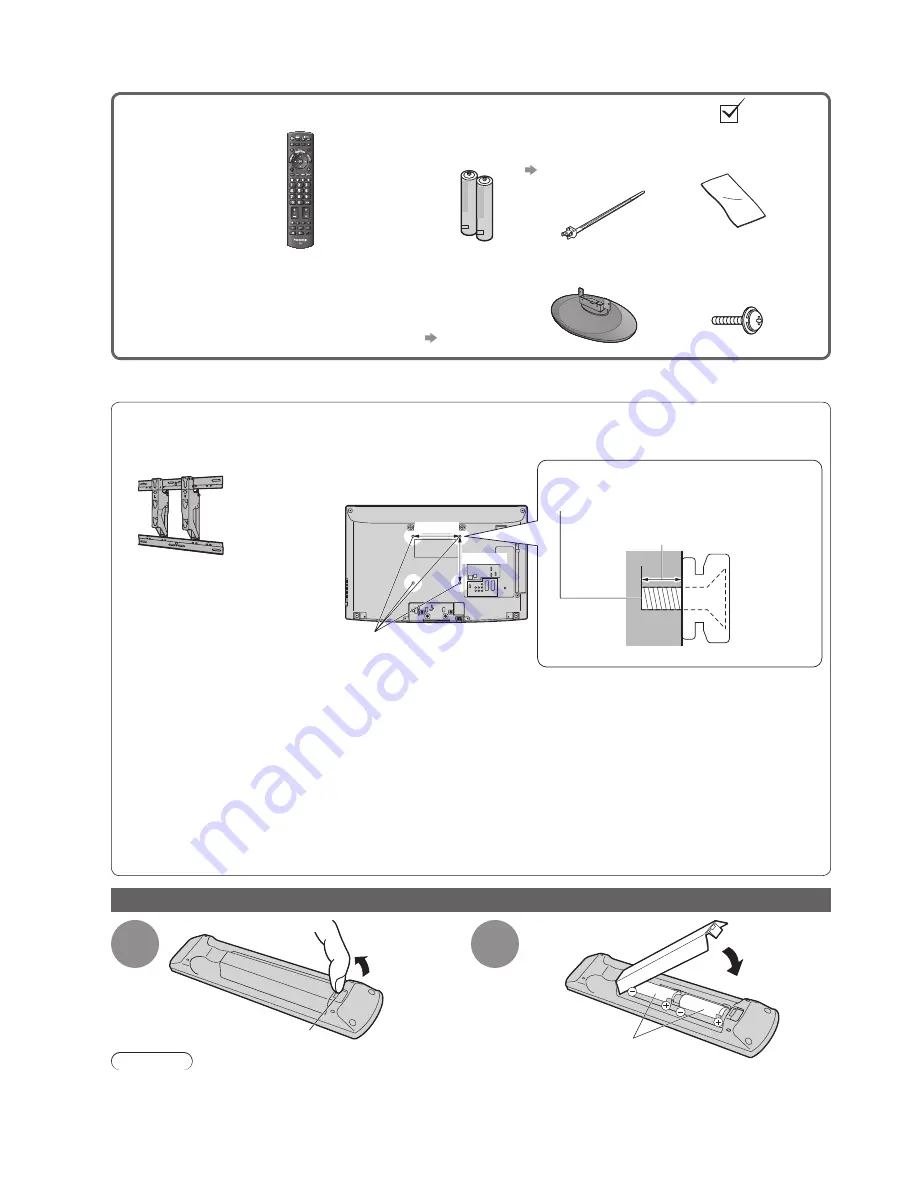
Accessories / Options

This product contains possibly dangerous parts (such as plastic bags), that can be breathed in or swallowed by 


young children accidentally. Keep these parts out of reach of young children.

Standard accessories 

Check that you have the accessories and items shown 

Remote Control


N2QAYB000428


abc

def

jkl

ghi

mno

tuv

pqrs

wxyz

Batteries for the 


Remote Control (2)

R6 (UM3)


Clamper


TMM8E18048


 p. 8

Cleaning cloth


TXFPE01RLTB


Operating Instructions


Pan European Guarantee Card


CRM 


(Customer Relationship Management)

Pedestal


TBLA0407


(TX-L32G10B)

TBLA0410


(TX-L37G10B)

 p. 7                      

Assembly screw 


for Pedestal (4)

XYM4+C10FJK


M4 × 10

Optional accessories

Please contact your nearest Panasonic dealer to purchase the 

recommended wall-hanging bracket. For additional details, please 

refer to the wall-hanging bracket installation manual.

(View from the side)

Rear of the TV

Holes for wall-hanging 

bracket installation

200 mm

Depth of screw: 

minimum 9 mm, maximum 12 mm

200 mm

Screw for fixing the TV onto the 

wall-hanging bracket

(not supplied with the TV)

Wall-hanging bracket

TY-WK3L2RW


WARNING!

Failure to use a Panasonic bracket or choosing to mount the unit yourself will be done at the risk of the 


consumer. Any damage resulting from not having a professional installer mount your unit will void your 

warranty.

Always be sure to ask a qualified technician to carry out set-up.


Incorrect fitting may cause equipment to fall, resulting in injury and product damage.

Do not mount the unit directly below ceiling lights (such as spotlights, floodlights or halogen lights) which 


typically give off high heat. Doing so may warp or damage plastic cabinet parts.

Take care when fixing wall brackets to the wall. Always ensure that there are no electrical cables or pipes in 


the wall before hanging bracket.

When using the angled-type wall hanging bracket, please ensure that there is sufficient space for the 


connecting cables not to press against the wall when the TV is tilted forward.

To prevent fall and injury, remove the TV from its fixed wall position when it is no longer in use.


Installing / removing remote’s batteries

1

Pull 

open

Hook

2

Note the correct

polarity (+ or -)

Close

Caution

Incorrect installation may cause battery leakage and corrosion, resulting in damage to the remote control.


Do not mix old and new batteries.


Do not mix different battery types (such as alkaline and manganese batteries).


Do not use rechargeable (Ni-Cd) batteries.


Do not burn or breakup batteries.


Batteries must not be exposed to excessive heat such as sunshine, fire or the like.

Содержание VIERA TX-L32G10B

Страница 1: ...ions LCD Television Model No TX L32G10B TX L37G10B Please read these instructions before operating your set and retain them for future reference The images shown in this manual are for illustrative purposes only English U K Standard ...

Страница 2: ... VIERA TOOLS Display special feature icons for easy accessibility p 14 VIERA TOOLS is the easy way to access the special features with the VIERA TOOLS button HD TV 1080p This TV supports high definition TV signals Sharp pictures with HDMI connection p 70 Enjoy high definition digital picture and high quality sound by using an HDMI cable This TV incorporates HDMI Version 1 3a with x v Colour techno...

Страница 3: ...ns 79 FULL HD This TV uses a high definition panel to produce high definition pictures close to their original resolution Intelligent Frame Creation This increases the frame count and allows natural frame to frame transitions for flicker less motion images with high resolution Wide Viewing Angle This LCD panel offers 178 degree viewing angle This delivers beautiful images regardless of the viewing...

Страница 4: ...ced If you lose the fuse cover the mains plug must not be used until a replacement cover is obtained A replacement fuse cover may be purchased from your local Panasonic dealer If the fitted moulded mains plug is unsuitable for the socket outlet in your home then the fuse shall be removed and the mains plug cut off and disposed of safety There is a danger of severe electrical shock if the cut off m...

Страница 5: ... surface clean with a dry cloth Caution Take care not to subject the TV s surfaces to detergent A liquid inside the TV could lead to product failure Take care not to subject surfaces to insect repellent solvent thinner or other volatile substances this may deteriorate the surface by peeling the paint Do not allow the cabinet and pedestal to make contact with a rubber or PVC substance for a long ti...

Страница 6: ...one at the risk of the consumer Any damage resulting from not having a professional installer mount your unit will void your warranty Always be sure to ask a qualified technician to carry out set up Incorrect fitting may cause equipment to fall resulting in injury and product damage Do not mount the unit directly below ceiling lights such as spotlights floodlights or halogen lights which typically...

Страница 7: ...nocked or children climb onto the pedestal with the TV installed the TV may fall over and personal injury may result Two or more people are required to install and remove the TV If two or more people are not present the TV may be dropped and personal injury may result Securing the TV Use the assembly screws to fasten securely Make sure that the screws are securely tightened Carry out the work on a...

Страница 8: ...TV to standby mode by the remote control Function select Volume Contrast Brightness Colour Sharpness Tint NTSC mode Bass Treble Balance Auto Setup p 34 and p 35 Remote control signal receiver Do not place any objects between the TV remote control signal receiver and remote control Timer LED Active for Timer Programming or Standby for Direct TV Recording orange flash Timer Programming On orange Inc...

Страница 9: ...index page teletext mode Coloured buttons Used for the selection navigation and operation of various functions Exit Returns to the normal viewing screen Numeric buttons Changes channel and teletext pages Sets characters When in Standby mode switches TV On VIERA Link Menu p 62 Accesses VIERA Link Menu Guide p 18 Displays TV Guide Option Menu p 17 Easy setting for viewing and sound options Main Menu...

Страница 10: ...r HDMI compatible equipment possible to connect to HDMI terminals HDMI1 HDMI2 HDMI3 HDMI4 by using HDMI cable p 66 Q Link connection p 58 VIERA Link connection p 58 and p 59 Read the manual of the equipment too External equipment and cables shown are not supplied with this TV Please ensure that the unit is disconnected from the mains socket before attaching or disconnecting any leads Example 1 Con...

Страница 11: ...F OUT RF IN 11 Rear of the TV DVD Recorder or VCR Cable TV box Fully wired SCART cable RF cable RF cable RF cable RF cable RF cable Example 2 Connecting DVD Recorder VCR TV DVD Recorder or VCR Example 3 Connecting DVD Recorder VCR and Cable TV box TV DVD Recorder VCR and Cable Mains lead Mains lead AC 220 240 V 50 60 Hz AC 220 240 V 50 60 Hz Rear of the TV Fully wired SCART cable Fully wired HDMI ...

Страница 12: ... 10 62 Cartoon Nwk Free TV 10 29 Analogue 33 Free TV 4 Pay TV 0 Radio 0 Data 0 Analogue 2 Searching BBC1 Analogue Sending Preset Data Please wait Remote control unavailable 0 100 If Q Link or similar technology p 60 compatible recorder with analogue tuner is connected analogue channel setting is automatically downloaded to the recorder Digital channel setting is not downloaded If downloading has f...

Страница 13: ...V W X Y Z 0 1 2 3 4 5 6 a b c d e f g h i j k l m n u v w x y z _ O P Q R S T 7 8 9 o p q r s t 1 2 abc 3 def 4 ghi 5 jkl 6 mno 7 pqrs 8 tuv 9 wxyz 0 Enter the PIN number twice at first setting access select select set You can set characters by using numeric buttons Characters table for numeric buttons p 69 Shop mode for shop display use only Automatic Demo Off On selection screen is displayed Aut...

Страница 14: ...ment on and then switch the TV on 1 Display icons of the feature VIERATOOLS 2 Select a feature VIERA Link Control access select 3 Follow the operations of each feature VIERA Link Control VIERA Link Control p 64 When more than two pieces of compatible equipment are connected a selection screen will be displayed Please select the correct description and access Pause Live TV Pause Live TV p 63 Slides...

Страница 15: ...n Press for about 1 second Mains power On Off switch should be On p 8 2 Select the mode freesat DVB Analogue or Other Sat TV Selection freesat DVB Other Sat Analogue Displayed if Other Satellite channels are tuned p 43 watch select TV Also possible by pressing the TV button repeatedly on the remote control or side panel of the TV p 8 103 ITV Wales 19 35 Coronation Street Now For info press freesat...

Страница 16: ...lable Multi Audio Multiple audio available Stereo Mono NICAM Audio mode 1 90 Off Timer remaining time For settings p 17 Encrypted Subtitles AD Radio For info press 3 ITV 19 35 itv1 All Analogue Channels CH23 A NICAM TXT 45 Mute Example Analogue Channel number Current time Display Information banner Also appears when changing a channel To confirm another tuned channel name To watch the channel list...

Страница 17: ...inition signals Display the selectable settings for the current programme Check or change the current programme status instantly OPTION To change change select Multi Audio AD freesat mode Allows you to select between alternative language or Audio Description for sound tracks if available Set Audio Description Auto in the Sound Menu p 31 to select the audio description sound track In freesat mode A...

Страница 18: ...rama Sports Hot Wars Emmerdal 10 O clock News BBC Panorama I m A Celebrity Rugby BBC ONE BBC 2W BBC NEWS BBCi BBC THRE BBC FOUR BBC Radio GUIDE 101 102 103 104 105 106 107 Programme Current date and time TV Guide time Channel position and name TV Guide date Landscape Displays by channel Example 101 BBC ONE 102 BBC 2W 103 BBC NEWS 104 BBCi 19 30 20 00 20 00 20 30 20 30 21 00 21 00 22 00 22 30 23 00...

Страница 19: ...egory EXIT D 1 BBC ONE D 7 BBC THREE D 14 E4 D 70 BBC FOUR 19 30 20 00 20 00 20 30 20 30 21 00 21 00 22 00 22 30 23 00 23 00 23 30 23 00 00 00 Eastender DIY SOS The Bill Red Cap Live junction POP 100 Rugby Wed 24th Wed 24 10 2007 10 46 TV Guide Portrait All Types All Channels Info Change display mode Select Advert GUIDE OPTION Portrait Displays by time Example To the previous day DVB mode red To t...

Страница 20: ...rogramme controlled by information from the TV Guide Programme start and end times may be changed by broadcasters and sent to the TV for timer programme to follow the change Split Programme is a programme which is interrupted by one or more other programmes Both of the above are subject to signals being sent by broadcasters Select the forthcoming programme to output to external recorder select set...

Страница 21: ...it is possible to navigate the pages using buttons on the remote control but because the commands available must apply to all manufacturers of digital equipment some on screen commands may not correspond exactly to the remote control buttons For example When select or go is displayed When symbol is displayed When back key is displayed BACK RETURN When the key words are displayed on colour bar red ...

Страница 22: ...the TV s memory Store frequently viewed pages p 23 To change mode Teletext in the Setup Menu p 33 1 Select Analogue or Other Sat p 15 TV Other Sat programmes are digital broadcasts The operations of the teletext services however are equal to Analogue teletext service 2 Switch to Teletext 01 02 03 04 05 06 07 TELETEXT INFORMATION 17 51 28 Feb Time date Sub page number Colour bar Current page number...

Страница 23: ...oured button you want to change Enter new page number press and hold abc def jkl ghi mno tuv pqrs wxyz View sub page View sub page Only when teletext is more than one page Appears at top of the screen To view specific sub page MENU blue Enter the 4 digit number example P6 mno Sub pages The number of sub pages varies depending on the broadcasters up to 79 pages It may take some time for searching d...

Страница 24: ...nput mode is not switched automatically Perform and Check the setup of the equipment 2 Display the Input select menu AV 3 Select the input mode connected to the equipment Input Selection AV1 AV2 S COMPONENT AV3 S PC HDMI1 HDMI4 HDMI3 HDMI2 TV select watch You can also select the input using the AV button on the remote control or the side panel of the TV Press the button repeatedly until the desire...

Страница 25: ...ent in VIERA Link VIERA Link Control p 64 Standby Set to Standby mode Turn on Play Playback videocassette DVD Stop Stop the operations Rewind Skip Search VCR Rewind view the picture rapidly in reverse DVD Skip to the previous track or title Press and hold to search backward Fast forward Skip Search VCR Fast forward view the picture rapidly forward DVD Skip to the next track or title Press and hold...

Страница 26: ...at any time EXIT To return to the previous screen BACK RETURN To change menu pages up down Choose from among alternatives To reset the settings To reset the picture settings only Reset to Defaults in the Picture Menu p 30 To reset the sound settings only Reset to Defaults in the Sound Menu p 31 To reset the picture and sound settings together N Also volume level and aspect mode are reset To initia...

Страница 27: ...icture Menu 2 2 Advanced PC Settings Access 3D COMB Off Reset to Defaults Reset Picture Menu P NR Off p 30 1 2 Mode Music Bass Treble Balance Headphone Volume Surround Off Volume Correction Speaker Distance to Wall Over 30cm Sound Menu Preferred Multi Audio English 2 2 HDMI1 Input Digital Audio Description Access Reset to Defaults Reset Sound Menu SPDIF Selection Auto NICAM Off p 31 R Gain G Gain ...

Страница 28: ...r ID Access Common Interface Access System Information Access Software Licence System Update Shipping Condition Access Access Access p 33 Other Satellite Tuning Menu Auto Setup Access Channel List Access Signal Condition Access Favourites Edit Access Manual Tuning Access Add New Channels Access p 42 Overview Setup Main Menu Picture Sound Setup Available in DVB Available in Analogue Available in An...

Страница 29: ...ameter CH62 802 MHz Wenvoe p 38 DVB Favourites Editor BBC One Wales All DVB Channels 1 BBC THREE 7 E4 14 CBBC Channel 70 Cartoon Nwk 72 BBCi 105 BBC Radio Wales 719 BBC Radio Cymru 720 Favourites1 p 39 Other Sat Favourites Editor BBC One Wales All Other Sat Channels 1 BBC THREE 2 E4 3 CBBC Channel 4 Cartoon Nwk 5 BBCi 6 BBC Radio Wales 7 BBC Radio Cymru 8 Favourites1 p 44 BBC1 Analogue Channel Lis...

Страница 30: ...yed in the top right of the screen Playing Time Display p 33 Contrast Brightness Colour Sharpness Increases or decreases the levels of these options according to your personal preference Tint With an NTSC signal source connected to the TV the picture hue can be adjusted to suit your taste For NTSC signal reception only Colour Balance Allows you to set the overall colour tone of the picture Cool No...

Страница 31: ...back space between the TV and wall is within 30 cm Up to 30cm is recommended Preferred Multi Audio Selects the preferred language for digital channel multi audio depending on the broadcaster NICAM NICAM Near Instantaneous Companded Audio Multiplex A format for digital sound over television Reproduces stereo sound Off On Off if reception is poor FM monaural sound Analogue mode only HDMI1 4 Input Se...

Страница 32: ... Tuning Menu Favourites Edit Creates list of favourite freesat channels p 37 Channel List Skips the unwanted freesat channels p 37 Auto Setup Automatically sets the freesat channels received in the area p 34 Signal Condition Checks the freesat signal condition p 37 DVB Tuning Menu Favourites Edit Creates list of favourite DVB channels p 39 Channel List Skips the unwanted DVB channels or edits DVB ...

Страница 33: ...tically compensates the picture frame rate to make the image smooth Off Mid Max 24p signal input only Set to Off if noise is generated on the screen Power on Preference Automatically selects the input when the TV is turned on TV AV Set to TV to view picture from TV tuner Set to AV to view input from an external equipment connected to a SCART terminal e g cable TV box The external equipment must be...

Страница 34: ...t Auto Setup freesat Auto Setup Signal Quality 0 10 Signal Strength 0 10 TV Channels Found 8 Radio Channels Found 2 Data Channels Found 1 Searching Channels found creating channel list Settings are made automatically 7 Enter your postcode Enter Postcode for local channels including space Postcode A B C D E F G H I J K L M N U V W X Y Z 0 1 2 3 4 5 6 O P Q R S T 7 8 9 1 2 abc 3 def 4 ghi 5 jkl 6 mn...

Страница 35: ...uning Menu Auto Setup Access Channel List Manual Tuning 6 Start Auto Setup All DVB tuning data will be erased DVB Auto Setup DVB DVB Auto Setup This will take about 3 minutes Scan CH 21 68 62 CH Channel Name Type Quality CBBC Channel Free TV 10 62 BBC Radio Wales Free TV 10 62 E4 Free TV 10 62 Cartoon Nwk Free TV 10 Free TV 4 Pay TV 0 Radio 0 Data 0 Searching All analogue tuning data will be erase...

Страница 36: ... Other Sat Tuning Menu Setup Menu Off Timer Off System Menu Display Settings Other Settings access select 5 Select one of the following functions Auto Setup Signal Condition Channel List freesat Tuning Menu Favourites Edit Access Access Access Access Retuning from Setup Menu p 34 access select 6 Set You can retune channels or make your favourite channel list skip unwanted channels etc To return to...

Страница 37: ...ers known as logical channel numbers cannot be changed due to broadcast restrictions To delete all channels yellow Store BACK RETURN Skip unwanted freesat channels Channel List You can hide unwanted freesat channels The hidden channels cannot be displayed except in this function Use this function to skip unwanted channels Select a channel and reveal hide BBC 1 Scotland freesat Channel List BBC 2 S...

Страница 38: ... update channel name and position automatically to Channel List Update Channel List CH Channel Name Type Quality Searching Analogue Scan 21 68 Scan CH 21 68 This will take about 3 minutes Free TV 0 Pay TV 0 Radio 0 Data 0 Channel List is updated while keeping your settings in Favourites Edit Channel List Child Lock Timer Programming etc Display a notification message New Channel Message Selects wh...

Страница 39: ... 0 set select You can set characters by using numeric buttons Characters table for numeric buttons p 69 BACK RETURN To move the channel green Select the new position Confirm green Store BACK RETURN Skip unwanted DVB channels Edit DVB Channels Channel List You can hide unwanted DVB channels The hidden channels cannot be displayed except in this function Use this function to skip unwanted channels S...

Страница 40: ...ink Settings Analogue Tuning Menu Access Child Lock Setup Menu Off Timer Off System Menu Display Settings Other Settings access select 5 Select one of the following functions Manual Tuning Auto Setup Analogue Tuning Menu Channel List Access Access Access Retuning from Setup Menu p 35 access select 6 Set You can retune channels or skip unwanted channels edit channels etc To return to TV EXIT Tuning...

Страница 41: ...g red see below To move the channel position green Select the new position Store green To rename the channel name blue Set characters one by one Store maximum five characters Edit channel name Name A B C D E F G H I J K L M N U V W X Y Z 0 1 2 3 4 5 6 a b c d e f g h i j k l m n u v w x y z _ O P Q R S T 7 8 9 o p q r s t 1 2 abc 3 def 4 ghi 5 jkl 6 mno 7 pqrs 8 tuv 9 wxyz 0 set select BACK RETURN...

Страница 42: ... Tuning Access Add New Channels Access access select 6 Set To return to TV EXIT Tuning and Editing Channels Other Sat Set Other Sat channel manually Manual Tuning Normally use Auto Setup or Add New Channels to tune Other Sat channels Other Satellite Manual Tuning Transponder Frequency 10773 Polarisation Horizontal Symbol Rate Ksym s Auto Set tuning parameters for the required satellite details can...

Страница 43: ...ing data will be erased Set the search mode and start Auto Setup Search Mode Free Channels All Channels start set Other Satellite Auto Setup Analogue Scan 21 68 Satellite No Channel Name Type Quality Free TV 4 Pay TV 0 Radio 0 Searching This may take up to 20 minutes Progress 0 100 Astra 2 Eurobird 1 BBC 1 East W Free TV 10 2 BBC 1 Cl Free TV 10 3 BBC HD Free TV 10 4 6945 Free TV 10 If you select ...

Страница 44: ...Z 0 1 2 3 4 5 6 a b c d e f g h i j k l m n u v w x y z _ O P Q R S T 7 8 9 o p q r s t 1 2 abc 3 def 4 ghi 5 jkl 6 mno 7 pqrs 8 tuv 9 wxyz 0 set select You can set characters by using numeric buttons Characters table for numeric buttons p 69 BACK RETURN To move the channel green Select the new position Confirm green Store BACK RETURN Skip unwanted Other Sat channels Edit Other Sat Channels Channe...

Страница 45: ...ef jkl ghi mno tuv pqrs wxyz Enter the PIN number twice at first setting Make a note of the PIN number in case you forget it Select Child Lock List Child Lock Child Lock List Change PIN Access select access Select the channel input to be locked Child Lock List TV and AV Name Input Lock Type BBC 1 Wales freesat Free TV BBC THREE DVB Lock Free TV E4 DVB Lock Free TV VCR Analogue Lock Analogue BBC1 A...

Страница 46: ...g Menu Setup Menu Off Timer Off System Menu Display Settings Other Settings access select 4 Select Network Setup Link Settings Q Link AV2 AV2 out TV Network Setup Access Q Link Download Intelligent Auto Standby Standby Power Save VIERA Link On On On No reminder access select 5 Set Network settings are for applications from broadcasters to enable greater interactivity and added features for freesat...

Страница 47: ...I J K L M N U V W X Y Z 0 1 2 3 4 5 6 a b c d e f g h i j k l m n u v w x y z _ O P Q R S T 7 8 9 o p q r s t 1 2 abc 3 def 4 ghi 5 jkl 6 mno 7 pqrs 8 tuv 9 wxyz 0 set select You can set characters by using numeric buttons Characters table for numeric buttons p 69 Proxy Port Sets Proxy port number This number is also specified by the provider with the Proxy address Select Proxy Port Move the curso...

Страница 48: ...ect Input Labels DVB DVB freesat freesat Other Sat Other Sat Analogue Analogue 2 2 The labels you set will be displayed in Input Selection menu p 24 TV Selection menu p 15 or banner If Skip is selected you cannot select the mode For easier identification and selection of the input mode you can label each input mode or skip terminal that is not connected to any equipment To select the input mode p ...

Страница 49: ...dition Access access select 5 Set Resets the TV to its original condition i e no channels tuned in All settings other than Owner ID are reset channels picture sound settings etc To return to TV EXIT Restore Settings Shipping Condition Check the message and initialise EXIT RETURN Confirm All tuning data will be erased Are you sure Are you sure Shipping Condition confirm confirm start Shipping Condi...

Страница 50: ...m Update Shipping Condition Access access select Common Interface is available in DVB or Other Sat mode only 6 Set Advanced Settings provide various features To return to TV EXIT Update TV s software system System Update Download new software to TV For details p 71 If System Update is performed the software will be updated it may change TV functions If you do not wish to do so set Auto Update Sear...

Страница 51: ...mber Select PIN Enter a new PIN number twice PIN NAME HOUSE NO POSTCODE Owner ID Data Entry select access abc def jkl ghi mno tuv pqrs wxyz Pay TV Common Interface The Common Interface Module menu provides access to software contained on Common Interface CI Modules This TV receiver works only Pay TV modules complying with CI standard This function is not available for BSkyB s Sky channels Caution ...

Страница 52: ...set Q Link in the Setup Menu p 32 to the connected terminal AV1 or AV2 and make timer programming of the recorder Read the manual of the recorder Recording is possible in composite video via SCART only including HD content While recording you cannot watch any other channels except the one being recorded 1 Select the mode you want to set a recording p 15 TV 2 Display the menu MENU 3 Select Setup Ma...

Страница 53: ...recording will be cancelled 53 Set timer programming details Timer Programming Start making the settings Repeat the operations as below and set items in the order of to select the item set and can also be entered with numeric buttons abc def jkl ghi mno tuv pqrs wxyz 1 D BBC1 Holiday News 18 10 FR 18 00 20 00 120 Off Date Start End min STTL 3 D ITV1 Freshly Squeezed Extra 18 10 SA 21 30 22 30 60 O...

Страница 54: ...10 p1010009 Photo View Mode Folder view 100_PANA Slideshow Sort by Month Sort by Date Select EXIT Select RETURN View Thumbnail Error display images that could not be loaded etc Selected photo Selected photo information is displayed select single view Slideshow p 55 Rotate Rotate Select Slideshow Single view EXIT List Operation guide Single view Displayed one at a time To display hide the operation...

Страница 55: ...s Nature 14 pictures Fruit 18 pictures ROOM 1 picture 201_PANA 7 pictures Photo View Mode Folder view Select EXIT Select RETURN All pictures View Folder view green File name Date Pixel p1010001 1 175 23 10 2008 1600 x 1200 p1010004 p1010003 p1010002 p1010001 p1010008 p1010007 p1010006 p1010005 p1010012 p1010011 p1010010 p1010009 Photo View Mode All pictures Slideshow Folder view Sort by Month Sort...

Страница 56: ...top To the previous movie red To the next movie green To return to list stop To change aspect ratio only for the 4 3 movie content ASPECT Movie View Audio Settings You can enjoy the multi channel sound via an amplifier connected to DIGITAL AUDIO OUT terminal To confirm or change the current sound status during playback Display the Option menu Change the sound if the movie has multiple audio signal...

Страница 57: ... white balance for green areas B Gain Adjusts the white balance for blue areas Gamma Switches the gamma curve 2 0 2 2 2 5 Reset to Defaults Press the OK button to reset to the default Advanced PC Settings Setup PC Setup Input Resolution Switches to a wide view VGA 640 480 pixels WVGA 852 480 pixels XGA 1 024 768 pixels WXGA 1 280 768 pixels 1 366 768 pixels Options change depending on signals Cloc...

Страница 58: ...alogue channel download Easy playback Power on link Power off link Reduce unnecessary power consumption in standby 3 3 Auto standby for unnecessary equipment 1 1 Pause Live TV programme 3 4 Direct TV Recording 3 Control the menu of the connected equipment by VIERA remote control 1 1 1 Speaker control Connection HDMI cable DIGA Recorder DVD Player Blu ray Disc Player HD Video Camera LUMIX Camera wi...

Страница 59: ...ble or RCA cable or SCART cable SCART cable HDMI cable HDMI cable Amplifier with VIERA Link function DIGA Recorder with VIERA Link function HD Video Camera LUMIX Camera with VIERA Link function Speaker system Use fully wired HDMI compliant cable Connect the equipment supporting VIERA Link to the TV s HDMI2 HDMI3 or HDMI4 terminal via an HDMI cable Use fully wired SCART cable Connect the equipment ...

Страница 60: ...ernal input AV watching TV s external input AV TV monitor out When Direct TV Recording is performed the recorder is automatically turned on if it is in Standby mode Changing channel or turning off the TV is available while the recorder is recording from its own tuner Changing channel is not available while the recorder is recording from the TV tuner To stop recording Unlock the tuner G U I D E Unl...

Страница 61: ...CDHG30 3 0 m RP CDHG50 5 0 m Use fully wired SCART cable Set up the connected equipment Read the manual of the equipment For optimal recording the settings of the recorder may need to be changed For details read the manual of the recorder Download Analogue channel setting Analogue channel download see below Set VIERA Link On in the Setup Menu VIERA Link p 32 Set up the TV After connection turn the...

Страница 62: ...ed Please stop recording to operate EXIT Features available Using VIERA Link Menu Features available Reduce unnecessary power consumption in standby Standby Power Save Set Standby Power Save On in the Setup Menu to use this function Standby Power Save p 32 The power consumption in Standby mode of the connected equipment is controlled higher or lower in synchronization with the TV On Off state to r...

Страница 63: ...rect TV Rec Speaker Selection VIERA Link Menu Home Cinema Start VIERA Link Control Speaker Selection Home Cinema Recorder Pause Live TV Access select pause The TV picture will be paused You can also pause directly by using VIERA TOOLS How to Use VIERA TOOLS p 14 Live TV programme is recorded on HDD from where it was paused If the paused TV picture disappears after a few minutes OPTION the paused p...

Страница 64: ...is displayed You can access the menu of the equipment But you cannot operate it Use its own remote control to operate the equipment 1 Display VIERA Link Menu 2 Select VIERA Link Control Direct TV Rec Speaker Selection VIERA Link Menu Home Cinema Start VIERA Link Control Speaker Selection Home Cinema Recorder Pause Live TV select 3 Select the equipment you want to access The type of the connected e...

Страница 65: ...mary of Q Link and VIERA Link features p 58 and p 59 Preparations p 61 Access and control the speaker volume TV 1 Display VIERA Link Menu 2 Select Speaker Selection Direct TV Rec Speaker Selection VIERA Link Menu Home Cinema Start VIERA Link Control Recorder Pause Live TV Speaker Selection Home Cinema select 3 Set to Home Cinema or TV set Home Cinema Player theatre Blu ray Disc theatre or Amplifie...

Страница 66: ...HDMI with HDMI Direct TV Recording Recommended Connection These diagrams show our recommendations for connection of your TV to various pieces of equipment For other connections consult the instructions for each piece of equipment the table below and the specifications p 79 Computer PC Viewing Listening To watch DVDs Viewing Listening or DVD player RCA cable Optical digital audio cable Amplifier wi...

Страница 67: ...dphones Camcorder Game equipment To adjust volume Headphone Volume in the Sound Menu p 31 M3 stereo mini plug Cable TV box Rear of the TV DVD Recorder VCR Fully wired SCART cable RF cable Fully wired SCART cable To watch cable broadcasts To record playback DVD Recorder Fully wired HDMI compliant cable Camcorder HDMI equipment Fully wired HDMI compliant cable or Satellite dish Satellite cable Cable...

Страница 68: ...4 525 480 60i 525 480 60p 625 576 50i 625 576 50p 750 720 60p 750 720 50p 1 125 1 080 60i 1 125 1 080 50i 1 125 1 080 60p 1 125 1 080 50p 1 125 1 080 24p Auto mode Auto mode determines the best aspect ratio to fill the screen It does this using a four step process WSS Control signal through SCART HDMI terminal Letterbox detection or Justify to fill the screen to determine This process may take sev...

Страница 69: ...onics and Information Technology Industries Association JEITA Note Format the card with the recording equipment The picture may not appear correctly on this TV depending on the recording equipment used Display may take some time when there are many files and folders This function cannot display Motion JPEG and still image not DCF formatted i e TIFF BMP A data modified with a PC may not be displaye...

Страница 70: ...f the connected equipment has an aspect adjustment function set the aspect ratio to 16 9 These HDMI connectors are type A These HDMI connectors are compatible with HDCP High Bandwidth Digital Content Protection copyright protection An equipment having no digital output terminal may be connected to the input terminal of either COMPONENT S VIDEO or VIDEO to receive analogue signals This TV incorpora...

Страница 71: ...y 5 straight LAN cables STP are required Read the manual of the network equipment too Note Depending on the ISP or telecommunications company the required equipment and the internet connection procedure are different Ensure that you use the network equipment that are authorized by your ISP and telecommunications company You cannot make settings for the network equipment on this TV You may be requi...

Страница 72: ...1 024 768 60 Hz 48 36 60 00 1 024 768 70 Hz 56 48 70 07 1 024 768 75 Hz 60 02 75 03 1 024 768 85 Hz 68 68 85 00 1 280 768 60 Hz 47 70 60 00 1 280 1 024 60 Hz 63 98 60 02 1 366 768 60 Hz 48 39 60 04 Macintosh13 640 480 35 00 66 67 Macintosh16 832 624 49 73 74 55 Macintosh21 1 152 870 68 68 75 06 PC from HDMI terminal Applicable input signal for PC is basically compatible to HDMI standard timing Sig...

Страница 73: ...rection of the dish or aerial to another transmitter installed nearby Check the analogue broadcast If the image quality is poor check the aerial and consult your nearest dealer freesat Auto Setup cannot be done completely Check connections and dish alignment The dish needs to be pointing at Astra 2 at 28 2 East and Eurobird 1 at 28 5 East If the problem persists consult your freesat registered ret...

Страница 74: ...Signal Condition p 37 38 and 42 If Signal Quality or Signal Strength are displayed in red the signal is weak Check aerial or dish Check your postcode area is able to receive the Freeview channels at www freeview co uk Digital signals may be relatively low to prevent interference with analogue signals for the period of Digital Switchover Check the plan of Digital Switchover at www digitaluk co uk W...

Страница 75: ...oes not work or is intermittent Are the batteries installed correctly p 6 Has the TV been switched On The batteries may be running low Replace them Point the remote control directly at the front of the TV within a 30 degree angle of the front of the TV Situate the TV away from sunshine or other sources of bright light not to shine on the TV s remote control signal receiver There may be red spots b...

Страница 76: ...the router Turn the TV and the router Off with the Mains power On Off switch and turn them On again Invalid operation Please check settings and connections Check the Q Link or VIERA Link connection and setting p 58 61 Invalid system time Please exit Cannot get the time information Check the connection of the RF cable IP address conflict Duplicate IP address has been detected Check the IP address o...

Страница 77: ... than 10 minutes it will no longer be performed as Guide link recording The recording will be performed according to the time setting Timer already expired Starting time in Timer Programming is already past Set correctly p 53 Timer Event Due to Start DVB 1 BBC1 has been programmed for recording at This message will appear 2 minutes before timer programming event due to start Timer incorrect Set St...

Страница 78: ...DMI 70 72 Hold 15 22 Home Cinema 59 65 Hotbird 43 I Information banner 16 Input Labels 48 Input signal 72 Intelligent Frame Creation 33 L Licence 78 M Mains Lead 10 Mains power On Off switch 8 12 Maintenance 5 Manual Tuning 39 41 42 Menu Functions 26 33 Mode 31 Movie View 56 Multi Audio 17 N Network connection ETHERNET 66 71 Network Setup 46 New Channel Message 38 NICAM 31 Normalisation 9 26 NTSC ...

Страница 79: ...TSC Video recorders VCR NTSC AV input only Playback from NTSC Video recorders VCR Satellite dish input Female F type 75 Ω Aerial input UHF Operating Conditions Temperature 0 C 35 C Humidity 20 80 RH non condensing Connection Terminals AV1 SCART terminal 21 Pin terminal Audio Video in Audio Video out RGB in Q Link AV2 SCART terminal 21 Pin terminal Audio Video in Audio Video out RGB in S Video in Q...

Страница 80: ...00am 5 30pm Friday 9 30am 5 30pm Excluding public holidays Or go on line through our Internet Accessory ordering application at www panasonic co uk Most major credit and debit cards accepted All enquiries transactions and distribution facilities are provided directly by Panasonic UK Ltd It couldn t be simpler Also available through our Internet is direct shopping for a wide range of finished produ...

Отзывы: