background image

Safety Precautions 

Setting Up the TV

4


Whether you are using a pedestal or not, always 
ensure the vents at the bottom of the TV are not 
blocked and there is sufficient space to enable 
adequate ventilation.


Moving the TV

Caution

Before moving the TV, disconnect all cables.


When not in use for a long time

Caution

This TV will still consume some power even in the Off 
mode, as long as the mains plug is still connected to a 
live socket outlet.


Remove the mains plug from the wall socket when the 
TV is not in use for a prolonged period of time.


Excessive volume

Caution


Do not expose your ears to 
excessive volume from the 
headphones. Irreversible 
damage can be caused.


If you hear a drumming noise in your ears, turn down 
the volume or temporarily stop using the headphones.


Battery for the Remote Control

Caution


Incorrect installation may cause battery leakage, 
corrosion and explosion.


Replace only with the same or equivalent type.


Do not mix old and new batteries.


Do not mix different battery types (such as alkaline and 
manganese batteries).


Do not use rechargeable batteries (Ni-Cd, etc.).


Do not burn or break up batteries.


Do not expose batteries to excessive heat such as 
sunshine, fire or the like.


Make sure you dispose of batteries correctly.


Remove the battery from the unit when not using for 
a prolonged period of time to prevent battery leakage, 
corrosion and explosion.

Setting Up the TV

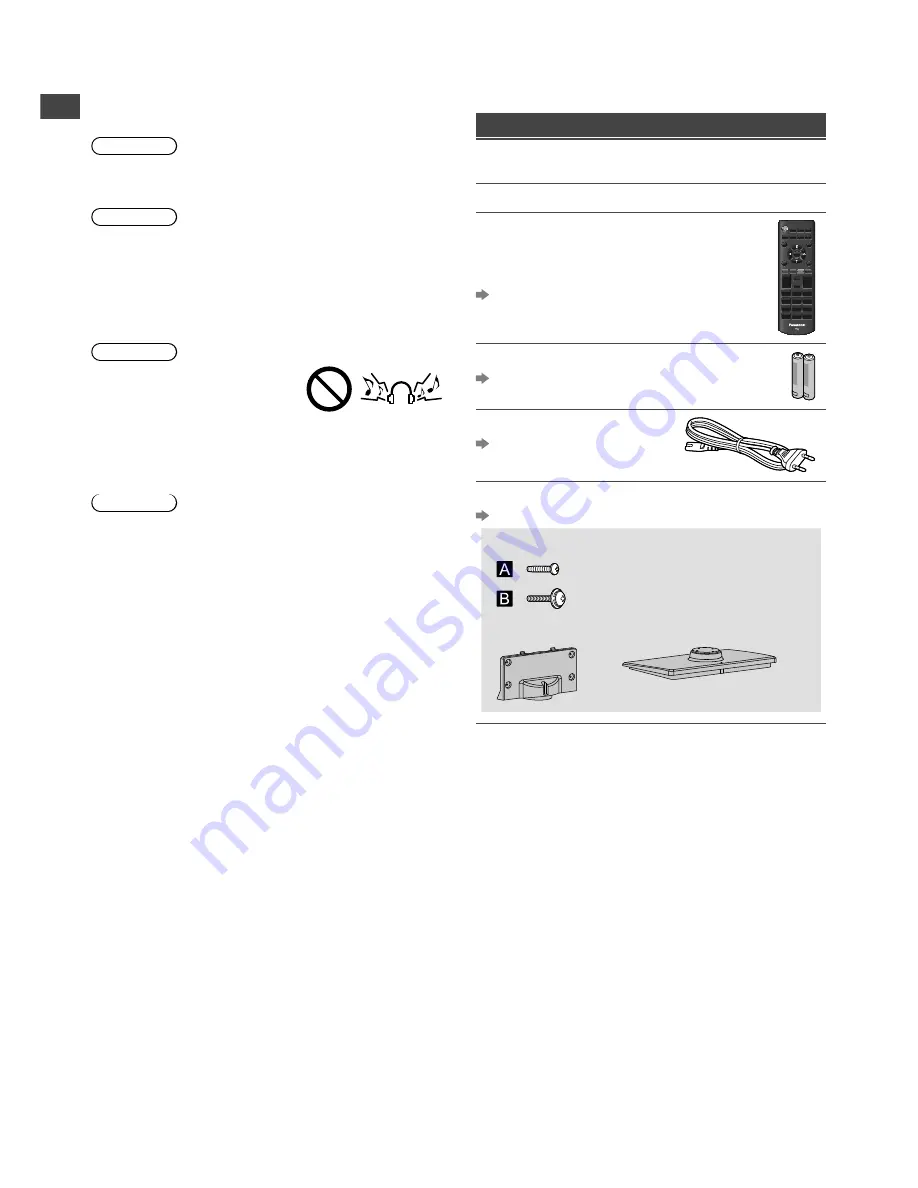
Supplied accessories

Accessories may not be placed all together. Take care 
not to throw them away unintentionally.

Operating Instructions

Remote Control


N2QAYB000816
or
N2QAYB000975

 (p. 8)

Batteries (R6) × 2

 (p. 5)

Mains Lead

 (p. 6)

 Pedestal

 (p. 5)


Assembly screws

× 3

(M4 × 15 mm) × 4


Bracket


Base

Содержание Viera TX-32CR410

Страница 1: ...retain them for future reference The images shown in this manual are for illustrative purposes only Some illustrations are presented as conceptual images and may be different from the actual products Illustrations shown may be different between models and countries Transport only in upright position DBX TQB4GC1425 Operating Instructions LCD Television ...

Страница 2: ...ces Class II This product is designed for household watching TV programmes Notice for DVB functions This TV is designed to meet the standards as of August 2013 of DVB T T2 MPEG2 and MPEG4 AVC H 264 digital terrestrial services and DVB C MPEG2 and MPEG4 AVC H 264 digital cable services Consult your local dealer for availability of DVB T T2 services in your area Consult your cable service provider f...

Страница 3: ...n unapproved pedestal mounting equipment Be sure to ask your local Panasonic dealer to perform the setup or installation of approved wall hanging brackets Do not apply strong force or impact to the display panel Do not place the TV on sloped or unstable surfaces and ensure that the TV does not hang over the edge of the base This TV is designed for table top use Do not expose the TV to direct sunli...

Страница 4: ...r temporarily stop using the headphones Battery for the Remote Control Caution Incorrect installation may cause battery leakage corrosion and explosion Replace only with the same or equivalent type Do not mix old and new batteries Do not mix different battery types such as alkaline and manganese batteries Do not use rechargeable batteries Ni Cd etc Do not burn or break up batteries Do not expose b...

Страница 5: ...anging bracket not supplied Depth of screw View from the side a Holes for wall hanging bracket installation a 200 mm b 200 mm Screw specification Type M4 Depth of screw Minimum 9 mm Maximum 14 mm Warning When optional accessories such as wall brackets etc are used always read and follow the manufacturer installation and usage instructions Do not mount the unit directly below ceiling lights such as...

Страница 6: ...se distortion of image sound may occur or operation of other equipment may be interfered Also read the manual of the equipment being connected Terminals Rear of the TV 1 2 3 4 5 6 7 8 1 DIGITAL AUDIO 2 HDMI 1 2 3 AV1 SCART 4 AV2 COMPONENT VIDEO 5 Terrestrial cable terminal 6 Headphone jack 7 USB port 8 CI slot Connections Aerial and mains lead RF cable Cable Mains lead supplied Terrestrial aerial ...

Страница 7: ... without ARC function use DIGITAL AUDIO To enjoy the sound from the external equipment in multi channel sound e g Dolby Digital 5 1ch connect the equipment to the amplifier For the connections read the manuals of the equipment and amplifier Initial Setup When you first turn on the TV a series of steps will pop up to guide you to setup your TV These steps are not necessary if the setup has been com...

Страница 8: ... Operating the TV Using the remote control MENU MEDIA PLAYER TEXT STTL GUIDE EXIT BACK RETURN OPTION INPUT MUTE STILL LAST VIEW OK ASPECT 1 13 14 15 16 17 18 19 20 21 3 2 4 5 6 7 8 9 10 11 12 1 Switches the TV On Standby 2 MEDIA PLAYER p 10 3 Displays Main Menu p 12 4 Switches to Teletext mode 5 Displays Information banner 6 OK Confirms selections Press after selecting channel positions to quickly...

Страница 9: ... Selection Aspect Selection Auto 16 9 14 9 Select RETURN EXIT Change Operation guide Referring to the operation guide To select the mode To change to the selected mode OK OK To return to the previous menu To exit from the menu BACK RETURN EXIT Using the TV controls Indicators on the TV 5 6 7 1 3 2 4 1 Changes the input mode Displays Main Menu when press and hold for 3 seconds Press again and hold ...

Страница 10: ...t may be slow to response when pressing the UP DOWN cursor button for TV program guide This is due to program data downloading Type filter Lets you view a channel list of the selected type filter blue Press again to return to TV Guide Type list Type Subtype MOVIE Drama NEWS Detective When you highlight on Type the corresponding Subtype will be shown Type Subtype are multi selectable OK Select Type...

Страница 11: ...e to view photo one at a time Slideshow Lets you view all photos in the slideshow mode View Select Lets you toggle between all photos view and folder view green All photos Display all photos Folder view Display the thumbnails grouped by folder Option Menu Slideshow Settings Transition Effect Effect for photo switching during slideshow None Dissolve Wipe right Wipe left Wipe up Wipe down Box in Box...

Страница 12: ...g or removing the CI module Insert the module in the correct direction then follow the on screen instructions Common Interface TV CI module Normally encrypted channels will appear If encrypted channel does not appear Common Interface p 16 If a smart card and a CI module come as a set first insert the CI module then insert the smart card into the CI module Features that appear on the screen are dep...

Страница 13: ...aste For NTSC signal reception Colour Balance Selects the colour temperature of the picture Cool Normal Warm Not available when Viewing Mode is set to True Cinema Eco Mode Automatically adjusts picture settings depending on ambient lighting conditions Off On P NR Picture noise reduction function which reduces unwanted picture noise and flicker noise in the contoured parts of a picture Off Min Mid ...

Страница 14: ...peaker Distance to Wall Compensates for the low frequency sound due to the distance between the speakers and the wall Over 30cm Up to 30cm If the distance between the TV and wall is over 30 cm Over 30cm is recommended If the distance between the TV and wall is within 30 cm Up to 30cm is recommended Preferred Audio 1 2 Selects the first and second preferred language for DVB multi audio depending on...

Страница 15: ... time count will be reset Setup Link Settings CEC When set to On the TV will automatically switch to the appropriate HDMI input whenever an HDMI connected equipment is initially turned on and play mode is selected Off On Power off Link When set to On all HDMI connected equipment will be turned off automatically by turning off the TV Off On A Panasonic DVD Recorder will not turn off if it is still ...

Страница 16: ...lection Selects the signal mode to tune Antenna DVB T and Analogue scan Cable DVB C and Analogue scan Auto Tuning Retunes the channels received in your area automatically Automatically searches and adds available channels to the memory Before performing this function select the signal mode to tune in TV Selection After the scan is complete all previously saved channels will be erased Automatic Cha...

Страница 17: ...dcasters Select a channel to add or remove from the list Encrypted channel Favourites Edit 1 901 2 902 Digital Analogue Digital Analogue Add Remove OK Add Remove Select Skip Skips or hides unwanted channels Select a channel then reveal hide Skip 1 901 2 902 Digital Analogue Digital Analogue Hide skip Reveal OK Access Select Sort Sorts channels 1 Select a channel Sort 1 901 2 902 Digital Analogue D...

Страница 18: ...e DVB programme that has rating information over the selected age enter the PIN number depending on the broadcaster 1 Select Parental Rating 2 Select the block setting Note Setting Shipping Condition p 16 erases the PIN number and all settings Performing System Update To update automatically Set Auto Download and Auto Install to Yes System Update Manual OAD Download Auto Download Auto Install Yes ...

Страница 19: ...9 Displays the image at the standard 14 9 without distortion Just Displays a 4 3 image full screen Stretching is only noticeable at the left and right edges 4 3 Displays the image at the standard 4 3 without distortion 4 3 Full Displays a 4 3 image enlarged horizontally to fit the screen For HD High definition signals only Zoom1 Displays a 16 9 letterbox or 4 3 image without distortion Zoom2 Displ...

Страница 20: ...d high quality sound by connecting the TV and the equipment Applicable HDMI features Input audio signal 2ch Linear PCM sampling frequencies 48 kHz 44 1 kHz 32 kHz Input video signal Input signal that can be displayed p 20 Match the output setting of the digital equipment Audio Return Channel HDMI 2 terminal only DVI connection If the external equipment has only a DVI output connect to the HDMI ter...

Страница 21: ... the TV and equipment off then turn them on again Check an input signal from the equipment p 20 Use equipment compliant with EIA CEA 861 861D Sound No sound is produced Check the sound mute setting p 8 and volume Low level or distorted sound Sound signal reception may be deteriorated Sound output via HDMI connection is unusual Set the sound setting of the connected equipment to 2ch L PCM Check the...

Страница 22: ...h CI Plus 1 DIGITAL AUDIO PCM Dolby Digital DTS Fibre optic Sound Audio output 20 W 10 W 10 W Headphones M3 3 5 mm stereo mini Jack 1 Receiving systems Band name Check the latest information on the available services at the following website English only http panasonic net viera support DVB C Digital cable services MPEG2 and MPEG4 AVC H 264 DVB T T2 Digital terrestrial services MPEG2 and MPEG4 AVC...

Страница 23: ...tice are also available for free in our website below http www unipf jp dl DTV13ET Maintenance First remove the mains plug from the socket outlet Regular care Gently wipe the surface of the display panel cabinet and pedestal by using a soft cloth Wipe the mains plug with a dry cloth at regular intervals Moisture and dust may lead to fire or electrical shock For stubborn dirt First clean the dust o...

Страница 24: ...ertain Hazardous Substances in electrical and electronic equipment TR on RoHS The content of hazardous substance with the exemption of the applications listed in the Annex 2 of TR on RoHS 1 Lead Pb not over 0 1wt or 1000wt ppm 2 Cadmium Cd not over 0 01wt or 100wt ppm 3 Mercury Hg not over 0 1wt or 1000wt ppm 4 Hexavalent chromium Cr6 not over 0 1wt or 1000wt ppm 5 Polybrominated biphenyls PBBs no...

Отзывы: