background image

4

English

To prevent the 

spread of fire, keep 

candles or other 

open flames away 

from this product at 

all times


Dangerous part / Small object

Warning

● 

This product contains possibly dangerous parts such 

as plastic bags, that can be breathed in or swallowed 

by young children accidentally. Keep these parts out 

of reach of young children.


Base

Warning

● 

Do not disassemble or modify the base.

Caution

● 

Do not use any base other than the one provided with 

this TV.

● 

Do not use the base if it becomes warped or 

physically damaged. If this occurs, contact your 

nearest Panasonic dealer immediately.

● 

During setup, make sure that all screws are securely 

tightened.

● 

Ensure that the TV does not suffer any impact during 

installation of the base.

● 

Ensure that children do not climb onto the base.

● 

Install or remove the TV from the base with at least 

two people.

● 

Install or remove the TV by the specified procedure.


Radio wave

Warning

● 

Do not use the TV in any medical institutions or 

locations with medical equipment. Radio waves may 

interfere with the medical equipment and cause 

accidents due to the malfunction.

● 

Do not use the TV near any automatic control 

equipment such as automatic doors or fire alarms. 

Radio waves may interfere with the automatic 

control equipment and cause accidents due to the 

malfunction.

● 

Keep the distance at least 22 cm from the TV when 

you have a cardiac pacemaker. Radio waves may 

interfere with the operation of the pacemaker.

● 

Do not disassemble or alter the TV in any way.


Built-in wireless LAN

Caution

● 

Do not use the built-in wireless LAN to connect to any 

wireless network (SSID

*

) for which you do not have 

usage rights. Such networks may be listed as a result 

of searches. However, using them may be regarded 

● 

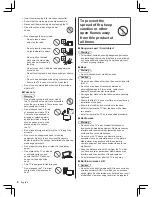
Insert the mains plug fully into the socket outlet.

● 

Ensure that the mains plug is easily accessible.

● 

Disconnect the mains plug when cleaning the TV.

● 

Do not touch the mains plug with wet 

hands.

● 

Do not damage the mains lead.

 •

Do not place a heavy 

object on the lead.

 •

Do not place the lead near 

a high temperature object.

 •

Do not pull on the lead. 

Hold onto the mains plug 

body when disconnecting 

the plug.

 •

Do not move the TV with the lead plugged into a 

socket outlet.

 •

Do not twist the lead, bend it excessively or stretch 

it.

 •

Do not use a damaged mains plug or socket outlet.

 •

Ensure the TV does not crush the mains lead.

● 

Do not use any mains lead other than that provided 

with this TV.


Take care

Warning

● 

Do not remove covers and never modify 

the TV yourself as live parts are accessible 

when they are removed. There are no user 

serviceable parts inside.

● 

Do not expose the TV to rain 

or excessive moisture. This 

TV must not be exposed to 

dripping or splashing water 

and objects filled with liquid, 

such as vases, must not be 

placed on top of or above 

the TV.

● 

Do not insert foreign objects into the TV through the 

air vents.

● 

Do not use an unapproved base / mounting 

equipment. Be sure to ask your local Panasonic 

dealer to perform the setup or installation of approved 

wall-hanging brackets.

● 

Do not apply strong force or impact to the display 

panel.

● 

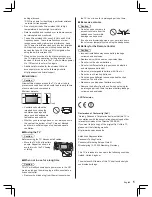
Do not place the TV on sloped 

or unstable surfaces, and 

ensure that the TV does not 

hang over the edge of the 

base.

● 

This TV is designed for table-top use.

● 

Do not expose the TV to direct 

sunlight and other sources of 

heat.

Содержание VIERA TX-32AS500B

Страница 1: ...ructions carefully before operating this product and retain them for future reference The images shown in this manual are for illustrative purposes only English Model No TX 32AS500B TX 32AS520B For more detailed instructions refer to eHELP Built in Operating Instructions How to use eHELP p 15 T0114 0 English ...

Страница 2: ...l unless otherwise mentioned Illustrations shown may be different depending on the model Contents Be Sure to Read Important Notice 3 Safety Precautions 3 Quick Start Guide Accessories 6 Connections 7 Identifying Controls 11 First time Auto Setup 13 Using your VIERA Operations 14 How to Use eHELP 15 Others FAQs 16 Maintenance 17 Specifications 17 ...

Страница 3: ...he mains plug with a screwdriver and replace the fuse then press the fuse cover down securely This TV is designed to operate on AC 220 240 V 50 60 Hz Important Notice Notice for DVB Data broadcasting IPTV functions This TV is designed to meet the standards as of August 2013 of digital services Not all the features are available depending on the country area broadcaster service provider and network...

Страница 4: ... in wireless LAN to connect to any wireless network SSID for which you do not have usage rights Such networks may be listed as a result of searches However using them may be regarded Insert the mains plug fully into the socket outlet Ensure that the mains plug is easily accessible Disconnect the mains plug when cleaning the TV Do not touch the mains plug with wet hands Do not damage the mains lead...

Страница 5: ...ntifying a particular wireless network for transmission Do not subject the built in wireless LAN to high temperatures direct sunlight or moisture Data transmitted and received over radio waves may be intercepted and monitored The built in wireless LAN uses 2 4 GHz and 5 GHz frequency bands To avoid malfunctions or slow response caused by radio wave interference keep the TV away from the devices su...

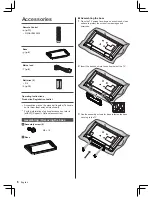
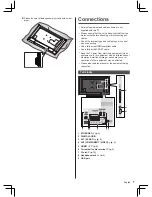
Страница 6: ... base to fasten the base securely to the TV Accessories Remote Control p 11 N2QAYB000830 Base p 6 Mains lead p 8 Batteries 2 R6 p 12 Operating Instructions Production Registration Leaflet Accessories may not be placed all together Take care not to throw them away unintentionally For the information of optional accessories refer to eHELP Support Optional accessories Assembling Removing the base Ass...

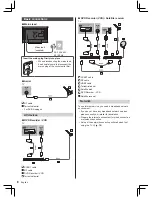
Страница 7: ...d SCART cable Keep the TV away from electronic equipment video equipment etc or equipment with an infrared sensor otherwise distortion of image sound may occur or operation of other equipment may be affected Please also read the manual of the equipment being connected Terminals 9 8 7 1 4 3 6 2 5 1 ETHERNET p 9 2 DIGITAL AUDIO 3 AV1 SCART p 8 4 AV2 COMPONENT VIDEO p 9 5 HDMI1 2 p 9 6 Terrestrial ca...

Страница 8: ...nce Prepare the internet environment for wired connection or wireless connection Setup of the network connection will start when first using the TV p 15 Basic connections Mains lead AC 220 240 V 50 60 Hz Mains lead supplied Insert the mains plug firmly into place When disconnecting the mains lead be absolutely sure to disconnect the mains plug at the socket outlet first Aerial TV RF cable Terrestr...

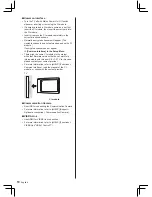
Страница 9: ...al equipment e g Dolby Digital 5 1ch connect the equipment to the amplifier For the connections read the manuals of the equipment and amplifier TV HDMI cable Amplifier with speaker system External equipment DVD Player etc Headphones To adjust volume Headphone Volume in the Sound Menu TV M3 stereo mini plug Wired connection TV Internet environment LAN cable Shielded Use the Shielded Twist Pair STP ...

Страница 10: ...ot appear Common Interface in the Setup Menu There might be some CI modules in the market with older firmware versions that do not work fully interoperable with this new CI v1 3 TV In this case please contact your content provider For more information refer to eHELP Functions Common Interface read the manual of the CI module or check with the content provider TV CI module Communication Camera Use ...

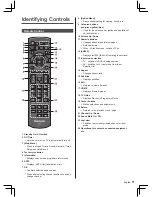
Страница 11: ...Screen 17 HOME Displays Home Screen 18 TV Guide Displays Electronic Programme Guide 19 Cursor buttons Makes selections and adjustments 20 Return Returns to the previous menu page 21 Channel Up Down 22 Sound Mute On Off 23 Last view Switches to previously viewed channel or input mode 24 Operations for contents connected equipment etc Identifying Controls Remote Control 1 Standby On Off switch 2 Off...

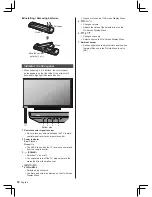
Страница 12: ... panel When pressing 4 5 6 buttons the control panel guide appears on the right side of the screen for 3 seconds to highlight the pressed button 4 5 6 3 7 2 1 Bottom side 1 Remote control signal receiver Do not place any objects between the TV remote control signal receiver and remote control 2 Power indicator Red Standby Green On The LED blinks when the TV receives a command from the remote contr...

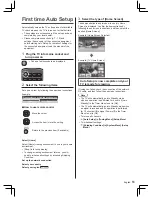
Страница 13: ...ystem Menu Setup Menu First time Auto Setup Automatically sets up the TV and searches for available TV channels when the TV is turned on for the first time These steps are not necessary if the setup has been completed by your local dealer Please complete connections p 7 10 and settings if necessary of the connected equipment before starting Auto Setup For details of settings for the connected equi...

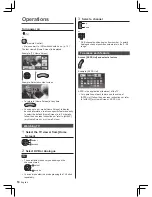
Страница 14: ...Control Mains power On Off switch should be on p 12 The last viewed Home Screen is displayed Example TV Home Screen Example Selected content screen To return to Home Screen at any time You can set up or make Home Screen to display desired information to access specific features easily to select the default Home Screen etc For details follow the on screen instructions or refer to eHELP my Home Scre...

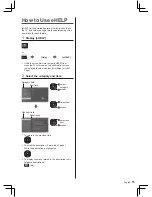
Страница 15: ... when the TV is turned on the confirmation screen is displayed to select whether First Page or Last Page 2 Select the category and item Category field Item field select category access select item access select sub item access Sub item field Description To return to the previous field To scroll the description if more than 1 page While the description is highlighted To display the menu related to ...

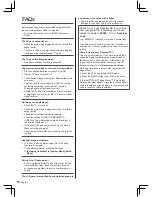
Страница 16: ...nto the TV and the socket outlet The fuse in the mains plug may have blown Replace it with one of an identical rating p 3 The TV goes into Standby mode Auto power standby function is activated The remote control does not work or is intermittent Are the batteries installed correctly p 12 Has the TV been switched on The batteries may be running low Replace them with new ones Point the remote control...

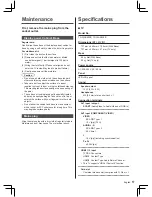
Страница 17: ...y panel cabinet or base by using a soft cloth to clean the dirt or fingerprints For stubborn dirt 1 First clean the dust on the surface 2 Dampen a soft cloth with clean water or diluted neutral detergent 1 part detergent to 100 parts water 3 Wring the cloth firmly Please note liquids do not enter the TV inside May lead to product failure 4 Finally wipe away all the moisture Caution Do not use a ha...

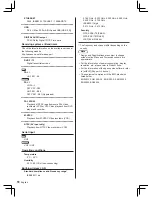
Страница 18: ...N55022 EN55024 ETHERNET RJ45 IEEE802 3 10BASE T 100BASE TX USB DC 5 V Max 500 mA Hi Speed USB USB 2 0 DIGITAL AUDIO output PCM Dolby Digital DTS Fibre optic Receiving systems Band name Check the latest information on the available services at the following website http panasonic net viera support DVB T T2 Digital terrestrial services PAL I UHF E21 68 PAL I VHF A J CATV S1 S20 UHF E21 E69 CATV S21 ...

Страница 19: ...2AS520B Energy efficiency class A Visible screen size diagonal 80 cm 32 inches On mode average power consumption 30 W Annual energy consumption 1 44 kWh Standby power consumption 2 0 30 W Off mode power consumption 0 30 W Screen resolution 1 366 W 768 H 1 Energy consumption XYZ kWh per year based on the power consumption of the television operating 4 hours per day for 365 days The actual energy co...

Страница 20: ...ect method of disposal Note for the battery symbol bottom two symbol examples This symbol might be used in combination with a chemical symbol In this case it complies with the requirement set by the Directive for the chemical involved Sales and Support Information Customer Communications Centre For customers within the UK 0844 844 3899 For customers within Ireland 01289 8333 Monday Friday 9 00am 5...

Отзывы: