background image

Using the Menu Functions

14

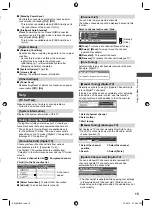
[Digital Audio Preference]

Selects the initial setting for audio tracks


[Dolby D] / [MPEG]

 [Dolby D] / [HE-AAC]

[Dolby D]:

 The priority is given to Dolby Digital. 

[MPEG]:

 The priority is given to MPEG.

[HE-AAC]:

 The priority is given to HE-AAC.


Dolby Digital is the method of coding digital signals 
developed by Dolby Laboratories. Apart from stereo 
(2ch) audio, these signals can be multi-channel audio.


MPEG is an audio compression method that 
compresses audio to the smaller size without any 
considerable loss of audio quality.


HE-AAC is a perceptual coding method used to 
compress digital audio for efficient storage and 
transmission.


For Digital TV only

[SPDIF Selection]

SPDIF: A standard audio transfer file format
Selects the initial setting for digital audio output signal 
from DIGITAL AUDIO OUT and HDMI 2 (ARC function) 
terminals 

[Auto] / [PCM]

[Auto]: 

Dolby Digital and HE-AAC multi-channel are 

output as Dolby Digital Bitstream. MPEG is output as 
PCM.


[PCM]: 

Digital output signal is fixed to PCM.


For Digital TV or video contents of Media Player

 [Audio Description]

Narration settings for visually impaired users


[Audio Description]

Set to [Auto] to activate the narration sound track when 
available on the broadcast 

[Off] / [Auto]


[Volume] 

Adjusts the volume of the narration sound track


[Speakers] 

Set to [On] to activate the narration sound track from 
the TV speakers 

[Off] / [On]

 [HDMI1 / 2 Input]

Selects to fit the input signal 

[Digital] / [Analogue] 

(p. 20)

[Digital]:

 When sound is carried via the HDMI cable 

connection

[Analogue]:

 When sound is not carried via the HDMI-

DVI adaptor cable connection


For HDMI input

 [Reset Sound Defaults]

Resets the current sound settings to defaults.

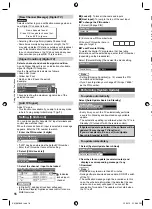
Timer

 [Off Timer]

Sets the duration until the TV automatically goes to 
Standby mode 

[Off] / [15] / [30] / [45] / [60] / [75] / [90] 

(minutes)


[Daylight Saving Time] 

Selects the time offset from the standard time for 
Summer 

[+1 hour] / [+1/2 hour] / [Off] / [Auto]

[Region Select] 

Selects the region where you live to adjust the standard 
time 

[NSW / ACT] / [Victoria] / [Queensland] / 

[South Australia] / [Western Australia] / [Northern 
Territory] / [Tasmania]

 [Auto Standby]

Enables turning the TV off automatically if no button is 
pressed for 4 hours 

[On] / [Off]

 [No signal Power off]

Enables turning the TV off if no signal is detected for 
10 minutes 

[On] / [Off]

Setup

 [Eco Navigation]

Sets the TV to operate in the most energy-saving mode


You can also access this item by using [VIERA 
TOOLS]   

(p. 10)

[Child Lock]   

(p. 16)

[Tuning Menu]   

(p. 15 - 16)

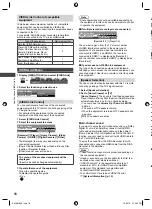
[Language] 


[Preferred Audio Language]

Selects the preferred language for digital TV multi 
audio (depending on the broadcaster) 

[English] / 

[Maori] / [French] / [German] / [Italian] / [Spanish] / 
[Korean] / [Chinese-Mandarin] / [Chinese-
Cantonese] / [Japanese] / [Hindi]


[Preferred Subtitles]

Selects the default language for Digital TV subtitles 
(depending on the broadcaster)

[Display Settings]


Teletext

Selects the Teletext display mode 

[FASTEXT] / [List]


This item is available only if the TV detects a Teletext 
broadcast.


[ Input Labels]

Accesses the input labels list to select the label of 
each input mode or set to skip unconnected one for 
easier identification and selection in [Input Selection] 
(p. 9) or banner


To name each input mode freely, select [User input] 
and set the characters (maximum 10 characters).


To skip the input mode, select [Skip].


[ Banner Display Timeout]

Sets how long the Information banner stays on screen 
(p. 8) 

[0 (No display)] / [1] / [2] / [3] / [4] / [5] / [6] / 

[7] / [8] / [9] / [10] 

(seconds)

[VIERA Link Settings]


 [VIERA Link]

Sets to use VIERA Link functions 

[On] / [Off]


[Power on Link]

When an HDMI connected equipment starts playback, 
the TV is turned on and input mode is switched 
automatically 

[On] / [Off]


Only


when the TV is in Standby mode.


[Power off Link]

When the TV is set to Standby mode, the HDMI 
connected equipment is also automatically set to 
Standby 

[On] / [Off]

M

D

[T
fa

C
b
T
“C
s

1
2

XM_EM6AZ.indd   14

XM_EM6AZ.indd   14

2/1/2013   2:13:59 PM

2/1/2013   2:13:59 PM

Содержание Viera TH-L32XM6A

Страница 1: ... before operating this product and retain them for future reference The images shown in this manual are for illustrative purposes only Some illustrations are presented as conceptual images and may be different from the actual products Illustrations shown may be different between models and countries Transport only in upright position CGN TQB4GC1036 1 XM_EM6AZ indd 1 XM_EM6AZ indd 1 2 1 2013 2 13 5...

Страница 2: ...n commercial activity and or was obtained from a video provider licensed to provide AVC Video No license is granted or shall be implied for any other use Additional information may be obtained from MPEG LA LLC See http www mpegla com This product incorporates the following software 1 the software developed independently by or for Panasonic Corporation 2 the software owned by third party and licens...

Страница 3: ... ensure that the TV does not hang over the edge of the base Important information If the TV is not positioned in a sufficiently stable location it can be potentially hazardous due to falling Many injuries particularly to children can be avoided by taking simple precautions such as Using cabinets or stands recommended by the manufacturer of the TV Only using furniture that can safely support the TV...

Страница 4: ...ains plug from the wall socket when the TV is not in use for a prolonged period of time Battery for the Remote Control Caution Incorrect installation may cause battery leakage corrosion and explosion Replace only with the same or equivalent type Do not mix old and new batteries Do not mix different battery types such as alkaline and manganese batteries Do not use rechargeable batteries Ni Cd etc D...

Страница 5: ...lting in personal injury and product damage that is not covered by warranty a b Rear of the TV Screw for fixing the TV onto the wall hanging bracket not supplied Depth of screw View from the side Holes for wall hanging bracket installation Models a b TH L32XM6A Z 200 mm 100 mm TH L39EM6A Z 200 mm 200 mm TH L50EM6A Z 400 mm 400 mm Screw specification Models Type Depth of screw Minimum Maximum TH L3...

Страница 6: ...lied Aerial To minimise DTV impulse noise pickup please ensure there is separation between mains lead and RF cable Do not place the RF cable under the TV An aerial correct cable 75 Ω coaxial and correct terminating plug are required to obtain optimum quality picture and sound If a communal aerial system is used you may require the correct connection cable and plug between the wall aerial socket an...

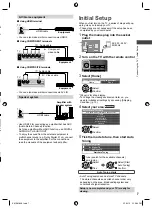
Страница 7: ...setup your TV These steps are not necessary if the setup has been completed by your local dealer 1 Plug the mains plug into the socket outlet AC 220 240 V 50 60 Hz 2 Turn on the TV with the remote control 3 Select Home Please select your viewing environment Home Shop OK Confirm Select Shop is for shop display To change the viewing environment later on you need to initialise all settings by accessi...

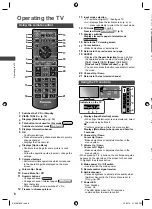
Страница 8: ...teletext mode 16 Exits to the TV viewing screen 17 Cursor buttons Makes selections or adjustments 18 Returns to the previous menu page 19 ASPECT Displays the Aspect Selection screen Follow the operation guide to select the mode 16 9 14 9 Just 4 3 Zoom 4 3 Full Sidecut Just Sidecut Zoom p 19 You can also press the button repeatedly to select the mode 20 Channel Up Down 21 Returns to the last viewed...

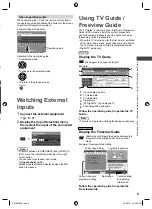
Страница 9: ...ut Example East ender DIY SOS The Bill 11 00am 11 30am 12 00pm 12 30 pm 1 00 pm The Bill Red Cap Good bye NEWS Hot Wars Holiday Program Pepsi Char Emerald 10 O clock News BBC Business News Market News Drama 2 Drama 1 Drama Live junction Sports Live Topics News Shopping 11 30 am 12 00 pm DIY SOS We open in the Battersbys 11 Home World Jade Pearl Sapphire Ruby Gold Home 16 81 84 100 101 102 11 D D D...

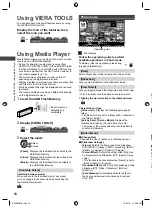
Страница 10: ...other mode by accessing the Contents Select screen B Photo mode Select RETURN Slideshow View Select Drive Select Contents Select Info View Option Menu USB Media Player Photo All photos Operation guide Error display Follow the operation guide to perform available operations in Photo mode To display hide the operation guide during View and Slideshow INFO View Enters Single view mode to view photo on...

Страница 11: ... Follow the operation guide to perform available operations in Video mode To display hide the operation guide and information banner during playback INFO Play Playbacks the selected title To playback from selected scene of the title Scene view Select the title Select the scene Play OK OK R To change aspect Display the Aspect Selection screen then select the desired mode You can also press the butt...

Страница 12: ...ss Colour Sharpness Tint Colour Temperature Vivid Colour Adaptive Backlight Control Ambient Sensor Noise Reduction and MPEG Noise Reduction can be adjusted and stored Backlight Contrast Brightness Colour Sharpness Increases or decreases the levels of these options according to your personal preference Tint Adjusts the picture hue to suit your taste For NTSC signal reception Colour Temperature Sele...

Страница 13: ...he destination input True Cinema Custom Destination Input Selects the destination input Copy Start Select Yes to start copying Reset Picture Defaults Resets the current picture settings to defaults Sound Mode Sets your favourite sound mode Standard Music Speech User The selected mode affects all input signals Standard Standard sound mode Music Improves sound quality for watching music videos etc S...

Страница 14: ...e Selects the time offset from the standard time for Summer 1 hour 1 2 hour Off Auto Region Select Selects the region where you live to adjust the standard time NSW ACT Victoria Queensland South Australia Western Australia Northern Territory Tasmania Auto Standby Enables turning the TV off automatically if no button is pressed for 4 hours On Off No signal Power off Enables turning the TV off if no...

Страница 15: ... Channels Favourites1 A channel is added 1 TEN Digital g g g g Favourit Select favourites To select other Favourites Add all To add all channels to the list Channel List You can hide skip unwanted channels The hidden channels cannot be displayed except in this function Select a channel and reveal hide 70 CBBC Channel 72 Cartoon Nwk 105 BBCi 719 BBC Radio Wales Digital TV Channel List Reveal Hide T...

Страница 16: ... TV Digital TV Analogue TV Analogue TV Analogue TV Lock AV1 AV VCR Indicates locked input channel In Digital TV additional lock item will appear Freeview Players Applies access control for some MHEG services Lock all To lock all channels and inputs Next input To jump to the top of the next input To change the PIN number 1 Select Change PIN Change PIN Child Lock 2 Enter a new PIN number twice Write...

Страница 17: ...d HDMI compliant cable Non HDMI compliant cables cannot be utilised Use an optical digital audio cable or RCA cable for audio output from the TV Set up the connected equipment Read the manual of the equipment Set VIERA Link to On in the Setup Menu VIERA Link p 14 Set up the TV After connection turn the equipment on and then switch the TV on Select the input mode from HDMI1 or HDMI2 and make sure t...

Страница 18: ... VIERA Link Menu VIERA Link Control Speaker Selection Home Cinema Recorder2 Recorder2 Recorder1 2 Player1 2 The number is given from the TV s lower number of HDMI terminal connected to the same type of equipment For example when two recorders are connected to HDMI 1 and HDMI 2 the recorder connected to HDMI 1 is displayed as Recorder1 and the recorder connected to HDMI 2 is displayed as Recorder2 ...

Страница 19: ...n Favourites Edit Rating Digital TV Rating Meaning Rating Meaning No Block Not classified M Mature P Pre school MA 15 Mature Adult 15 C Children AV 15 Adult strong Violence 15 G General R Restricted 18 PG Parental Guidance recommended Rating Meaning No Block Not classified G General PGR Parental Guidance Recommended AO Adults Only Aspect 16 9 Directly displays the image at 16 9 without distortion ...

Страница 20: ...9 Match the output setting of the digital equipment Audio Return Channel HDMI 2 terminal only Content Type VIERA Link HDAVI Control 5 DVI connection If the external equipment has only a DVI output connect to the HDMI terminal via a DVI to HDMI adaptor cable When the DVI to HDMI adaptor cable is used connect the audio cable to the audio input terminal use AV1 audio terminals Note Audio settings can...

Страница 21: ...ndby function p 19 The remote control does not work or is intermittent Replace the batteries p 5 Point the remote control directly at the remote control signal receiver of the TV within about 7 m and 30 degree angle Situate the TV away from sunshine or block sources of bright light from shining on the remote control signal receiver of the TV Parts of the TV become hot Even if the temperature of pa...

Страница 22: ...ome PAL Video recorders VCR M NTSC Playback from M NTSC Video recorders VCR NTSC Playback from NTSC Video recorders VCR Dimensions W H D With Pedestal mm 741 513 207 890 593 217 1 159 738 298 TV only mm 741 448 55 890 531 60 1 159 693 69 Mass Net With Pedestal kg 8 0 12 0 21 0 TV only kg 7 0 10 0 17 5 Aerial input Standard Belling Lee connector VHF UHF Operating Conditions Temperature 0 C 35 C Hum...

Страница 23: ...the nearest Authorised Service Centre Send or take the product to a Panasonic Authorised Service Centre together with your proof of purchase receipt as a proof of purchase date Please note that freight and insurance to and or from your nearest Authorised Service Centre must be arranged by you Note that home or pick up delivery service is available for the following products in the major metropolit...

Страница 24: ...its rear panel You should note this serial number in the space provided below and retain this book plus your purchase receipt as a permanent record of your purchase to aid in identification in the event of theft or loss and for Warranty Service purposes Model Number Serial Number WARRANTY New Zealand only Distributed in New Zealand by Panasonic New Zealand Limited 350 Te Irirangi Drive East Tamaki...

Отзывы: