background image

Advanced

M a i n   m e n u

P i c t u r e   m e n u

S o u n d   m e n u

S e t u p   m e n u

Viewing mode
Contrast
Brightness
Colour
Sharpness
Tint
Colour balance
Colour management

Mosquito NR

Normal
On

Off

MPEG NR

Off

P-NR

Auto

Picture menu

Dynamic

3D-COMB

On

Viewing mode
Contrast
Brightness
Colour
Sharpness
Tint
Colour balance
Colour management

Mosquito NR

Normal
On

Off

MPEG NR

Off

P-NR

Auto

3D-COMB

On

Picture menu

Dynamic

Colour balance

Normal

Sharpness

Access

Tuning menu

16

17

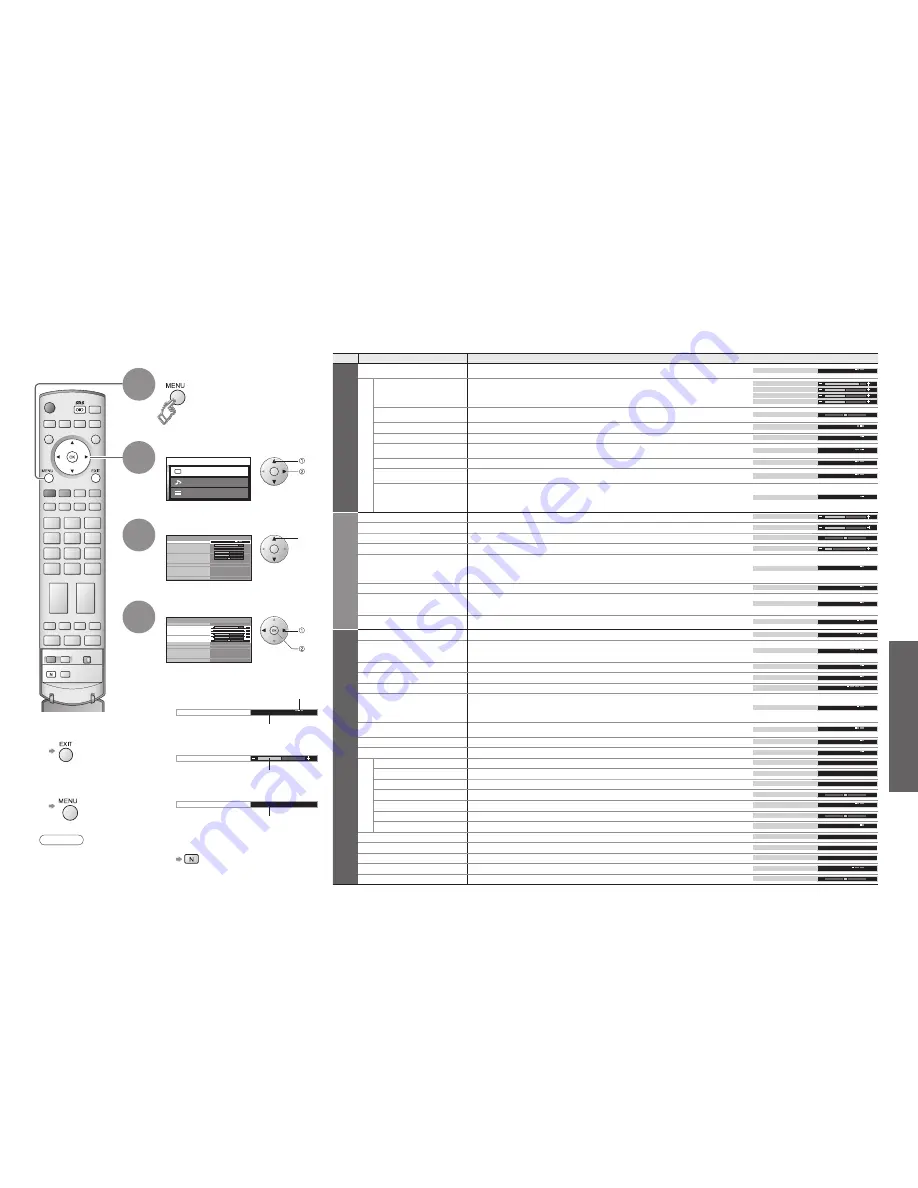
How to Use Menu Functions

Display menu

3

1

2

4

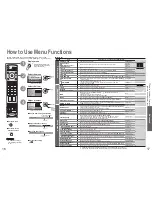
Various menus allow you to make settings for the picture, sound,

and other functions so that you can enjoy watching TV in your own way.

• 

Displays the functions that

can be set (varies according

to the input signal)


To return to TV


To return to the

previous screen


Select the menu

Select the item

(example: Picture menu)

 select

select

Adjust or select

 change

(example: Picture menu)

(example: Picture menu)

Changed

Number and positions

of alternatives

Moved

Displays the next

screen


Choose from among alternatives


Adjust using the slide bar


Go to the next screen


To reset the setting


Menu list

 next

 store

(Required

by some 

functions)

How to Use Menu Functions

(picture, sound quality

, etc.)

Menu

Item

Adjustments / Con

fi

 gurations (alternatives)

Picture menu

Viewing mode

Basic picture mode 

(Dynamic / Normal / Cinema / Auto)

• 

Set for each input signal

Viewing mode

Dynamic

Adjust by each viewing mode

Contrast,

Brightness, Colour,

Sharpness

Adjusts colour, brightness, etc. for each picture mode to suit your taste 

Contrast
Brightness
Colour
Sharpness

Tint

Adjusts tint of image 

• 

For NTSC signal reception only

Tint

Colour balance

Chooses the colour balance of the entire image 

(Cool / Normal / Warm)

Colour balance

Normal

Colour management

Automatically adjusts colours to vivid ones 

(Off / On)

Colour management

On

P-NR

Automatically reduces unwanted picture noise 

(Off / Normal / Dynamic / Auto)

• 

Not valid on HDMI, PC, SD Card and Analogue component signal

P-NR

Auto

MPEG NR

Automatically reduces noise for watching DTV, DVD, VCD and SD Card 

(Off / Min / Mid / Max)

MPEG NR

Off

Mosquito NR

Automatically reduces 

fl

 icker noise in the contoured parts of a picture 

(Off / Min / Mid / Max)

• 

Not valid on PC

Mosquito NR

Off

3D-COMB

Automatically makes still pictures and slow pictures look more vivid 

(Off / On)

• 

For PAL or NTSC signal reception only 

• 

Not valid on RGB, SECAM, S-Video, component, PC, HDMI and SD Card

• 

Cannot be used with DVB

3D-COMB

On

Sound menu

Bass

Adjusts the output level of deep bass

Bass

Treble

Adjusts the output level of high-pitch, shrill sound

Treble

Balance

Adjusts volume level of right and left speakers

Balance

Headphone volume

Adjusts the volume of the headphones

Headphone volume

MPX

Select stereo / monaural 

(Mono / Stereo)

• 

Normally: Stereo

• 

Stereo signal cannot be received: Mono

• 

M1 / M2: Available while mono signal is transmitted

MPX

Stereo

Mode

Improves sound quality for music and dramas 

(Music / Speech)

Mode

Music

SRS TruSurround XT

SRS TruSurround XT® creates a high quality surround sound effect using just two 

speakers from the source which can output surround encoded signals 

(Off / On)

• 

Switching is also possible by SRS button on the remote control

SRS TruSurround XT

Off 

HDMI1 / 3 input

Chooses according to the signal when HDMI1 or HDMI3 is connected 

(Auto / Digital / Analogue)

 (p. 36)

• 

HDMI2 terminal is for digital signal only

HDMI1 input

Auto

Setup menu

Q-Link

Chooses the connector to which a Q-Link compatible equipment is connected 

(Off / AV2 / AV3)

 (p. 32)

Q-Link

AV2

AV2/AV3 out

Chooses the signal to be transmitted from the TV to Q-Link 

(Analogue / DVB / AV1 / AV2 / AV3 / AV4 / Monitor)

• 

Monitor: Image displayed on screen 

• 

Component, PC and HDMI signals cannot be outputted

AV2 out

Monitor

Control with HDMI

Control with HDMI function 

(Off / On)

 (p. 29)

Control with HDMI

On

Teletext

Teletext display mode 

(TOP (FLOF) / List)

 (p. 14)

Teletext

TOP

Off timer

Sets the time the TV automatically turns Off. 

(Off / 15 / 30 / 45 / 60 / 75 / 90)

 (minutes)

Off timer

Off

Text language

Selects teletext language (Analogue) 

(West / East1 / East2)

• 

West: English, French, German, Greek, Italian, Spanish, Swedish, Turkish

• 

East1: Czech, English, Estonian, Lettish, Rumanian, Russian, Ukrainian

• 

East2: Czech, Hungarian, Lettish, Polish, Rumanian

Text language

West

Side panel

Increases the brightness of the side panel 

(Off / Low / Mid / High)

• 

The recommended setting is High to prevent panel "after-image"

Side panel

Off

Power save

Reduces brightness of picture to economise on power consumption 

(Off / On)

Power save

Off

SD card LED

Lights blue LED while SD Card is inserted 

(Off / On)

 (p. 27)

SD card LED

On

Tuning menu

Programme edit

Edits channels (p. 20)

Programme edit

Access

Auto setup

Sets channels automatically (p. 20)

Access

Auto setup

Manual tuning

Sets channels manually (p. 20)

Manual tuning

Access

Fine tuning

Fine tuning of channels (during rain, etc.)

Fine tuning

Colour system

Selects optional colour system depending on video signals 

(Auto / PAL / SECAM / M.NTSC)

Colour system

Auto

Volume correction

Adjusts volume of individual stations

Volume correction

Decoder (AV2 / AV3)

Set “On” when the decoder is connected to AV2 or AV3 terminal via a Q-Link equipment 

(Off / On)

Decoder (AV2)

Off

DVB Setup Menu

Edits or setups DVB channels (p. 18)

DVB Setup Menu

Access

System language

Changes language for on-screen displays

System language

Access

Shipping condition

Resets all settings, for example, when moving house (p. 34)

Shipping condition

Access

Colour system

Selects optional colour system based on video signals in AV mode 

(Auto / PAL / SECAM / M.NTSC / NTSC)

Colour system

Auto

Volume correction

Adjusts volume for AV, PC, HDMI and component mode

Volume correction

• 

A different menu will be displayed while PC or SD Card is used.

 (p. 25 and p. 27)

• 

In AV mode, the Sound menu and Setup menu give a smaller number of options.

Note

• 

To initialize all settings,

use "Shipping condition"

(p. 34). 

• 

Cannot be used with DVB

Содержание Viera TH-65PX600E

Страница 1: ... contact your local authority for further details of your nearest designated collection point Penalties may be applicable for incorrect disposal of this waste in accordance with national legislation For business users in the European Union If you wish to discard electrical and electronic equipment please contact your dealer or supplier for further information Information on Disposal in other Count...

Страница 2: ...eatures How to Use Menu Functions 16 picture sound quality etc Advanced DVB Settings DVB 18 pay TV time etc Editing and Setting Channels Analogue 20 Editing and Setting Channels DVB 22 Displaying PC Screen on TV 25 Viewing SD Card Photos 26 External Equipment 28 Q Link Control with HDMI Connections Basic Features Watching TV 10 Watching Videos and DVDs 12 Viewing Teletext 14 Enjoy your TV Technica...

Страница 3: ...Do not twist the lead bend it excessively or stretch it Do not pull on the lead Hold onto the mains plug body when disconnecting lead Do not use a damaged mains plug or socket outlet Electronic equipment In particular do not place video equipment near the TV electromagnetic interference may distort images sound Equipment with an infrared sensor This TV also emits infrared rays this may affect oper...

Страница 4: ...irect channel access Analogue During normal TV viewing or when in the Tuning Programme edit or Manual tuning menus press and then enter channel number using the numeric buttons Press twice to change to the Cableband mode Viewing SD Card p 26 Switches SRS TruSurround XT On Off p 17 Switches DVB digital broadcasting Analogue mode p 10 Changes programme channel p 10 DVB lamp DVB system active during ...

Страница 5: ...r TV is ready for viewing You can now use the remote control to turn On the TV or turn the TV to standby mode Power lamp On 2 External equipments and cables shown in this manual are not supplied with this TV Please ensure that the unit is disconnected from the mains before attaching or disconnecting any leads If Q Link p 28 equipment is connected analogue channel information is automatically downl...

Страница 6: ...i auf der Flucht 20 00 20 55 For info press 1 Das Erste 20 30 All Services Profile ger Encrypted No Signal Multi Audio Now Channel Programme Broadcast time Current time During scrambled broadcasting Features available Displayed if programme type is radio channel or data channel In case of bad signal or non correct programme number a message will be displayed Teletext information will be displayed ...

Страница 7: ...nnected via SCART or HDMI terminal is operated When the equipment is turned off the TV is set to TV mode If the external equipment has an aspect adjustment function set to 16 9 For details see the manual of the equipment or ask your local dealer To return to TV example AV1 red PC blue yellow twice With the equipment turned On Select the external input Displays the selected connector AV1 AV2 S vide...

Страница 8: ...ers Using teletext conveniently green TOP BOTTOM Normal FULL Expand the BOTTOM half TOP FLOF mode only Return to the main index page If you wish to hold the current page without updating Stop or resume automatic updating To resume HOLD Sub pages The number of sub pages varies depending on the broadcasters up to 79 pages It may take some time for searching during which time you can watch TV Enter t...

Страница 9: ...l is transmitted MPX Stereo Mode Improves sound quality for music and dramas Music Speech Mode Music SRS TruSurround XT SRS TruSurround XT creates a high quality surround sound effect using just two speakers from the source which can output surround encoded signals Off On Switching is also possible by SRS button on the remote control SRS TruSurround XT Off HDMI1 3 input Chooses according to the si...

Страница 10: ...Timeout Preferred Language Setting Select Display Timeout and set the time 0 No display to 10 sec in 1 sec increments Information banner p 11 set select Auto Update Search in Standby Software Licence DVB System Update On System Update Search Now To update immediately Select System Update Search Now Searches for an update for several min and displays a corresponding message if any Downloads for abo...

Страница 11: ...3 FTP Programme edit Prog Chan Name Lock Sys 1 2 3 4 5 CH44 CH51 CH41 CH47 CH37 ABC XYZ FTP 123 456 Off Off Off Off Off SC1 SC1 SC1 SC1 SC1 ABCDEFGHIJKLMNOPQRST UVWXYZ 0123456789 Programme edit Prog Chan Name Lock Sys 1 2 3 4 5 CH44 CH51 CH41 CH47 CH37 Off Off Off Off Off SC1 SC1 SC1 SC1 SC1 XYZ FTP 123 456 To change the name of the broadcaster displayed when selecting channels Usable characters S...

Страница 12: ...hange PIN Child Lock Child Lock Service List Access Child Lock Service List 1 Das Erste 2 arte 3 PHOENIX 4 ARD MHP Data 5 ZDF 6 Info 3sat 7 Doku KiKa 22 23 Editing and Setting Channels Select Setup menu Select DVB Setup Menu 3 1 2 Select the function 4 Display the menu 5 Set Prevent children from watching specific channels Child Lock Your favourite channels can be listed and children can be preven...

Страница 13: ...ed PC menu setting changed as desired Making settings How to Use Menu Functions to p 16 Menu Item Adjustments Configurations options Picture menu Viewing mode Contrast Brightness Sharpness Colour balance p 16 Advanced setting W B High R White balance of bright red area and repeatedly adjusted W B High B White balance of bright blue area W B Low R White balance of dark red area W B Low B White bala...

Страница 14: ...ress the centre of the card Error display images that could not be loaded etc Selected photo To display the operation guide Slide show Select the photo for the first view Start Slide show Display the menu Select Viewing setup Select the functions and set next select Picture menu p 16 Blue LED Note Blue LED lights while SD Card is inserted if set SD card LED to On in Setup menu p 16 set select Caut...

Страница 15: ... Home theatre the sound of TV speakers is mute When the equipment is turned off TV speakers will be active Volume up down Mute TV speaker Control with HDMI ControlTM Preparations For the first time When adding new equipment reconnecting equipment or changing setup After connection turn the equipment on and then switch the TV on Select the input mode to HDMI1 HDMI2 or HDMI3 p 12 and make sure that ...

Страница 16: ...ect VCR DVD recorder Recording Playback Connect DVD player Playback Connect Set top box RGB input Connect VCR DVD recorder and Set top box example Connect DVD recorder and VCR example Easy playback For connection to HDMI2 or HDMI3 terminal refer to p 32 Rear of the TV Rear of the TV Front of the TV Rear of the TV Front of the TV Rear of the TV Rear of the TV Rear of the TV This TV Panasonic Player...

Страница 17: ...ble below and the specifications p 43 AUDIO SCART cable Recommended Connection Control with HDMI p 29 Types of connectable equipment to each connector DVD player Connections overview DIGA or Panasonic Amplifier External Equipment within 10 cm VIDEO or S VIDEO Headphones Camcorder Game equipment Press the cable through and close Pull back the tabs to open When using HDMI2 or HDMI3 terminal as Contr...

Страница 18: ...um size and aspect can be chosen and you can enjoy finer images p 11 Auto aspect Auto aspect determines the best aspect ratio to use to fill your screen It does this using a four step process to determine if the picture being viewed is a widescreen picture If Auto aspect detects a widescreen signal it switches into the appropriate 16 9 or 14 9 widescreen mode If Auto aspect does not detect a wides...

Страница 19: ...finition digital images and high quality sound by connecting the TV and the equipment HDMI compatible equipment 1 with an HDMI or DVI output terminal such as a set top box or a DVD player can be connected to the HDMI terminal using an HDMI compliant fully wired cable Note HDMI2 terminal is for digital signal only Use with a PC is not assumed The 720p 1080i signals will be reformatted before being ...

Страница 20: ...l still cameras compatible with JPEG files of DCF and EXIF standards Data format Baseline JPEG Sub sampling 4 4 4 4 4 2 or 4 2 0 Max number of files 9 999 Image resolution 8 8 to 5 120 3 840 Compliant card type maximum capacity SDHC Card 4 GB SD Card 2 GB Multi Media Card 128 MB miniSD Card 1 GB requiring miniSD adapter If miniSD Card is used insert remove it together with the adapter Check the la...

Страница 21: ...ive p 7 Is the volume set to the minimum Sound level is low or sound is distorted Sound signal reception may be deteriorated Set MPX p 16 in the Sound menu to Mono Analogue only Whirling sound is heard The sound is from built in cooling fan not a sign of faulty operation FAQs Problem Actions DVB Problem Actions Other HDMI Due to the digital reception technologies involved quality of the DTV signal...

Страница 22: ... Ω C 0 286 V p p 75 Ω AUDIO L R RCA PIN Type 2 0 5 V rms Others COMPONENT Y 1 0 V p p including synchronization PB PR 0 35 V p p HDMI1 2 3 TYPE A Connectors PC HIGH DENSITY D SUB 15PIN R G B 0 7 V p p 75 Ω HD VD TTL Level 2 0 5 0 V p p high impedance AUDIO L R RCA PIN Type 2 0 5 V rms Card slot SD CARD slot 1 Output AUDIO L R RCA PIN Type 2 0 5 V rms high impedance Dimensions W H D 1 554 mm 985 mm...

Отзывы: