background image

English

15

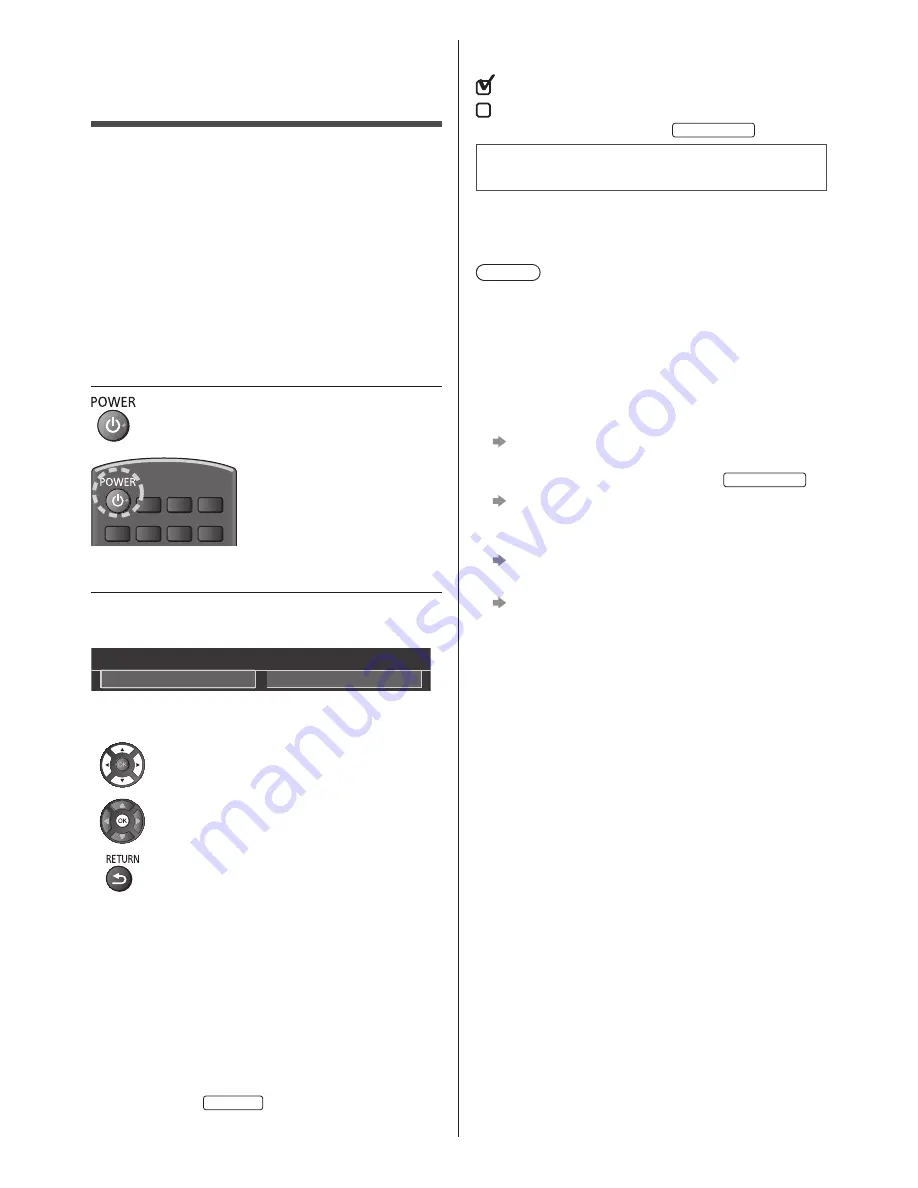
 Tick the TV signal mode to tune, and then select 
[Start Auto Tuning]

  :  tune (search for the available channels)
  :  skip tuning

 Select your region. (Satellite) 

New Zealand

 Auto Tuning is now complete and the 
TV is ready for viewing.

 If tuning has failed check the Satellite cable, RF cable, 
and the network connection, and then follow the on-
screen instructions.

 Note


 The TV goes into Standby mode when no operation 
is performed for 4 hours if [Auto Standby] in the Timer 
Menu is set to [On].


 The TV goes into Standby mode when no signal 
is received and no operation is performed for 10 
minutes if [No signal Power off] in the Timer Menu is 
set to [On].


 To retune all channels

    [Auto Tuning] in [Tuning Menu] (Setup Menu)


 If no satellite channel is found, set [LNB Band 
Frequency] to suit your environment. 

New Zealand

    [LNB Configuration] in [Satellite TV Tuning 

Menu] (Setup Menu)


 To add the available TV signal mode later

    [Add TV Signal] in [Tuning Menu] (Setup Menu)


 To initialise all settings

    [Shipping Condition] in [System Menu] (Setup 

Menu)

  First time Auto 
Tuning

 When the TV is turned on for the first time, it will 
automatically search for available TV channels and give 
options to set up the TV.


 These steps are not necessary if the setup has been 
completed by your local dealer.


 Please complete connections (p. 8 - 11) and settings 
(if necessary) of the connected equipment before 
starting Auto Tuning. For information about the 
settings for the connected equipment, read the 
manual of the equipment.

 1

  Plug the TV into a live mains socket 

and turn the power on


 Takes a few seconds to be displayed.


 2

  Select the following items

 Set up each item by following the on-screen instructions.

 Example:


 Please select your viewing environment.

 Home

 Shop


 How to use the remote control


 Move the cursor


 Access the item / store the setting


 Return to the previous item (if available)


 Select the language
 Select [Home]

 Select [Home] for use in a home viewing environment.


 [Shop] is for shop display.


 To change the viewing environment later on, the set 
will need to have all settings initialised by accessing 
Shipping Condition.

  Set up the network connection
 Select your area 

Australia

Содержание Viera TH-60CX700A

Страница 1: ...ase carefully read the Safety Precautions of this manual before use The images shown in this manual are for illustrative purposes only For more detailed instructions please refer to eHELP Built in Operating Instructions How to use eHELP p 16 M0315 0 English Operating Instructions LED TV English Model No Australia New Zealand TH 60CX700A TH 60CX700Z TQB4GC1391 ...

Страница 2: ...ntioned Illustrations shown may be different between models and countries Contents Be Sure to Read Important Notice 3 Safety Precautions 3 Quick Start Guide Accessories 6 Connections 8 Identifying Controls 12 First time Auto Tuning 15 Using your VIERA Watching TV 16 How to Use eHELP 16 Viewing 3D images 17 Others FAQs 18 Maintenance 18 Specifications 19 ...

Страница 3: ...no authority to and does not grant you that permission and explicitly disclaims any right ability or intention to obtain such permission on your behalf It is your responsibility to ensure that your use of this or any other device complies with applicable copyright legislation in your country Please refer to that legislation for more information on the relevant laws and regulations involved or cont...

Страница 4: ...lter the TV and Touch Pad Controller in any way Take care Warning Do not remove covers and never modify the TV yourself as live parts are accessible when they are removed There are no user serviceable parts inside Do not expose the TV to rain or excessive moisture This TV must not be exposed to dripping or splashing water and objects filled with liquid such as vases must not be placed on top of or...

Страница 5: ...the 3D Eyewear may cause an allergic reaction Built in wireless LAN Caution Do not use the built in wireless LAN to connect to any wireless network SSID for which you do not have usage rights Such networks may be listed as a result of searches However using them may be regarded as illegal access SSID is a name for identifying a particular wireless network for transmission Do not subject the built ...

Страница 6: ...r guardians who must ensure their safety and health while they are viewing 3D images Stop viewing 3D images immediately if you feel tired feel unwell experience any other uncomfortable sensation or clearly see double images Take an appropriate break before continuing to view When you set the 3D effect by using 3D Adjustment take into account that the vision of 3D images varies among different indi...

Страница 7: ...English 7 Assembling the pedestal A C D 1 2 B 3 Assembling Removing the pedestal A Assembly screw 4 M5 15 B Assembly screw 4 M4 12 C Bracket 2 D Base ...

Страница 8: ...affected Please also read the manual of the equipment being connected Preventing the TV from falling over It is recommended to secure the pedestal to a furniture as shown to prevent the TV from falling over This information is designed to reduce the risk of injuries caused by the TV falling over However no measure can guarantee protection in all cases E Band F Screw G Wood screw F E G Optional pos...

Страница 9: ... and sound If a communal aerial system is used you may require the correct connection cable and plug between the wall aerial socket and the TV Your local Television Service Centre or dealer may be able to assist you in obtaining the correct aerial system for your particular area and the accessories required Any matters regarding aerial installation upgrading of existing systems or accessories requ...

Страница 10: ...ss connection Internet environment Built in wireless LAN Access point Connections for 4K compatible equipment TV HDMI cable 4K compatible equipment Connect the 4K compatible equipment to HDMI terminal and you can watch contents of 4K format When connecting to HDMI terminal use a 4K compatible cable Satellite dish New Zealand TV Satellite cable Satellite dish For Satellite TV To ensure your satelli...

Страница 11: ... the manuals of the equipment and amplifier TV HDMI cable Amplifier with speaker system External equipment DVD Player etc USB HDD for recording Use USB 3 for connecting the USB HDD For details refer to eHELP Recording VIERA Link Use HDMI1 3 for VIERA Link connection For details refer to eHELP Functions VIERA Link HDAVI Control Other connections DVD Player COMPONENT equipment TV Viewing Listening D...

Страница 12: ...s Audio Description Subtitle Menu 16 Exit Returns to the normal viewing screen 17 Netflix Accesses NETFLIX service directly A broadband network environment is required to be able to use this function fully This service may be stopped or changed without notice 18 HOME Displays Home screen For details refer to eHELP Read first Features 19 Cursor buttons Makes selections and adjustments 20 Return Ret...

Страница 13: ... polarity or Close Touch Pad Controller Touch Pad Controller is designed for the convenient operations especially on Home screen or internet content You can operate the TV intuitively with this controller Touch Pad Controller can be used exclusively for controlling this TV Register the Touch Pad Controller to this TV with Bluetooth wireless technology before using The registration starts automatic...

Страница 14: ... the TV receives a command from the remote control 4 Input mode selection Press repeatedly until you reach the desired mode Main Menu Press and hold for about 3 seconds to display main menu OK when in the menu system 5 Channel Up Down Cursor Up Down when in the menu system 6 Volume Up Down Cursor Left Right when in the menu system 7 Mains power On Off switch Use to switch the mains power Installin...

Страница 15: ...tings Shipping Condition in System Menu Setup Menu First time Auto Tuning When the TV is turned on for the first time it will automatically search for available TV channels and give options to set up the TV These steps are not necessary if the setup has been completed by your local dealer Please complete connections p 8 11 and settings if necessary of the connected equipment before starting Auto T...

Страница 16: ...em access Sub item field Description To return to the previous field To scroll the description if more than 1 page While the description is highlighted To display the menu related to the description only for some descriptions red To check the features of this TV Read first Features Watching TV 1 Turn power on TV or Remote Control Mains power On Off switch should be on p 14 Displays information bar...

Страница 17: ...mages will be displayed in 2D mode If the input mode is not switched automatically select the input mode connected to the player using the AV button 3D supported broadcast Please consult the suppliers of content or programmes for availability of this service 3D photos and 3D videos taken by 3D compatible Panasonic products Available in Media Player and Network services 2D images converted to 3D Se...

Страница 18: ...s The TV does not switch on Check the mains lead is plugged into the TV and the mains socket The TV goes into Standby mode Auto power standby function is activated The remote control does not work or is intermittent Are the batteries installed correctly p 13 Has the TV been switched on The batteries may be running low Replace them with new ones Point the remote control directly at the TV s remote ...

Страница 19: ... air broadcast PAL 60 Hz Playback of NTSC tape from some PAL Video recorders VCR M NTSC Playback from M NTSC Video recorders VCR NTSC Playback from NTSC Video recorders VCR Satellite dish input New Zealand Female F type 75 Ω Aerial input Standard Belling Lee connector VHF UHF Specifications TV Model No TH 60CX700A TH 60CX700Z Dimensions W H D 1 347 mm 822 mm 344 mm With Pedestal 1 347 mm 781 mm 53...

Страница 20: ...02 11a n 5 15 GHz 5 35 GHz 5 47 GHz 5 85 GHz IEEE802 11b g n 2 400 GHz 2 4835 GHz Security WPA2 PSK TKIP AES WPA PSK TKIP AES WEP 64 bit 128 bit Bluetooth wireless technology 2 Standard Compliance Bluetooth 3 0 Frequency Range 2 402 GHz 2 480 GHz 1 The frequency and channel differ depending on the country 2 Not all the Bluetooth compatible devices are available with this TV Up to 5 devices can be ...

Страница 21: ......

Страница 22: ......

Страница 23: ... for the name address of the nearest Authorised Service Centre Send or take the product to a Panasonic Authorised Service Centre together with your proof of purchase receipt as a proof of purchase date Please note that freight and insurance to and or from your nearest Authorised Service Centre must be arranged by you Note that home or pick up delivery service is available for the following product...

Страница 24: ...nic com Panasonic Corporation 2015 English Printed in Malaysia New Zealand WARRANTY New Zealand only Distributed in New Zealand by Panasonic New Zealand Limited 350 Te Irirangi Drive East Tamaki Private Bag 14911 Panmure Auckland Tel 09 272 0100 Customer Care Center Email Customerservice nz panasonic com www panasonic co nz NEW ZEALAND Warranty Information on Disposal in other Countries outside th...

Отзывы: