background image

English

10

 1.  Select the HDMI input mode connected to the 

equipment.

 2.  Display the menu and select [HDMI Auto Setting] 

(Setup Menu).

● 

 For information about the valid format, refer to 
[eHELP] (Watching > 4K resolution > HDMI Auto 
Setting).

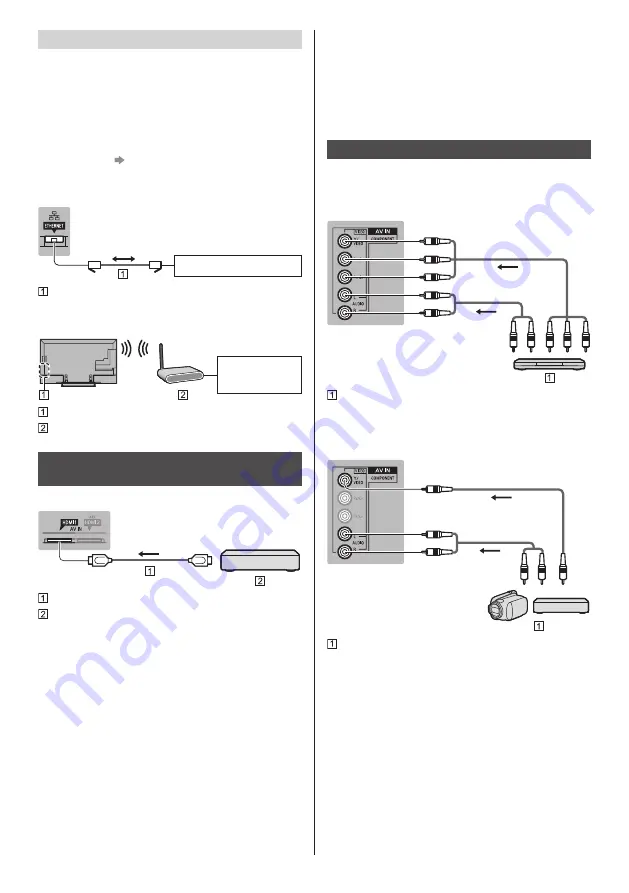
 Other connections


  DVD Player


(COMPONENT equipment)

 TV


 (Viewing)

 (Listening)

   DVD Player


  Camcorder / Game equipment


(VIDEO equipment)

 TV


 (Viewing)

 (Listening)

   Camcorder / Game equipment

  Network

 A broadband network environment is required to be able 
to use internet services.

● 

 If you do not have any broadband network services, 
please consult your retailer for assistance.

● 

 Prepare the internet environment for wired connection 
or wireless connection.

● 

 Setup of the network connection will start when first 
using the TV.   

(p. 14)


 Wired connection

 TV


 Internet environment

   LAN cable (Shielded)

● 

 Use Shielded Twist Pair (STP) LAN cable.


 Wireless connection


 Internet 

environment

   Built-in wireless LAN
   Access point

  Connections for 4K compatible 
equipment

 TV

 
    HDMI cable
    4K compatible equipment

● 

 Connect the 4K compatible equipment to HDMI 
terminal using a 4K compatible cable and you can 
watch content in 4K format.


  [HDMI Auto Setting] (Setup Menu)

 Reproduces the image more precisely with the 
expanded colour gamut when connecting the 4K 
compatible equipment. Select the mode depending on 
the equipment.

 [Mode1]:
 For better compatibility. Set to [Mode1] when the 
image or sound in HDMI input is not played properly.
 [Mode2]:
 For the 4K compatible equipment that has the 
function to output the image precisely with the 
expanded colour gamut

● 

 To change the mode

Содержание Viera TH-55DX640A

Страница 1: ...se carefully read the Safety Precautions of this manual before use The images shown in this manual are for illustrative purposes only For more detailed instructions please refer to eHELP Built in Operating Instructions How to use eHELP p 15 M0116 0 English Operating Instructions LED TV English Model No Australia New Zealand TH 55DX640A TH 55DX640Z TH 65DX640A TH 65DX640Z ...

Страница 2: ...herwise mentioned Illustrations shown may be different between models and countries Contents Be Sure to Read Important Notice 3 Safety Precautions 4 Quick Start Guide Accessories 6 Connections 8 Identifying Controls 12 First time Auto Tuning 14 Using your VIERA Watching TV 15 How to Use eHELP 15 Others FAQs 16 Maintenance 17 Specifications 17 ...

Страница 3: ...se for the personal and non commercial use of a consumer to i encode video in compliance with the AVC Standard AVC Video and or ii decode AVC Video that was encoded by a consumer engaged in a personal and non commercial activity and or was obtained from a video provider licensed to provide AVC Video No license is granted or shall be implied for any other use Additional information may be obtained ...

Страница 4: ...the TV and supporting furniture Educating children about the dangers of climbing on furniture to reach the TV or its controls This TV is designed for indoor use This TV is designed for table top use Do not expose the TV to direct sunlight and other sources of heat Safety Precautions To help avoid risk of electrical shock fire damage or injury please follow the warnings and cautions below Mains plu...

Страница 5: ... required to move the TV When not in use for a long time Caution This TV will still consume some power even in the Off mode as long as the mains plug is still connected to a live mains socket Remove the mains plug from the wall socket when the TV is not in use for a prolonged period of time To prevent the spread of fire keep candles or other open flames away from this product at all times Suffocat...

Страница 6: ...ry for the Remote Control Caution Incorrect installation may cause battery leakage corrosion and explosion Replace only with the same or equivalent type Do not mix old and new batteries Do not mix different battery types such as alkaline and manganese batteries Do not use rechargeable batteries Ni Cd etc Do not burn or break up batteries Do not expose batteries to excessive heat such as sunshine f...

Страница 7: ...he pedestal to a furniture as shown to prevent the TV from falling over This information is designed to reduce the risk of injuries caused by the TV falling over However no measure can guarantee protection in all cases E Band F Screw G Wood screw Base Assembling the pedestal 1 A C D ...

Страница 8: ... infrared sensor otherwise distortion of image sound may occur or operation of other equipment may be affected Please also read the manual of the equipment being connected Terminals 1 2 3 4 5 6 7 3 4 6 7 5 New Zealand Australia 1 USB 1 3 port F E G The illustration for TH 65DX640A is used Optional position for installation Removing the pedestal from the TV Be sure to remove the pedestal in the fol...

Страница 9: ...F cable HDMI cable DVD Recorder VCR Aerial Set top box TV HDMI cable Set top box 2 HDMI3 3 AV IN COMPONENT VIDEO p 10 10 4 ETHERNET terminal p 10 5 Aerial terminal p 9 Satellite terminal p 9 New Zealand 6 DIGITAL AUDIO OUT 7 HDMI1 2 p 9 9 11 To watch content in 4K format use HDMI terminal p 10 Basic connections Mains lead AC 220 240 V 50 60 Hz Mains lead supplied Push until both side tabs click Ma...

Страница 10: ...e network connection will start when first using the TV p 14 Wired connection TV Internet environment LAN cable Shielded Use Shielded Twist Pair STP LAN cable Wireless connection Internet environment Built in wireless LAN Access point Connections for 4K compatible equipment TV HDMI cable 4K compatible equipment Connect the 4K compatible equipment to HDMI terminal using a 4K compatible cable and yo...

Страница 11: ...ernal equipment e g Dolby Digital 5 1ch connect the equipment to the amplifier For information about the connections read the manuals of the equipment and amplifier TV HDMI cable Amplifier with speaker system External equipment DVD Player etc USB HDD for recording Use USB 3 port for connecting the USB HDD For details refer to eHELP Recording VIERA Link Use HDMI1 3 for VIERA Link connection For det...

Страница 12: ...io Description Displays Audio Description Subtitle Menu 16 Exit Returns to the normal viewing screen 17 Netflix Accesses NETFLIX service directly A broadband network environment is required in order to fully use this function This service may be stopped or changed without notice 18 HOME Displays Home Screen For details refer to eHELP Read first Features 19 Cursor buttons Makes selections and adjus...

Страница 13: ...as been pressed 5 4 6 7 1 2 3 Rear side of the TV 1 Remote control signal receiver Do not place any objects between the TV remote control signal receiver and remote control 2 Ambient sensor Senses brightness to adjust picture quality when Ambient Sensor in the Picture Menu is set to On 3 Power LED Red Standby Green On Orange Standby with some functions recording etc active The LED blinks when the ...

Страница 14: ...tings Shipping Condition in System Menu Setup Menu First time Auto Tuning When the TV is turned on for the first time it will automatically search for available TV channels and give options to set up the TV These steps are not necessary if the setup has been completed by your local dealer Please complete connections p 8 11 and settings if necessary of the connected equipment before starting Auto T...

Страница 15: ...em access Sub item field Description To return to the previous field To scroll the description if more than 1 page While the description is highlighted To display the menu related to the description only for some descriptions red To check the features of this TV Read first Features Watching TV 1 Turn power on TV or Remote Control Mains power On Off switch should be on p 13 Displays information bar...

Страница 16: ...n about 7 m and a 30 degree angle of the signal receiver Situate the TV away from sunshine or other sources of bright light so they do not shine on the TV s remote control signal receiver No image is displayed Check the TV is turned on Check the mains lead is plugged into the TV and the mains socket Check the correct input mode is selected Check the setting of AV COMPONENT VIDEO in Input Selection...

Страница 17: ...or pedestal by using a soft cloth to remove dirt or fingerprints For stubborn dirt 1 First clean the dust from the surface 2 Dampen a soft cloth with clean water or diluted neutral detergent 1 part detergent to 100 parts water 3 Wring out the cloth firmly Please note do not let liquid enter the TV inside as it may lead to product failure 4 Carefully wipe moisten and wipe away the stubborn dirt 5 F...

Страница 18: ...onnection terminals AV IN COMPONENT VIDEO VIDEO RCA PIN Type 1 1 0 V p p 75 AUDIO L R RCA PIN Type 2 0 5 V rms Y 1 0 V p p including synchronisation PB CB PR CR 0 35 V p p HDMI 1 2 3 input TYPE A Connectors HDMI1 3 4K Content Type Deep Colour x v Colour HDMI2 4K Content Type Audio Return Channel Deep Colour x v Colour This TV supports HDAVI Control 5 function ETHERNET 10BASE T 100BASE TX USB 1 2 3...

Страница 19: ...ew for fixing the TV onto the wall hanging bracket not supplied with the TV Warning When optional accessories such as wall brackets etc are used always read and follow the manufactures installation and usage instructions Do not mount the unit directly below ceiling lights such as spotlights or halogen lights which typically give off high heat Doing so may warp or damage plastic cabinet parts When ...

Страница 20: ... for the name address of the nearest Authorised Service Centre Send or take the product to a Panasonic Authorised Service Centre together with your proof of purchase receipt as a proof of purchase date Please note that freight and insurance to and or from your nearest Authorised Service Centre must be arranged by you Note that home or pick up delivery service is available for the following product...

Страница 21: ...nic com Panasonic Corporation 2016 English Printed in Malaysia Information on Disposal in other Countries outside the European Union This symbol is only valid in the European Union If you wish to discard this product please contact your local authorities or dealer and ask for the correct method of disposal New Zealand WARRANTY New Zealand only Distributed in New Zealand by Panasonic New Zealand Li...

Отзывы: