background image

Advanced

Menu

Item

Adjustments / Con

fi

 gurations (options)

Picture

Advanced

PC 

Settings

W/B High R

White balance of bright red area

 and 

repeatedly adjusted

W/B High B

White balance of bright blue area

W/B Low R

White balance of dark red area

W/B Low B

White balance of dark blue area

Gamma

(2.0 / 2.2 / 2.5 / S Curve)

Setup

PC

Setup

Input

Resolution

Switches to a wide view


VGA (640 × 480 pixels), WVGA (852 × 480 pixels),

XGA (1,024 × 768 pixels), WXGA (1,366 × 768 pixels)


Options change depending on signals

Clock 

Set to the minimum level if noise occurs

H-pos

Adjusts horizontal position


V-pos

Adjusts vertical position


Clock Phase

Eliminates 

fl

 icker and distortion


Adjust after Clock adjustment


Set to the minimum level if noise occurs

Sync

Chooses another synchronous signal if the image is distorted 

(H & V / On G)


H & V : by the horizontal and vertical signals from your PC

On G  : by the green signal from your PC (if available)

OPTION SD CARD

EXIT

RETURN

INPUT

Input Selection

AV1

AV2/AV2S

AV3/AV3S

COMPONENT

PC

HDMI1

HDMI2

TV

Main Menu

VIERA Link

Picture

Sound

Setup

2/3

Common Interface

System Update

Input Labels

Banner Display Timeout

3 seconds

Time Zone

Auto

VIERA Link

On

       Setup Menu

Power Save

Off

Side Panel

Off

Access

Refresh Rate

100Hz

OPTION SD CARD

INPUT

EXIT

TV

RETURN

Input Labels

AV1

DVD

AV2/AV2S

AV2/AV2S

COMPONENT

COMPONENT

AV3/AV3S

AV3/AV3S

PC

PC

HDMI1

HDMI1

HDMI2

HDMI2

32

33

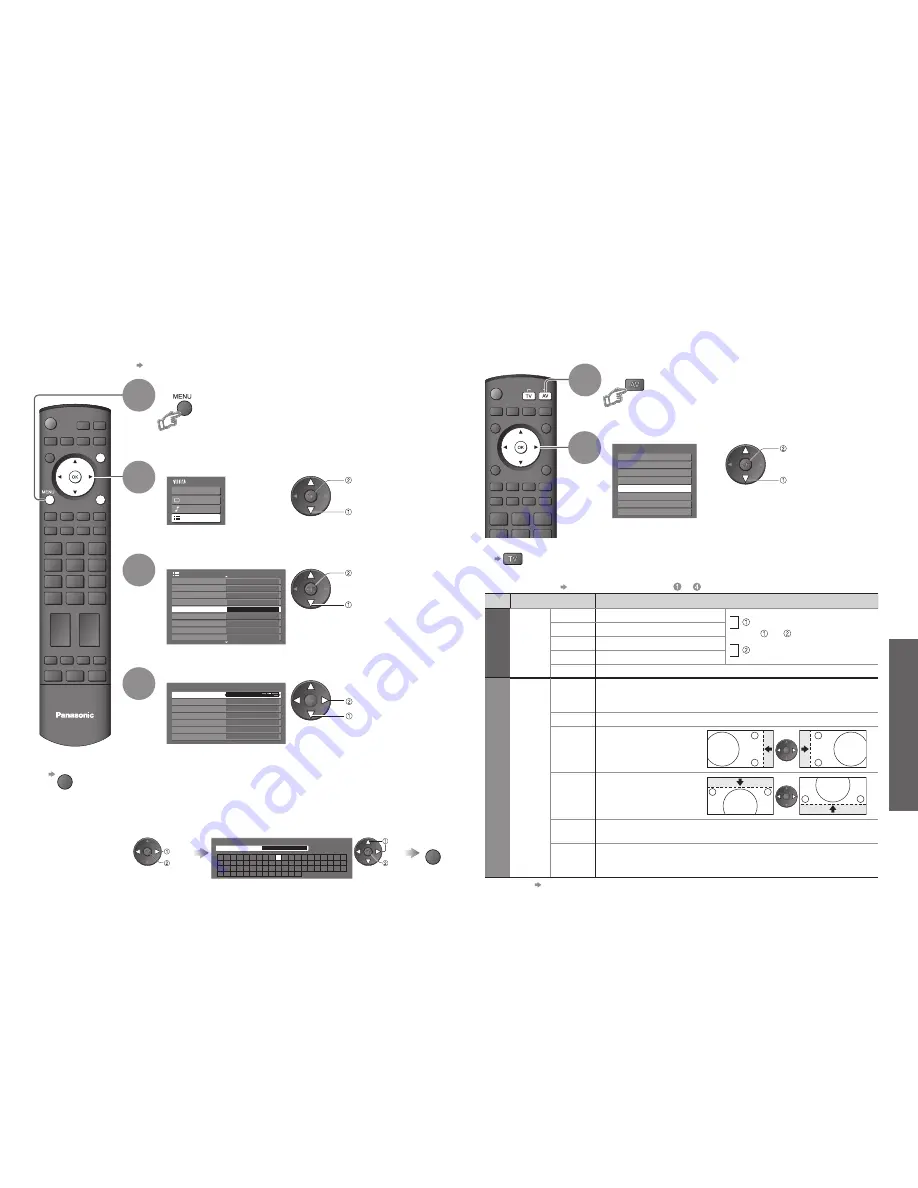
Displaying PC Screen on 

TV

Input Labels


To return to TV 


Displaying PC Screen on TV

Select the external input

Select “PC”

2

The screen of the PC connected to the TV can be displayed on the TV.

You can also listen to PC sound with the audio cable connected. To connect PC


(p. 40)

• 

Corresponding signals (p. 44)

• 

If “H-freq.” or “V-freq.” is shown in red, 

the signals may not be supported.


PC menu setting 

(changed as desired)

 • 

To make settings   “How to Use Menu Functions” 

 to 

 (p. 20)

• 

Other items   p. 22 and p. 23

1

Input Labels

2

3

4

Select “Setup”

Select “Input Labels”

Display the menu

Select a input terminal and set


To return to TV


EXIT

For easier identi

fi

 cation and selection of the input mode, you can label each input terminals or skip 

terminal that is not connected to any equipment.

(To select the input mode   p. 16)


set


select

1

The labels you set will be displayed in “Input Selection” menu (p. 16) or banner.

• 

If “Skip” is selected, you cannot select the mode.

 access

 select

 access

 select

 access

 select


User input

You can name each input terminals freely. 

Select “User input”

 access

 select

Set characters

User input

Name

A

B

C D

E

F

G H

I

J

K

L

M N

U

V W X

Y

Z

0

1

2

3

4

5

6

a

b

c

d

e

f

g

h

i

j

k

l

m

n

u

v

w

x

y

z

(

)

+

-

.

*

_

O P Q R

S

T

7

8

9

!

:

#

o

p

q

r

s

t

 set

 select

(maximum: ten characters)

Store

RETURN

Содержание Viera TH-42PZ70E

Страница 1: ...ion This symbol is only valid in the European Union If you wish to discard this product please contact your local authorities or dealer and ask for the correct method of disposal Printed in Czech Republic Matsushita Electric Industrial Co Ltd Web Site http www panasonic europe com 2007 Matsushita Electric Industrial Co Ltd All Rights Reserved Customer s Record The model number and serial number of...

Страница 2: ...3 Viewing from SD Card Photos 34 Q Link Functions 36 HDMI Functions 37 HDMI terminal VIERA Link External Equipment 40 Basic Features Watching TV 14 Watching Videos and DVDs 16 Viewing Teletext 18 Enjoy your TV Technical Information 42 FAQs 45 Specifications 47 Licence 48 FAQs etc Accessories Options 6 Installation of the pedestal 7 Identifying Controls 9 Basic Connection 10 Auto Setup 12 Quick Sta...

Страница 3: ...care not to subject the TV s surfaces to detergent A liquid inside the TV could lead to product failure Use care not to subject surfaces to bug repellent solvent thinner or other volatile substances this may deteriorate the surface by peeling the paint Do not allow the cabinet to make contact with a rubber or PVC substance for a long time Do not allow children to handle SD card As with a small obj...

Страница 4: ...during installation since subjecting it to impact or other forces may cause product damage Optional accessories Wall hanging bracket vertical TY WK42PV3W angle TY WK42PR2W TY WK42PR3W Securing the TV Label View from the bottom Arrow mark Hole for pedestal installation Assembling the pedestal Caution Do not use any other TV and displays Otherwise the TV may fall over and become damaged and personal...

Страница 5: ...t both top corners on the rear of the TV and attach the clamps to the TV using the removed screws Band 2 Screw 2 Nominal diameter 4 mm 12 Wood screw 2 Clamp 2 Installation of the pedestal Securing to a base Fix pedestal and base together with band Securing to a wall Fix to wall or post with strong commercial wire or chain Remove Attach Attaching the bands for fixing cables To tighten To loosen Pre...

Страница 6: ...ing any leads When disconnecting the mains lead be absolutely sure to disconnect the mains plug at the socket outlet first Example 1 Connecting aerial Example 2 Connecting DVD Recorder VCR Note Connect to AV1 2 for a DVD Recorder VCR supporting Q Link p 36 Example 3 Connecting DVD Recorder VCR and Set top box Mains lead supplied Mains lead supplied SCART cable fully wired DVD Recorder or VCR RF ca...

Страница 7: ...al dealer Auto Setup is now complete and your TV is ready for viewing You can now use the remote control to turn On the TV or turn the TV to standby mode Power LED On To edit channels Editing Channels p 26 Analogue Programme Edit p 29 ON SCREEN HELP Instructions box Open the main menu Return to the previous menu Move the cursor select the menu Move the cursor adjust levels select from a range of o...

Страница 8: ...he list is displayed select the mode Store Display subtitles STTL Display hide subtitles if available To change the language for DVB Preferred Subtitles p 23 If available Display the current programme status OPTION Check or change the current programme status instantly To change Subtitle Language DVB mode Possible if the programme has some languages of subtitles Multi Audio DVB mode Possible if th...

Страница 9: ...switch Select VCR to operate Panasonic VCR or DVD equipment Select DVD to operate Panasonic DVD equipment or Player home theatre Standby Set to Standby mode Turn on Play Playback videocassette DVD Stop Stop the operations Rewind Skip Search VCR Rewind view the picture rapidly in reverse DVD Skip to the previous track or title Press and hold to search backward Fast forward Skip Search VCR Fast forw...

Страница 10: ...veal hidden data red Re hide red Reveal hidden words e g quiz page answers Using teletext conveniently FULL TOP BOTTOM green Normal FULL BOTTOM Expand the BOTTOM half Return to the main index page If you wish to hold the current page without updating Stop or resume automatic updating To resume HOLD Store frequently viewed pages in the colour bar List mode only press and hold As page is displayed T...

Страница 11: ...lect Overview VIERA Link Control Speaker Selection VIERA Link Menu Home Cinema Recorder p 39 Main Menu VIERA Link Picture Sound Setup The menu of the accessed equipment 2 2 3D COMB Off Reset to Default Set MPEG NR Off Picture Menu MOSQUITO NR Off p 22 1 2 Viewing Mode Auto Contrast Brightness Colour Sharpness Tint Colour Balance Warm Colour Management Off P NR Off Picture Menu Mode Music Bass Treb...

Страница 12: ...wanted DVB channels p 27 Q Link Settings Q Link Selects which AV terminal is to be used for data communication between this TV and a compatible recording equipment AV1 AV2 p 36 AV1 AV2 out Chooses the signal to be transmitted from the TV to Q Link Analogue DVB AV1 AV2 AV3 Monitor Monitor Image displayed on screen Component PC and HDMI signals cannot be outputted Download Downloads analogue channel...

Страница 13: ...veral min and displays a corresponding message if any Download access select Download may take for about 20 min Pay TV The Common Interface Module menu provides access to software contained on Common Interface CI Modules This TV receiver works only Pay TV modules complying with CI standard Common Interface Slot 1 Module inserted Access Common Interface select go Coloured characters red green yello...

Страница 14: ...dit and To name the Profile red Select the character RETURN To move the channel green Select the new position Confirm green To delete the channel yellow To delete all channels blue access select access select Control channel audience 1 of 2 Child Lock PIN Entry Please enter new PIN PIN Child Lock Service List Change PIN Access Wed 12 05 04 10 46 Child Lock Service List BBC One Wales Service Name 1...

Страница 15: ...ame Type Quality CBBC Channel DVB 10 62 BBC Radio Wales DVB 10 62 BBC Radio Cymru DVB 10 62 E4 DVB 10 62 Cartoon Nwk DVB 10 CH 29 Analogue CH 33 BBC1 Analogue Settings are made automatically Edit Analogue channels Analogue Programme Edit 1 CH33 2 CH21 3 CH21 4 CH60 5 CH21 Prog Chan Name 1 2 3 X Y Z F T P 4 5 6 SC1 Auto SC1 Auto SC1 Auto SC1 Auto SC1 Auto Sound Sys Colour Sys To change sound system...

Страница 16: ... New Service Message New DVB service found Press OK to add new service Press EXIT to lgnore Selects whether to give a notification message when a new DVB service is found Off On Set DVB channel manually DVB Manual Tuning Normally use Auto Setup or Add New DVB Services for the DVB channel setting If tuning has not done completely use this function adjust frequency set where the level of Signal Qual...

Страница 17: ... 100Hz OPTION SDCARD INPUT EXIT TV RETURN Input Labels AV1 DVD AV2 AV2S AV2 AV2S COMPONENT COMPONENT AV3 AV3S AV3 AV3S PC PC HDMI1 HDMI1 HDMI2 HDMI2 32 33 Displaying PC Screen on TV Input Labels To return to TV Displaying PC Screen on TV Select the external input Select PC 2 The screen of the PC connected to the TV can be displayed on the TV You can also listen to PC sound with the audio cable con...

Страница 18: ...impact Insert the card in the correct direction otherwise card may be damaged Electrical interference static electricity or erroneous operation may damage the data or card Back up the recorded data at regular intervals in case of deteriorated or damaged data or erratic operation of the TV Panasonic is not liable for any deterioration or damage of recorded data Selected photo information is display...

Страница 19: ...e equipment 1 with an HDMI or DVI output terminal such as a set top box or a DVD player can be connected to the HDMI terminal using an HDMI compliant fully wired cable About connections see External Equipment p 40 Note HDMI is the world s first complete digital consumer AV interface complying with a non compression standard If the external equipment has only a DVI output connect to the HDMI1 termi...

Страница 20: ...lly set to Standby This function will work even if the TV enters standby mode automatically by Off Timer function or auto power standby function select set Preparations Setup the equipment to enable this function Read the manuals of the equipment About connections see External Equipment p 41 Read the manuals of the equipment too For the first time When adding new equipment reconnecting equipment o...

Страница 21: ...ecommended Connection Types of connectable equipment to each connector External Equipment Easy playback Easy control only with VIERA remote control Home Cinema Panasonic DVD Recorder HD Video Camera etc Use fully wired HDMI compliant cable Read the manuals of the equipment too VIERA Link p 38 VIDEO or S VIDEO AUDIO Headphones Camcorder Game equipment To adjust volume Headphone Volume in the Sound ...

Страница 22: ...onic s conventional HDAVI equipment HDMI connections to some Panasonic equipment allow you to interface them automatically p 38 VIERA Link ControlTM 4 3 Full Displays a 4 3 image enlarged horizontally to fit the screen 4 3 Displays the image at the standard 4 3 without distortion Note During downloading do not turn Off the TV or touch any button The TV is automatically activated after downloading ...

Страница 23: ...nal Aspect 4 3 1 440 1 080 pixels 16 9 1 920 1 080 pixels FAQs Before requesting service or assistance please follow these simple guides to resolve the problem If problem still persists please contact your local Panasonic dealer for assistance White spots or shadow images noise Check the position direction and connection of the aerial Neither image nor sound is produced Is the TV in AV mode Is the...

Страница 24: ... Screen Sound HDMI Chaotic image noisy Set P NR in the Picture Menu to remove noise p 22 Check nearby electrical products car motorcycle fluorescent lamp No image can be displayed Is Colour or Contrast in the Picture Menu set to the minimum p 22 Check Colour system p 29 Blurry or distorted image no sound or low volume Reset channels p 29 No sound is produced Is Sound mute active p 9 Is the volume ...

Отзывы: