background image

32

33

Advanced

Off timer

Tuning menu
Owner ID

Setup menu

Shipping condition

Access

Off

Teletext

TOP

HDMI setting

Power save

Off

Side panel

High

1

2

3

4

5

6

7

8

9

0

MUTE

MENU

IDTV

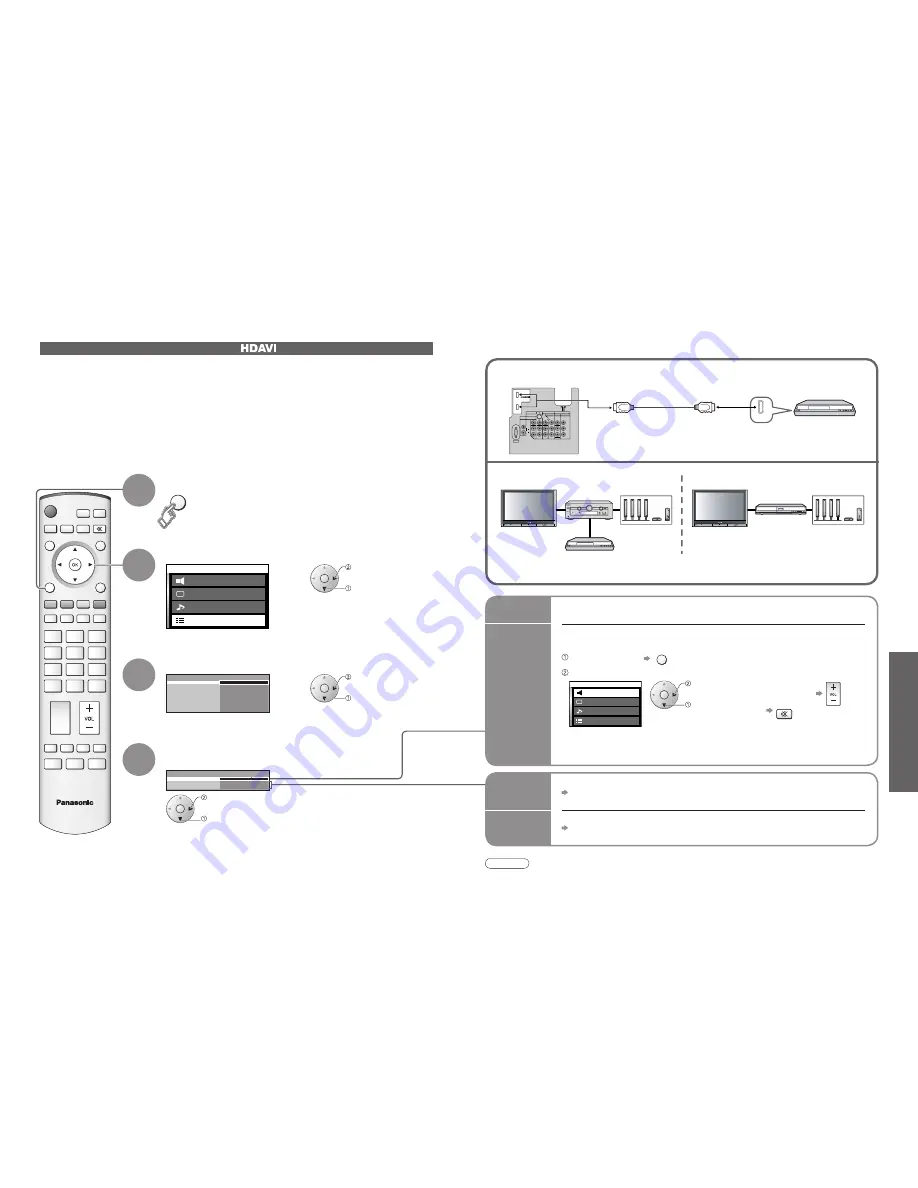
Control with HDMI
Power off link
Power on link

HDMI setting

Set
Set

On

M a i n   m e n u

P i c t u r e   m e n u

S e t u p   m e n u

H o m e   t h e a t r e

S o u n d   m e n u

M a i n   m e n u

P i c t u r e   m e n u

S e t u p   m e n u

H o m e   t h e a t r e

S o u n d   m e n u

PC

MONITOR

OUT

AUDIO

IN

AV1  IN

COMPONENT VIDEO COMPONENT

S VIDEO

MONO

MONO

MONO

VIDEO

Y

L

R

AUDIO

Y

PR/CR

PB/CB

PR/CR

PB/CB

L

R

L

R

AUDIO

AV2  IN

AV3  IN

AV IN

1

2

MENU

Select "Control with HDMI" 

and set to "On"

External Equipment

Select "Setup menu"

Select "HDMI setting"

2

1

3

Display the menu

Enjoy additional HDMI Inter-Operability with Panasonic products which have "HDAVI Control" function.

HDMI connections to some Panasonic equipments (Panasonic DVD Recorder DIGA, Panasonic Player 

theatre, Panasonic Ampli

fi

 er, etc.) allow you to enjoy the easy playback or home theatre.

About connections, see p. 33. Read the manuals of the equipment too.

Non-HDMI-compliant cables cannot be utilized.

About applicable equipments, consult your local Panasonic dealer.

Easy 

playback

Automatic Input switching-When the connected Panasonic equipment is operated, input 

mode is switched automatically. When it is stopped operating, input mode is not returned.

Power on 

link

Set to "Set"

 When the connected Panasonic equipment is operated, TV is also automatically 

turned on and the content is reproduced. (Only when TV is in Standby mode.)

Power off 

link

Set to "Set"

 When TV is set to Standby mode, the connected Panasonic equipment is also 

automatically set to Standby.

Theatre 

speaker

Control with HDMI "

 Control

TM

"

Preparations

(For the 

fi

 rst time / When adding new equipment, reconnecting equipment or changing setup)

After connection turn the equipment on and then switch the TV on.

Select the input mode to HDMI1 or HDMI2 (p. 14), and make sure that an image is displayed 

correctly.

4

External Equipment

You can control the theatre speaker with TV’s remote control.

This function is available when Panasonic Ampli

fi

 er or Player theatre is connected.

 Display the menu   

MENU

 Select "Home theatre" or "TV speaker"


Home theatre:

• 

When selecting "Home theatre", the sound of TV speakers is mute.

• 

When the equipment is turned off, TV speakers will be active.

Volume up / down


Mute


MUTE


TV speaker:

Adjustment for equipment (automatically 
turned on if it is in Standby mode)

TV speakers are active.

Connections for Control with HDMI

• 

It is recommended that you use Panasonic’s HDMI cable.

  Recommended part number:

  RP-CDHG15 (1.5 m)

  RP-CDHG30 (3.0 m)

  RP-CDHG50 (5.0 m)

 access

 select

 access

 select

 set

 select

 set

 select

Note

• 

The TV remains on even if the “Control with HDMI” compatible equipment is turned off.


Easy playback 

(For connection to HDMI2 terminal, refer to p. 34)

Rear of the TV

Panasonic DVD recorder 

DIGA

HDMI


Home theatre

This TV

Panasonic 

Player theatre

Panasonic DVD recorder 

DIGA

Panasonic 

Ampli

fi

 er

Speaker system

This TV

Speaker system

Read the manuals of Panasonic Ampli

fi

 er or Player theatre for details.

Содержание Viera TH-42PX600A

Страница 1: ...rs Drums Developer Film Ink Ribbon Film Cartridge Printer Heads 5 If warranty service is required you should Telephone Panasonic s Customer Care Centre on 132600 or visit our website and use the Service Centre Locator for the name address of the nearest Authorised Service Centre Send or bring the product to a Panasonic Authorised Service Centre together with your proof of purchase receipt as a pro...

Страница 2: ...0 External Equipment 32 Control with HDMI Connections Basic Features Watching TV 10 Using TV Guide DVB 12 Watching Videos and DVDs 14 Viewing Teletext 16 Enjoy your TV Technical Information 36 FAQs 41 SD Card On screen messages 45 Licence 46 Specifications 47 WARRANTY 48 FAQs etc Accessories Options 6 Identifying Controls 7 Connection 8 Auto Tuning 9 Quick Start Guide Enjoy rich multi media Receiv...

Страница 3: ...shock may result Do not expose to direct sunlight and other sources of heat Avoid exposing the TV to direct sunlight and other sources of heat To prevent fire never place any type of candle or naked flame on top or near the TV Blocked ventilation by curtains etc may cause overheating fire or electrical shock Allow sufficient space around the TV for radiated heat Cleaning an energized TV may cause ...

Страница 4: ...nstalling remote s batteries 1 Pull open Hook 2 Note the correct polarity or Close Snap open Snap shut Caution Incorrect installation may cause battery leakage and corrosion resulting in damage to the remote control Do not mix old and new batteries Do not mix different battery types such as alkaline and manganese batteries Do not use rechargeable Ni Cd batteries Do not burn or breakup batteries At...

Страница 5: ...l dealer Input owner ID DVB Auto Tuning is now complete and your TV is ready for viewing When inputting owner ID later EXIT From now on you can use the remote control to turn On the TV or turn the TV to standby mode 4 If you input the ID later Owner ID p 26 Auto Tuning will start to search for digital TV services and store them To check service list at a glance TV Guide DVB p 12 To edit analogue c...

Страница 6: ...B In Analogue Displays hides status information Displayed information For example Programme number Channel number Stereo mode Aspect mode Sound menu Picture menu Programme Programme Start Finish time Current time Displayed the rating information p 36 Displayed when programme contains Dolby Digital and MPEG audio sound After you have defined a Fav List press B to change Fav List To set display time...

Страница 7: ...e DVB Analogue Service To previous day R To next day G To view a programme list of the selected favourites list B To view a programme list of the selected type Y Using TV Guide select favourite list TV Guide Electronic Programme Guide EPG provides an on screen listing of programmes currently broadcast and future broadcasts over the next seven days depending on the broadcaster TV Guide date Program...

Страница 8: ... the connector connected to the equipment AV mode screen Note If the external equipment has an aspect adjustment function set to 16 9 For details see the manual of the equipment or ask your local dealer To return to TV TV AV example AV1 R PC B Y Displays the selected connector Watching Videos and DVDs AV1 AV2 AV3 AV4 PC HDMI1 HDMI2 When colour bar disappears Press any coloured buttons You can also...

Страница 9: ...eniently TOP BOTTOM Normal FULL Expand the BOTTOM half INDEX INDEX TOP mode only Return to the main index page HOLD If you wish to hold the current page without updating Stop or resume automatic updating To resume HOLD HOLD Watch TV while waiting for update P108 MENU Y Y Appears when updating is completed You cannot change the channel Teletext automatically updates itself when new information beco...

Страница 10: ...e Side panel Off Power save Reduces brightness of picture to economise on power consumption Off On Power save Off Tuning menu Edits or sets channels Analogue p 24 Tuning menu Access DVB Setup Menu Setups DVB channels p 20 DVB Setup Menu Access DVB Tuning Menu Edits or sets channels DVB p 22 DVB Tuning Menu Access Owner ID Inputs the owner ID p 26 Owner ID Access Shipping condition Resets all setti...

Страница 11: ...S DIGITAL 1 4 FTV guide 2 ABC TV Sydney 4 FTV guide All Services Fav List 1 To edit List Move the cursor to the field of List to edit and Delete the service G Delete all services Y Move the service B Select the position Confirm B To add all services to the list Y Create your favourite service List from various broadcasters up to 4 Fav List 1 Fav List 2 Fav List 3 Fav List 4 The list is displayed i...

Страница 12: ...d Please Wait DVB Auto Tuning Prog RF Ch Service Name Net ID TS ID Quality This will take about 3 mins 2 3 4 7 9 2 3 4 7 9 12302 12302 12302 12302 12302 4158 4158 4158 4158 4158 9 9 9 9 9 ABC TV Sydney SBS DIGITAL 1 FTV guide 7 Digital NINE DIGITAL 69 6 Exit Settings are made automatically No data is stored if an Auto Tuning sequence is interrupted A new service is added to the DVB service list wh...

Страница 13: ...e factory settings Analogue channel pre tuned perform Shipping condition p 36 Exit Return Start Tuning All analogue tuning data will be erased WARNING Start Auto tuning set Automatically set the channels received in the area AUTO TUNING IN PROGRESS SEARCHING PLEASE WAIT Exit Return 1 Settings are made automatically To exit EXIT Programme number flash Channel access select access select access or s...

Страница 14: ...ave the opportunity to enter your details and help the police crack crime see instruction book PIN NUMBER NAME POSTCODE Owner ID HOUSE NO TV AV MENU 1 2 3 4 5 6 7 8 9 0 To return to TV TV AV B To next page Y Displaying PC Screen on TV Select the external input 1 Select PC 2 The screen of the PC connected to the TV can be displayed on the TV You can also listen to PC sound with the audio cable conn...

Страница 15: ...e Thumbnail screen Caution During the playback no signals are output from the monitor output terminals Date shows the date on which the recording was made by this TV DIGA or D snap Its format is 01 01 2000 when recordings are made without date signal To return to TV To return to the SD menu EXIT Videos Photos To change the aspect ratio ASPECT SD Card access select Videos and photos Videos operate ...

Страница 16: ... is not available for AV input signal During recording it is possible to watch other terminals input signal Start recording Cancel EXIT Set Select the SD mode Select Setup Should such a message appear Recording a Programme on SD Card Menu Item Adjustments Configurations Setup menu Rec mode Select image quality Extra fine Super fine Fine Normal Economy The quality of audio is not changed Multi Medi...

Страница 17: ... on and the content is reproduced Only when TV is in Standby mode Power off link Set to Set When TV is set to Standby mode the connected Panasonic equipment is also automatically set to Standby Theatre speaker Control with HDMI ControlTM Preparations For the first time When adding new equipment reconnecting equipment or changing setup After connection turn the equipment on and then switch the TV o...

Страница 18: ...tening Control with HDMI p 32 To watch satellite broadcasts To record playback To watch DVDs Types of connectable equipment to each connector DVD player Connections To listen with speakers DIGA or Panasonic Amplifier External Equipment Conversion adapter if necessary VIDEO or S VIDEO Headphones Camcorder Game equipment M3 stereo mini plug When using HDMI2 terminal as Control with HDMI select the e...

Страница 19: ... the software system DVB mode Note During downloading do not turn Off the TV or touch any button The TV is automatically activated after downloading is completed Update system software regularly to ensure that you have latest version software If there is an update available a notification banner is displayed when the channel has the update information To download new software press OK Downloading ...

Страница 20: ...ble by using the remote control for Amplifier Read the manuals of Amplifier Control with HDMI function is not possible using DVI connection HDMI connections to some Panasonic equipments allow you to enjoy the easy playback or home theatre Note If the stereo signal is poor or the receiving conditions are not optimum or if STEREO MONO automatic switching occurs it is recommended you switch from STER...

Страница 21: ...ture 320 x 240 QVGA or 176 x 144 QCIF Max number of files 65 535 Image resolution 8 x 8 to 5 120 x 3 840 Sound format G 726 32 Kbps 8 kHz sampling frequency monaural Compliant card type maximum capacity SD Card 2 GB Multi Media Card miniSD Card requiring miniSD adapter Check the latest information on the card type at the following website English only http panasonic co jp pavc global cs DCF Design...

Страница 22: ...aks up on some channels or No Signal message Check Signal Display p 22 If Signal Quality or Signal Strength are displayed in red or constantly changing check aerial If problem persists consult your local TV aerial installer Check that the aerial and antenna cable are designed for DVB For your safety the aerial and cable should be inspected installed by a licenced installer that should comply with ...

Страница 23: ...of recorded data WARNING As with an small object SD card can be swallowed by young children Do not allow children to handle SD card Please remove SD card immediately after use Is SD Card in Insert a SD card SD Card is locked Please unlock to operate Unlock the SD card This file is locked Please unlock to operate Unlock the file in the card This type of format is not supported The TV does not suppo...

Страница 24: ...ms VIDEO RCA PIN Type 1 1 0 V p p 75 Ω S VIDEO Mini DIN 4 pin Y 1 0 V p p 75 Ω C 0 286 V p p 75 Ω Monitor Output AUDIO L R RCA PIN Type 2 0 5 V rms high impedance VIDEO RCA PIN Type 1 1 0 V p p 75 Ω Others HDMI1 2 Input TYPE A Connectors PC Input HIGH DENSITY D SUB 15PIN R G B 0 7 V p p 75 Ω HD VD TTL Level 2 0 5 0 V p p high impedance AUDIO Input RCA PIN Type 2 0 5 V rms DIGITAL AUDIO OUT PCM Dol...

Отзывы: