Panasonic TY-ST08S Скачать руководство пользователя страница 6

6

English

6

6

Precautions with regard to setting up

WARNING

Installation work should only be carried out by a qualified technician.

• 

If the pedestal is not installed correctly, the Wide Plasma Display may fall over and personal injury may result.

CAUTION

Do not use any displays other than those given in the catalogue.
Do not climb up onto the pedestal or use it as a step. (Young children should be made
particularly aware of this caution.)

• If the unit falls over or becomes damaged through misuse, injury may result.

Do not use the pedestal if it becomes warped or physically damaged.

• If you use the pedestal whilst it is physically damaged, personal injury may result. Contact your

nearest Panasonic Dealer immediately.

Set up on a stable, level surface.

• If this is not done, the unit may fall over and become damaged, and personal injury may result.

Do not use in places with high humidity.

• Long-term usage in such conditions can cause warping or deformation. This can lead to loss of

strength, and the unit may fall over and become damaged, and personal injury may result.

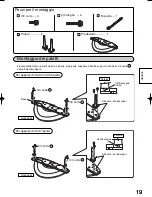
During setting-up, make sure that all screws are securely tightened.

• If sufficient care is not taken to ensure screws are properly tightened during assembly, the

pedestal will not be strong enough to support the Wide Plasma Display, and it might fall over
and become damaged, and personal injury may result.

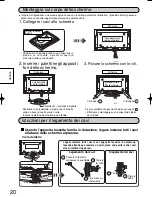
Use the accessory parts for fall-prevention to secure the Wide Plasma Display.

• If the unit is knocked or children climb onto the pedestal with the Wide Plasma Display installed,

the Wide Plasma Display may fall over and personal injury may result.

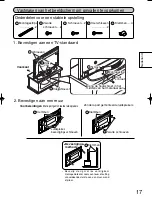
Two people are required to install and remove the display.

• If two people are not present, the display may be dropped, and personal injury may result.

Leave a space of at least 3 

15

/

16

inches (10 cm) at the top, left and right, at least 2 

3

/

8

inches

(6 cm) at the bottom, and at least 2 

49

/

64

inches (7 cm) at the rear.

• Do not cover the air inlet holes at the bottom or rear of the display, or air outlet holes at the top,

or a fire may result.

Notes on handling

1) If the unit is placed in direct sunlight or next to a stove, the light and heat may cause discoloration or deformation.
2) Cleaning

Wipe the unit with a dry cloth. If the unit is particularly dirty, clean it using a cloth soaked with water to which a
small amount of neutral detergent has been added, and then wipe with a dry cloth.
Do not use products such as solvents, thinner or household wax for cleaning, as they can damage the surface
coating.
(If using a chemically-treated cloth, follow the instructions supplied with the cloth.)

3) Do not attach sticky tape or labels, as they can make the surface of the pedestal dirty.

Notes on installing the pedestal

• Be sure to connect the power plug to an easily accessible power outlet.
• Ensure there is free circulation of air around the equipment sufficient to keep the ambient temperature

below 40°C.
Failure to do this may cause the display to overheat, and malfunction may result.

Содержание TY-ST08S

Страница 1: ...e interamente le presenti istruzioni Siete inolte pregati di conservare questo libro per future consultazioni Pi destal pour l Ecran plasma 16 9 me Manuel d installation Avant d essayer d assembler ce...

Страница 2: ...2 2...

Страница 3: ...3...

Страница 4: ...4...

Страница 5: ...5...

Страница 6: ...for fall prevention to secure the Wide Plasma Display If the unit is knocked or children climb onto the pedestal with the Wide Plasma Display installed the Wide Plasma Display may fall over and person...

Страница 7: ...estal 1 Base Pedestal Pole Pole Stamped mark Stamped mark Align the stamped marks Align the stamped marks Short screws Short screws Short screws Short screws For 42 inch 50 inch For 37 inch Securely a...

Страница 8: ...n the cord to minimize stress firmly bind all cables with the supplied binding strap Binding the Cables Pass the binding strap through the strap anchor Pull Bundle all cables tidily Unbinding the Cabl...

Страница 9: ...ithout separately installed speakers Clamps Black screws Fastening method Wood screws Wood screws Locate the wood screw at the center of the material width Clamps 4 Secure the console to prevent tippi...

Страница 10: ...s Breitbild Plasmadisplays Im Falle eines Erdbebens oder wenn Kinder auf den Sockel klettern kann das Plasmadisplay umst rzen und Verletzungen verursachen F r das Aufh ngen und das Abnehmen des Displa...

Страница 11: ...and 1 Basis Stand Stangen Stangen Markierung Markierung Die Markierungen angleichen Die Markierungen angleichen Kurze Schrauben Kurze Schrauben Kurze Schrauben Kurze Schrauben F r 42 Zoll 50 Zoll F r...

Страница 12: ...l fest b ndeln L sen der Kabel Ziehen An der Klemme ziehen Klemmstreifen Kabel Klemmstrei fenhalter Die Seite des Standes mit dem Modell Nr Aufkleber nach hinten weisend aufstellen Den Stand bis zum A...

Страница 13: ...getrennt installierte Lautsprecher Klemmen Schwarze Schrauben Befestigung sverfahren Die Holzschrauben in der Mitte der Mitte anbringen 1 Auf einem Fernsehschrank befestigen 2 Befestigung an einer Wan...

Страница 14: ...ruik de bijgeleverde montage onderdelen om het breedbeeld plasmascherm te bevestigen In het geval van een aardbeving of wanneer er kinderen op de vloerstandaard klimmen wanneer de Breedbeeld Plasmadis...

Страница 15: ...taande afbeelding Voor 42 inch 50 inch Voor 37 inch Korte schroeven 4 Bevestig de insteekpennen Montage onderdelen Lange schroeven 4 Insteekpennen 2 Kabelbindriempje 1 Voet 1 Onderplaat Voet Insteekpe...

Страница 16: ...akke en stabiele ondergrond Bevestigings anker 1 Sluit de aansluitkabels op het beeldscherm aan 2 Steek de insteekpennen in de gaten van het beeldscherm 3 Maak de schroeven vast Leg schone dekens of i...

Страница 17: ...ant Zonder apart gemonteerde luidsprekers Klemmen Zwarte schroeven Bevestigings methode Hout schroef Breng de houtschroef in het midden van het materiaal aan Vastmaken van het beeldscherm om omvallen...

Страница 18: ...a fornite come accessori per fissare la schermo al plasma Se si verifica un movimento tellurico oppure se i bambini si arrampicano sul piedistallo sul quale montato lo schermo al plasma 16 9 pu cadere...

Страница 19: ...unghe 4 Paletti 2 Fascetta 1 Piedestallo 1 Base Piedestallo Paletto Paletto Contrassegno inciso Contrassegno Allineare i contrassegni Allineare i contrassegni Viti corte Viti corte Viti corte Viti cor...

Страница 20: ...rnita in dotazione legare insieme tutti i cavi alla base dello schermo al plasma Legare insieme tutti i cavi con l apposita fascetta in dotazione facendo attenzione a lasciare un certo gioco onde evit...

Страница 21: ...ere Metodo di fissaggio Vite da legno Vite da legno Posizionare le viti da legno in corrispondenza del centro della base su cui ha luogo il montaggio Morsetti 4 Fissaggio dello schermo per evitare cap...

Страница 22: ...isme se produit ou si des enfants grimpent sur le pi destal alors que l Ecran plasma 16 9 me est install I Ecran plasma 16 9 me risque de tomber et de causer des blessures Pour poser ou d poser l cra...

Страница 23: ...ports vertical Supports vertical Rep re embouti Rep re embouti Alignez les rep res emboutis Alignez les rep res emboutis Vis courtes Vis courtes Vis courtes Vis courtes Pour 42 pouces 50 pouces Pour 3...

Страница 24: ...s supports verticaux dans les per ages de la console de l cran 3 Serrez les vis Placez des couvertures propres ou des objets similaires sur un sol ou une table plate et placez l cran dessus dirig vers...

Страница 25: ...ntes install es s par ment Attaches Vis noires M thode de montage Vis bois Vis bois Placez la vis bois au centre de l paisseur du mat riau Attaches 4 Maintenez la console pour viter qu elle ne bascule...

Страница 26: ...or mica de Plasma instalada la Pantalla Panor mica de Plasma puede caerse pudiendo sufrir da os personales Es necesaria la ayuda de dos personas para instalar y desmontar la pantalla Si no tiene la ay...

Страница 27: ...arca estampada Marca estampada Alinee las marcas estampadas Alinee las marcas estampadas Tornillos cortos Tornillos cortos Tornillos cortos Coloque firmemente ambos postes el izquierdo en la cara supe...

Страница 28: ...les con la banda de uni n suministrada Para unir los cables Pase la banda de uni n a trav s de su anclaje Tire de la banda Una todos los cables ordenadamente Para soltar los cables Tire de la banda Ti...

Страница 29: ...as Tornillo Bandas Banda Cara fontal Sin altavoces instalados separadamente Abrazaderas Tornillos negros M todo de apriete Coloque el tornillo para madera en el centro del material 1 Colocaci n en un...

Страница 30: ...att f sta den breda plasmask rmen p plats Om en jordb vning intr ffar eller om barn kl ttrar p stativet n r den Bred plasma monitorn r monterad kan den Bred plasma monitorn v lta och orsaka personska...

Страница 31: ...F st st ngerna Delar f r montering Korta skruvar 4 L nga skruvar 4 St nger 2 Bindrem 1 Sockel 1 Bas Sockel St ng St ng St mplat m rke St mplat m rke Anpassa de st mplade m rkena till varandra Anpassa...

Страница 32: ...inte uts tts f r tryck och bind samman alla kablar ordentligt med den medf ljande bindremmen Bindning av kablarna Dra bindremmen genom remf stet Dra Bunta samman alla kablar ordentligt Unbinding the C...

Страница 33: ...s ttning av h gtalare Kl mmor Kl mmor Skruv Band Band Framsida Utan separat installerade h gtalare Kl mmor Svarta skruvar F stmetod Tr skr uvar Tr skruv Placera tr skruven mitt p bredden av materialet...

Страница 34: ...l forebyggelse af nedfald af Widescreen plasmask rmen til at fastg re denne I tilf Ide af rystelser eller hvis b rn kravler op p hylden mens Widescreen plasmask rmen er monteret kan Widescreen plasmas...

Страница 35: ...S t masterne p Dele til samling Korte skruer 4 Lange skruer 4 Master 2 Fastg ringsb nd 1 Fod 1 Base Fod Mast Mast Indstemplet m rke Indstemplet m rke Ret de indstemplede m rker ind efter hinanden Ret...

Страница 36: ...kabler stramt med det medf lgende fastg ringsb nd Opbinding af kablerne F r fastg ringsb ndet gennem b ndforankringen Tr k til Bundt alle kabler p nt Unbinding the Cables Tr k Tr k i knoppen Fastg rin...

Страница 37: ...Uden separat installerede h jttalere Klamper Sorte skruer Fastg ring smetode Plac r tr skruen i midten af materialebredden 1 Fastg relse til TV sokkel 2 Fastg relse til en v g Fastg r omhyggeligt til...

Страница 38: ...38...

Страница 39: ...39...

Страница 40: ...40...

Страница 41: ...41...

Страница 42: ...42...

Страница 43: ...43...

Страница 44: ...44...

Страница 45: ...45...

Страница 46: ...46...

Страница 47: ...47...

Страница 48: ...48...

Страница 49: ...49...

Страница 50: ...ioner Units mm inches Front 72 2 27 32 60 2 23 64 55 2 5 32 360 1411 64 704 27 23 32 578 22 3 4 100 3 15 16 40 1 37 64 8 5 16 145 5 1 4 179 7 3 64 327 12 7 8 141 5 9 16 136 5 23 64 131 5 5 32 46 1 13...

Страница 51: ...51 Memo...

Страница 52: ...M0505A 10705 MBS 2005 Matsushita Electric Industrial Co Ltd All rights Reserved Matsushita Electric Industrial Co Ltd Web Site http www panasonic co jp global...

Отзывы: