background image

2

English

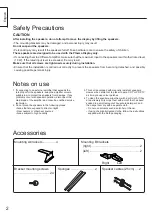
Left

Right

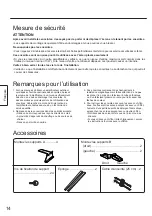
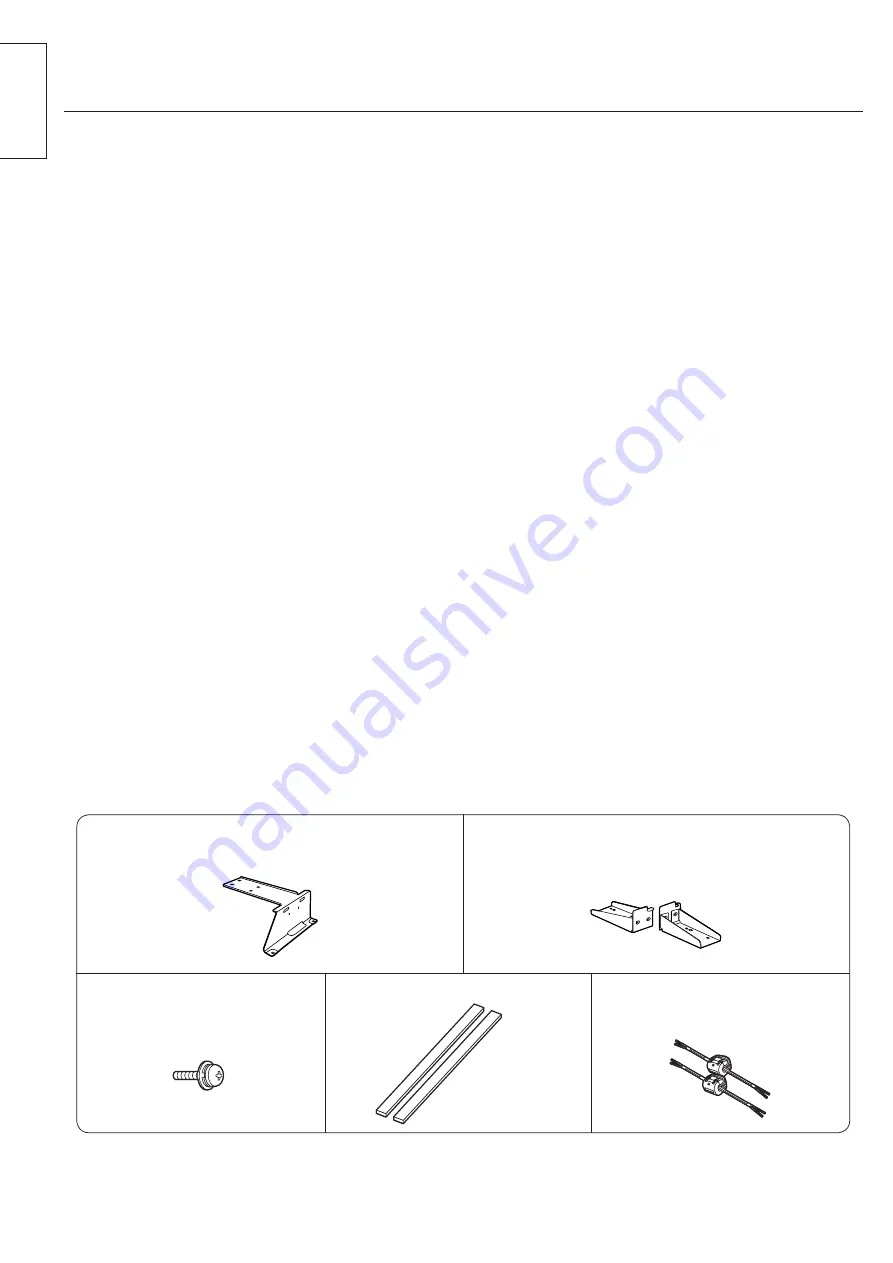
Mounting A brackets ................4

Mounting B brackets
  (right) .........................................................2
  (left) ...........................................................2

Bracket mounting screws
......................................... 24

Sponges ............................ 2

Speaker cables (25 cm) .... 2

Safety Precautions

Accessories

1.  If connecting to an external amplifier that exceeds the 

rated input for the speakers, keep the amplifier volume 

suitably low to protect the speakers from damage. If any 

problems occur with speaker operation, disconnect the 

mains lead of the amplifier and consult a qualified service 

technician.

2.  Do not place the speakers in the following places:

• Areas that are exposed to direct sunlight

• Near heaters or other heat sources

• Areas subject to high humidity

3.  This set is equipped with magnetic resistant speakers.

However be careful not to place it near a CRT or PDP TV 

as it may cause colour patches.

4.  To clean the speakers, wipe them with a soft cloth. If they 

are extremely dirty, wipe them with a cloth that has been 

soaked in a small amount of household detergent, and 

then wipe them dry with a separate cloth.

• Do not use solvents such as alcohol or thinner.

•  If using chemically-treated cloths, follow the instructions 

supplied with the cloth packaging.

Notes on use

CAUTION

After installing the speakers, do not attempt to move the display by lifting the speakers.

• The mounting brackets may be damaged, and personal injury may result.

Do not suspend the speakers.

• Personal injury may result if the speakers fall off. Take particular care to ensure the safety of children. 

These speakers are designed to be used with the Plasma Display only.

•  If connecting them to a different amplifier, make sure that the maximum input to the speakers is within their rated level 

(10 W). If the rated input level is exceeded, fire may result.

Make sure that all screws are tightened securely during installation.

•  Ensure that the installation is carried out correctly to prevent the speakers from becoming detached, and possibly 

causing possible personal injury.

Содержание TY-SP65P10WK

Страница 1: ...rvez soigneusement les présentes instructions Vous pouvez en avoir besoin pour effectuer un entretien ou si vous désirez déplacer l applique Instrucciones de instalación Altavoces para Pantalla de Plasma Antes de empezar el trabajo lea atentamente estas instrucciones y el manual de la pantalla de plasma para asegurar una instalación correcta Guarde estas instrucciones Podrá necesitarlas cuando hag...

Страница 2: ... wipe them with a cloth that has been soaked in a small amount of household detergent and then wipe them dry with a separate cloth Do not use solvents such as alcohol or thinner If using chemically treated cloths follow the instructions supplied with the cloth packaging Notes on use CAUTION After installing the speakers do not attempt to move the display by lifting the speakers The mounting bracke...

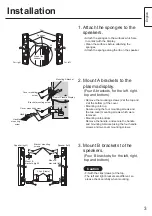
Страница 3: ... the cover Mounting onto top Secure using the four mounting screws and the two cover mounting screws which were removed Mounting onto bottom Remove the handle and secure the handle and mounting A bracket using the four handle screws and two cover mounting screws 3 Mount B brackets to the speakers Four B brackets for the left right top and bottom 1 Attach the sponges to the speakers Attach the spon...

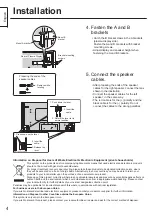
Страница 4: ...u may be able to return your products to your local retailer upon the purchase of an equivalent new product Disposing of this product correctly will help to save valuable resources and prevent any potential negative effects on human health and the environment which could otherwise arise from inappropriate waste handling Please contact your local authority for further details of your nearest design...

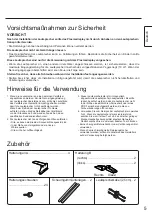
Страница 5: ...utsprecher stark verunreinigt sind wischen Sie sie mit einem Tuch ab das mit einer geringen Menge Haushalts Lösungsmittel angefeuchtet wurde Danach wischen Sie sie mit einem anderen Tusch trocken Keine Lösungsmittel wie Alkohol oder Verdünnungsmittel verwenden Wenn chemisch imprägnierte Reinigungstücher verwendet werden sollten die Hinweise des Herstellers auf der Verpackung befolgt werden Hinweis...

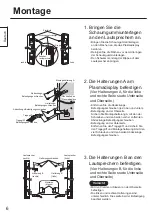
Страница 6: ...g A mit den vier Schrauben und den beiden vorher entfernten Abdeckungs Befestigungsschrauben Befestigung an der Unterseite Entfernen Sie den Tragegriff und sichern Sie den Tragegriff und Montagehalterung A mit den vier Schrauben und den beiden Abdeckungs Befestigungsschrauben 3 Die Halterungen B an den Lautsprechern befestigen Vier Halterungen B für die linke und rechte Seite sowie Unterseite und ...

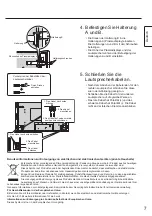
Страница 7: ...rennt entsorgt werden müssen Bringen Sie bitte diese Produkte für die Behandlung Rohstoffrückgewinnung und Recycling zu den eingerichteten kommunalen Sammelstellen bzw Wertstoffsammelhöfen die diese Geräte kostenlos entgegennehmen Die ordnungsgemäße Entsorgung dieses Produkts dient dem Umweltschutz und verhindert mögliche schädliche Auswirkungen auf Mensch und Umwelt die sich aus einer unsachgemäß...

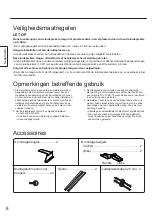
Страница 8: ...te maken Als de luidsprekers erg vuil zijn kunt u de doek bevochtigen met een beetje milde zeep Veeg wel met een droge doek na Gebruik geen oplosmiddelen zoals alcohol of witte spiritus Als u een chemisch geïmpregneerde doek gebruikt moet u nauwkeurig de instructies opvolgen die bij de doek worden geleverd Opmerkingen betreffende gebruik LET OP Na het aanbrengen van de luidsprekers mag u het plasm...

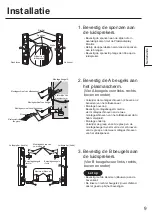
Страница 9: ...venop Bevestig montagebeugel A met de vier montageschroeven en de twee montageschroeven van het afdekpaneel dat u hebt verwijderd Montage onderop Verwijder de greep en zet de greep en de montagebeugel A vast met de vier schroeven van de greep en de twee montageschroeven van het afdekpaneel 3 Bevestig de B beugels aan de luidsprekers Vier B beugels voor links rechts boven en onder 1 Bevestig de spo...

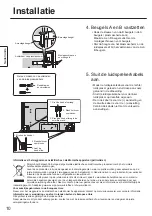
Страница 10: ...eer u dit product op de juiste manier als afval inlevert spaart u waardevolle hulpbronnen en voorkomt u potentiële negatieve gevolgen voor de volksgezondheid en het milieu die anders kunnen ontstaan door een onjuiste verwerking van afval Neem contact op met uw gemeente voor meer informatie over het dichtstbijzijnde inzamelingspunt of raadpleeg www nvmp nl www ictoffice nl of www stibat nl Voor zak...

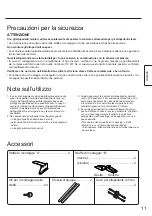
Страница 11: ...porco persistente strofinarli con un panno leggermente inumidito in un debole detergente ad uso casalingo ed asciugarli poi con un panno asciutto Non usare solventi quali alcol o benzina o simili Nel caso in cui si faccia uso di panni trattati chimicamente attenersi alle istruzioni fornite insieme ai panni stessi Note sull utilizzo ATTENZIONE Con gli altoparlanti montati evitare assolutamente di s...

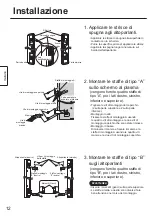
Страница 12: ...ore e 2 sulla parte inferiore Montaggio in alto Fissare la staffa di montaggio A usando le quattro viti di montaggio e le due viti di montaggio coperchio che sono state rimosse Montaggio in basso Rimuovere il manico e fissare il manico e la staffa di montaggio A usando le quattro viti manico e le due viti di montaggio coperchio 3 Montare le staffe di tipo B sugli altoparlanti vengono fornite quatt...

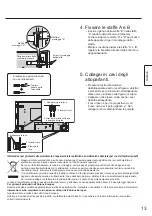
Страница 13: ...i rifiuti domestici generici Per un corretto trattamento recupero e riciclaggio portare questi prodotti ai punti di raccolta designati dove verranno accettati gratuitamente In alternativa in alcune nazioni potrebbe essere possibile restituire i prodotti al rivenditore locale al momento dell acquisto di un nuovo prodotto equivalente Uno smaltimento corretto di questo prodotto contribuirà a far risp...

Страница 14: ... avec un chiffon doux Si elles sont très sales essuyez les avec un chiffon humecté d une petite quantité de détergent domestique puis séchez les en les essuyant avec un autre chiffon N utilisez pas de solvants tels que de I alcool ou des diluants Si vous utilisez un chiffon traité chimiquement suivez les instructions fournies avec le chiffon Remarques pour l utilisation ATTENTION Après avoir insta...

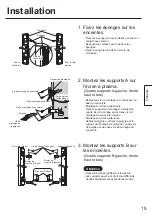
Страница 15: ...couvercle Montage sur la face supérieure Fixez le support de montage A à l aide des quatre vis de montage et des deux vis de montage du couvercle retirées Montage sur la face inférieure Retirez la poignée et fixez la poignée et le support de montage A à l aide des quatre vis de poignée et des deux vis de montage du couvercle 3 Montez les supports B sur les enceintes Quatre supports B gauche droite...

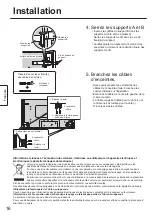
Страница 16: ...ble de renvoyer les produits au revendeur local en cas d achat d un produit équivalent En éliminant correctement ce produit vous contribuerez à la conservation des ressources vitales et à la prévention des éventuels effets négatifs sur l environnement et la santé humaine qui pourraient survenir dans le cas contraire Afin de connaître le point de collecte le plus proche veuillez contacter vos autor...

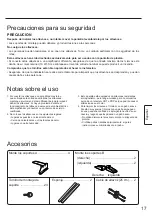
Страница 17: ... están muy sucios frótelos con un paño empapado en una pequeña cantidad de detergente neutro de uso casero y luego séquelos pasando un paño seco No utilice disolvente tales como alcohol o diluyente de pintura Si utiliza paños tratados químicamente siga las instrucciones suministradas con el paño Notas sobre el uso PRECAUCION Después de instalar los altavoces no intente mover la pantalla levantándo...

Страница 18: ... de la cubierta Montaje en la parte superior Asegure la ménsula de montaje A utilizando los cuatro tornillos de montaje y los dos tornillos de montaje de la cubierta que fueron quitados Montaje en la parte inferior Quite el asa y asegure el asa y la ménsula de montaje A utilizando los cuatro tornillos del asa y los dos tornillos de montaje de la cubierta 3 Monte los soportes B en los altavoces Cua...

Страница 19: ...productos a su minorista local al comprar un producto nuevo equivalente Si desecha el producto correctamente estará contribuyendo a preservar valiosos recursos y a evitar cualquier posible efecto negativo en la salud de las personas y en el medio ambiente que pudiera producirse debido al tratamiento inadecuado de desechos Póngase en contacto con su autoridad local para que le informen detalladamen...

Страница 20: ... i ett milt rengöringsmedel om det förekommer fläckar som är svåra att få bort och torka sedan på nytt med en torr trasa Använd inte sprit thinner eller andra flyktiga lösningar Vid användning av en kemiskt behandlad trasa ska du noga följa anvisningarna som återfinns på dess förpackning Observera om användningen OBSERVERA Efter installation av högtalarna får du aldrig försöka flytta skärmen genom...

Страница 21: ...rna 2 högst upp och 2 längst ner från skyddet Montering ovanpå Fäst monteringsjärnet A med de fyra monteringsskruvarna och de två monteringsskruvar för skyddet som togs bort Montering på botten Tag bort handtaget och fäst det och monteringsjärnet A med de fyra handtagsskruvarna och de två skruvarna för skyddet 3 Montera hållarna B på högtalarna Fyra hållare B för vänster höger ovansida och undersi...

Страница 22: ...n du som ett alternativ lämna in dina produkter hos återförsäljaren när du köper en motsvarande ny produkt Om denna produkt avyttras korrekt sparas värdefulla resurser och eventuellt negativa effekter på den mänskliga hälsan och miljön förhindras vilket kan bli fallet vid felaktig avyttring Kontakta din lokala myndighet för mer information om var din närmsta återvinningsstation finns Böter kan til...

Страница 23: ...øjttalerne rengøres ved at de tørres af med en blød klud Hvis de er meget snavsede skal de tørres af med en klud som er vredet op i en smule almindeligt rengøringsmiddel Tør dem derefter af med en anden klud Anvend ikke opløsningsmidler som alkohol og fortynder Hvis du anvender en kemisk behandlet klud skal du følge anvisningerne på kludens emballage Bemærkninger vedrørende brug FORSIGTIG Forsøg i...

Страница 24: ...rst på dækslet Montering øverst Fastgør monteringsbeslaget A ved hjælp af de fire monteringsskruer og de to dækselmonteringsskruer som blev fjernet Montering nederst Fjern håndtaget og fastgør håndtaget og monteringsbeslaget A ved hjælp af de fire håndtagsskruer og de to dækselmonteringsskruer 3 Monter B beslagene på højttalerne Fire B beslag til venstre side højre side og over og underside 1 Fast...

Страница 25: ... indlevere dine produkter hos den lokale forhandler hvis du køber et nyt og tilsvarende produkt Hvis du afhænder dette produkt på korrekt vis vil det være med at spare på de værdifulde naturlige råstoffer og forhindre eventuelle negative påvirkninger på folkesundheden og miljøet hvilket ellers kunne blive følgerne af en forkert håndtering af affaldet Kontakt de lokale myndigheder for at få yderlig...

Страница 26: ...стических систем протрите их мягкой тканью Если они сильно загрязнены протрите их тканью смоченной небольшим количеством бытового моющего средства а затем вытрите насухо другой тканью Не используйте растворители такие как спирт или разбавитель При использовании химически обработанной ткани следуйте инструкции поставляемой с упаковкой ткани Примечания относительно использования ПРЕДОСТЕРЕЖЕНИЕ Посл...

Страница 27: ... 2 сверху и 2 снизу Установка сверху Закрепите установочный кронштейн А используя четыре крепежных винта и два крепежных винта панели которые были удалены Установка снизу Удалите ручку потом закрепите ручку и установочный кронштейн А используя четыре крепежных винта и два крепежных винта панели 3 Прикрепите кронштейны В к акустическим системам Четыре кронштейна В для левой правой верхней и нижней ...

Страница 28: ...акустических систем Удалите прокручивая 1 Нажмите на рычаг 3 Верните рычаг в его первоначальное положение 2 Вставьте кабель Установка Информация по обращению с отходами для стран не входящих в Европейский Союз Действие этого символа распространяется только на Европейский Союз Если Вы собираетесь выбросить данный продукт узнайте в местных органах власти или у дилера как следует поступать с отходами...

Страница 29: ...ватись неправильно 4 Для чищення динаміків використовуйте м яку тканину Якщо вони сильно забруднились протріть їх тканиною змоченою у невеликій кількості миючого засобу а потім протріть сухою ганчіркою Не застосовуйте розчинники такі як спирт або розріджувач При використанні хімічно обробленої тканини спочатку уважно прочитайте інструкції до неї Вказівки з використання ОБЕРЕЖНО Після встановлення ...

Страница 30: ...ху і 2 знизу Монтаж зверху Закріпіть монтажний кронштейн A за допомогою чотирьох монтажних гвинтів і двох гвинтів для монтажу кришки які були видалені Монтаж знизу Видаліть ручку і закріпіть її і монтажний кронштейн А за допомогою чотирьох гвинтів ручки і двох гвинтів для монтажу кришки 3 Закріпіть кронштейни B на динаміках Чотири кронштейни B лівий правий верхній та нижній 1 Прикріпіть губки до д...

Страница 31: ...атисніть на важілець 3 Поверніть важілець у первісне положення 2 Вставте кабель Інформація щодо утилізації в країнах які не входять в Європейський Союз Даний символ дійсний тільки на території Європейського Союзу При потребі утилізації даного виробу зверніться до місцевого керівництва або дилера щодо правильного методу її здійснення 1 Натисніть на важілець 2 Вставте кабель 3 Відпустіть важілець За...

Страница 32: ...ons L x H x P Poids Matériau du coffret 11 1 cm x 92 5 cm x 9 0 cm 2 2 kg par enceinte Plastique Unidad de altavoz Impedancia de régimen Entrada de régimen Registro medio 5 7 cm x 12 6 cm ovalados x 2 Altavoz para agudos 5 2 cm de diá 8 Ω 10 W Dimensiones An x Al x Prof Peso Material del mueble 11 1 cm x 92 5 cm x 9 0 cm 2 2 kg por altavoz Plástico Högtalarlåda Märkimpedans Märkineffekt Mellanregi...

Отзывы: