background image

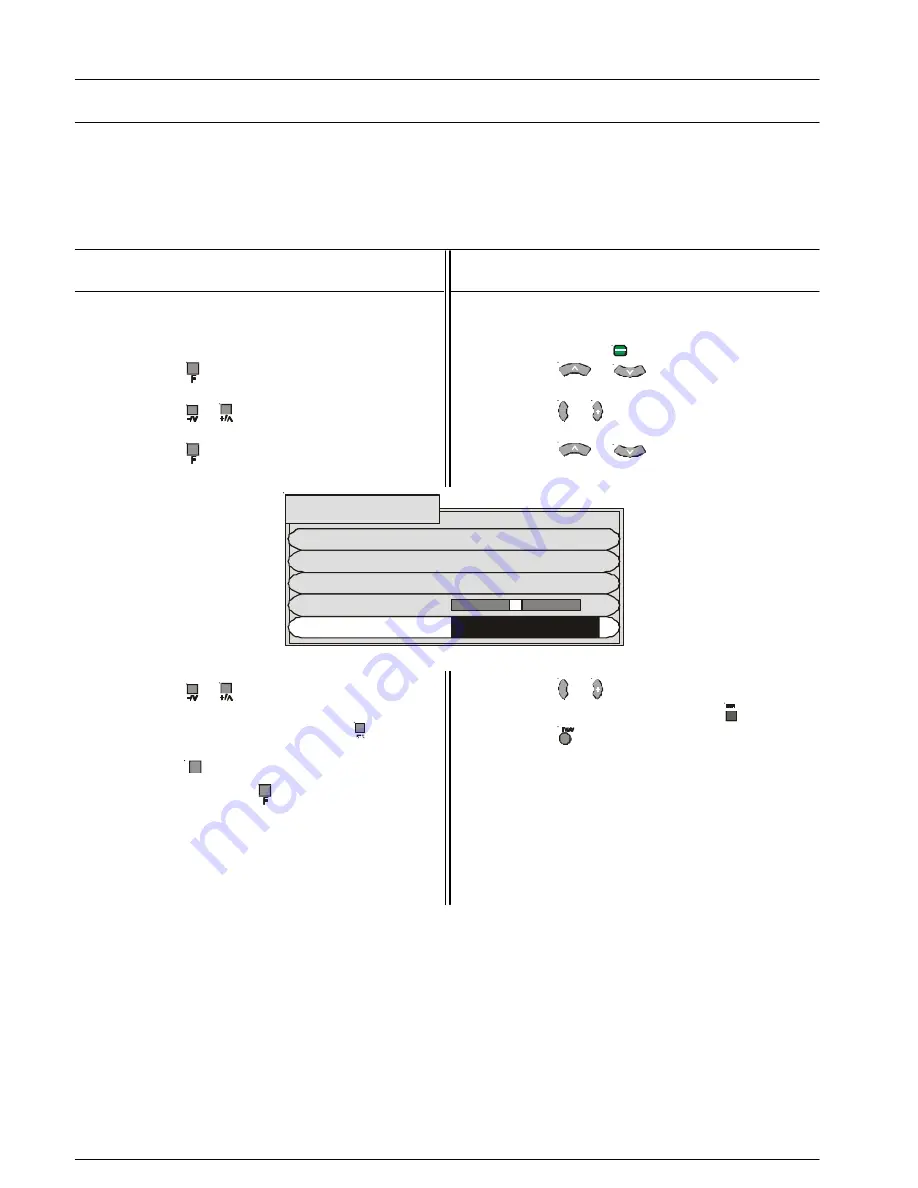
This option allows you to “Skip” (bypass) the unused or undesired Programme Numbers. The Function is only
applicable when the Programme Number Up or down buttons are Pushed. The use of the remote control Direct
Programme Number Buttons overrides the Skip function.

Tuning Menu

Skip

Using the Remote Control

1.

Select the Programme location number you want
to “Skip”.

2.

Push the Set Up (

) button.

3.

Push the 

 or 

 button to access the

Tuning Menu.

4.

Push the 

 or   button to select the Tuning

Menu.

5.

Push the 

 or 

 button to select the Skip.

6.

Push the 

 or   button to turn Skip on or off.

f.

7.

To store the Skip setting, push the 

 button.

8.

Push the 

 button to return the television to

normal operation.

Using the Front Panel

1.

Select the Programme location number you
want to “Skip”

2.

Push the 

 button repeatedly until the Tuning

Mode is reached.

3.

Push the   or 

 Button to access the Tuning

Menu.

4.

Push the 

 button to select Skip.

5.

Push the   or 

 Button to turn the Skip on or

off.

6.

To store the Skip setting, push the   button.

7.

To return the television to normal operation
push the 

TV/AV

 button on the front panel or

repeatedly push the 

 button until the volume

display appears.

8.

The on screen display will disappear after a few
seconds.

Auto tuning

Manual tuning

Tuning menu

Fine tuning

Sys select                  Australia

Skip                            

Off

Содержание TX-86PW200A

Страница 1: ...200A Operating Instructions Please read these operating instructions completely before operating this set and retain the booklet for future reference tau FLA DIGI AL Dolby and the symbol are trademarks of Dolby Laboratories Manufactured under licence from Dolby Laboratories TQB4A0162 Panasonic ...

Страница 2: ...ecycling If you or someone else has no further use for the carton it can be flattened or cut up and placed into the recycle bin or service provided by your local council applicable for most parts of Australia By recycling the cardboard you are benefiting the environment by reducing waste to landfill and reducing the dependence on virgin forest timbers for paper fibre Plastics Panasonic is reducing...

Страница 3: ...oughout this booklet Programme Location Numbers are referred to These are memory locations into which you can tune television broadcast stations Any television station can be tuned into any Programme Location Number Picture Quality All televisions are affected by Magnetic Interference Magnetic interference may come from such things as unshielded motors moving the TV while it is switched ON turning...

Страница 4: ...D BUTTONS 12 STILL 12 CH SEARCH 13 0 9 DIRECT PROGRAMME NUMBER SELECTION 13 TWO DIGIT PROGRAMME NUMBER SELECTION 13 Using the On Screen Displays 14 Picture Menu Operation 15 16 Menu 15 Contrast Brightness Colour Sharpness NTSC Tint 15 Colour Temperature 16 P NR Picture Noise Reduction 16 Scan mode 16 Sound Menu Operation 17 18 Menu 17 Volume Bass Treble Balance Headphone Volume Subwoofer 17 Dolby ...

Страница 5: ... Remote Control VCR DVD Buttons 34 REWIND REVIEW 34 STOP 34 POWER BUTTON 34 RECORD 34 PAUSE 34 PLAY 34 FAST FORWARD CUE 34 VCR DVD 34 PROGRAMME NUMBER DOWN AND UP PROGRAMME SKIP 34 Manufacturers Code Settings 35 Connecting Equipment to the TV 36 38 Front Panel Connections 36 Headphones 36 AV Equipment 36 Rear Panel Connections 37 39 Connecting a DVD player or Set Top Box to the AV Input 37 Connect...

Страница 6: ...age of 240V 50Hz and the New Zealand Standard Mains Voltage of 230V 50Hz NOTE If the television is not going to be used for an extended period remove the power plug from the wall outlet Turn on the Television Push the Power Switch to turn the television ON Sit back and enjoy your new Panasonic television Power Switch S VIDEO VIDEO L AUDIO R AV5IN AV2 IN COMPONENT MONITOR OUT R P B P Y MONO MONO A ...

Страница 7: ...nt The springs inside the battery compartment connect to the negative terminal of the battery Two AA size batteries Replace Battery Cover Fit the battery cover and slide it forward until it clicks into place Battery Precautions Do Not use rechargeable batteries Differences in size and performance may cause incorrect operation Do Not mix battery types Alkaline with zinc carbon etc Do Not mix old an...

Страница 8: ...Push the door at the point marked to open Push again to close For details of TELETEXT Operation remote control operation please refer to page 25 For details of VCR and DVD player remote control operation please refer to page 33 Bilingual broadcasting is not currently available in Australia or New Zealand Remote Control Buttons Stereo Mono Bilingual 100Hz Progressive Scan Recall Aspect Surround Set...

Страница 9: ...e following functions sequentially Volume Geomagnetic Contrast Tuning mode Brightness Balance Colour Treble Sharpness Bass NTSC Tint Notes NTSC Tint Only in AV Mode when receiving NTSC signals Tuning mode Not displayed when in AV mode This button is used to select the next lower programme number It is also used with the F button to adjust function settings This button is used to select the next hi...

Страница 10: ...ually selected BILINGUAL This system allows two languages to be transmitted for one broadcast Switching between the Main I and Sub II positions selects the desired language Note Bilingual sound is not currently available in Australia or New Zealand 100Hz PROGRE This button allows you to change the Picture refresh setting between 75 883i 100Hz and Progressive Please refer to Scan mode on page 16 SU...

Страница 11: ... When the On Screen display coloured boxes is OFF the main picture can be changed Use the normal programme or AV select buttons RECALL Pressing this button will display all current active functions The functions that can be displayed include AV Number Programme Number Colour system Sound Option Picture Option Stereo or Mono and Off Timer setting Pressing the button again cancels the recall functio...

Страница 12: ...crease the volume output level from the television The volume control has a range from 0 to 100 TV AV Pressing the TV AV Button will cycle between TV the current AV Input and back to TV While the AV indicator is still on screen the different AV inputs can be selected using the coloured buttons RED GREEN YELLOW BLUE AV1 AV2 AV3 AV4 AV5 COLOURED BUTTONS These buttons are used for selecting different...

Страница 13: ...sed to exit the feature The Red button is used to select each programme in turn The green button is used to swap the main display between the current programme and the one selected by the red button The Blue button returns to normal viewing RED GREEN YELLOW BLUE SELECT OK EXIT Notes Skipped channels are not shown When all the programmed channels have been displayed the television will restart the ...

Страница 14: ... the External connection option Use the or button to view information on how to connect external equipment Menu demo Press the or button to select the Menu demo option Use the or button to view the demonstration Menu Colour Temperature Standard P NR Auto Contrast Brightness Colour Sharpness Picture menu Scan mode 75 833i Menu Colour Temperature Standard P NR Auto Contrast Brightness Colour Sharpne...

Страница 15: ...her than normal levels of Brightness and Contrast Standard For viewing in normal evening lighting environments This menu selects the normal levels of Brightness and Contrast Cinema For viewing in a dark room This menu selects reduced levels of Brightness and Contrast Adjust for best picture Contrast contrast Less More Adjust for easier viewing Brightness of dark pictures such as Darker Brighter ni...

Страница 16: ... scan mode function is not available when Picture in Picture is being used Switching is also possible using the button on the remote control Normalisation N Pressing the Normal Button on the remote control when the Picture Menu is displayed will return all picture settings to the factory preset levels This is called Normalisation Normalisation will not occur if the Picture Menu is not displayed wh...

Страница 17: ...V5 modes Volume Adjusts the output volume Quieter Louder Used to boost or cut low Bass frequency sounds Cut Boost Used to boost or cut high Treble frequency sounds Cut Boost Adjusts the sound balance Balance between the left and right Left SP Right SP speakers Headphone Adjust for output volume Volume Quieter Louder for the headphones Subwoofer Adjusts the subwoofer Quieter Louder volume Volume Ba...

Страница 18: ...y between the left and right speakers to achieve a Phantom Centre Image It also processes the Virtual surround signal before sending it to the left and right speakers creating a virtual image around the listener The virtual effect is stronger with Dolby Surround encoded movies Switching the Dolby virtual to OFF gives you normal television sound Dolby and the symbol are trademarks of Dolby Laborato...

Страница 19: ...n to Stand By The power indicator will blink if the Wake Up Timer has been set correctly When the Wake Up time has elapsed the television will turn ON The Off Timer will be set to 90 minutes WAKE UP TIMER and the Off Timer will be displayed at the top of the screen Press any button to cancel the display Notes When the Wake Up Timer turns the set on the Off Timer will automatically switch it off ag...

Страница 20: ...tion is On dot interference or cross colour will be reduced Note This function is not available for component input Use the or buttons to switch the 3D COMB on or off f Tuning menu This provides access to many other features including RF Mode only system select and tuning options Use the or buttons to access the TUNING MENU Teletext TOP Wake up timer Off Blue back On Geomagnetic Tuning menu Owner ...

Страница 21: ...ption allows you to AV Mode only select the correct colour system for the signal being received If a clear picture with correct colours cannot be obtained a change to the Colour System may improve the picture The settings are AUTO PAL NTSC4 43 and NTSC3 58 The Australian and New Zealand colour system is PAL Use the or buttons to switch between settings Note PAL and NTSC3 58 are different colour si...

Страница 22: ...k ON 2 Adjustment for geomagnetic should be performed every time the location of the TV is changed 3 In some cases colour patches will not be completely eliminated even after adjustment particularly in ferroconcrete buildings and other structures susceptible to geomagnetic effects In these cases the TV location will have to be changed Using the Front Panel 1 Push the button repeatedly to access th...

Страница 23: ...O Enter your House Number or other identification Use the left and right buttons to move from character to character Use the Up and Down buttons to change the character Move to POSTCODE Enter your Postcode Use the left and right buttons to move from character to character Use the Up and Down buttons to change the character Press STR to store your details You will be asked Are you sure Press STR to...

Страница 24: ...isplay a standard 4 3 picture with no aspect distortion Zoom 1 This option will display 16 9 letterbox or 4 3 pictures with no aspect distortion Zoom 2 This option will display 16 9 anamorphic letterbox pictures as a full screen display with no aspect distortion Zoom 3 This option will display 21 9 letterbox pictures as a full screen display with no aspect distortion Notes If in Auto mode you expe...

Страница 25: ...can be found on Teletext Page 801 TOP Table Of Pages mode In TOPTEXT mode the red button moves to the previous page number and the green button moves to the next page number The yellow and blue buttons correspond to different subjects These subjects can be accessed by Pushing the coloured button This is the current preferred method of operation in Australia FASTEXT or FLOF Full Level One Features ...

Страница 26: ...ng When TEXT is on the sound from the broadcast channel is still audible To adjust the volume press the Sound button or the button to display the volume indica tor The volume can then be adjusted normally STR This button is used to store page numbers into the coloured buttons or the Favourite Page button The STR button is located behind the remote control door PAGE NUMBERS UP AND DOWN These button...

Страница 27: ... Other Updates When a news flash page or another page which provides regular updates has been selected Push the Set Up button followed by the Yellow button to view the TV picture When a news flash is received the page number will be displayed on the screen Push the Yellow button to display the news flash TIME TEXT When a Page has more than one screen sub page of information you may have to wait fo...

Страница 28: ...rn the television to normal operation Using the Front Panel 1 Push the button repeatedly until the Tuning Mode is reached 2 Push the or Button to access the Tuning Menu 3 Push the button to select Sys select 4 Push the or Button to switch between Australia and NZ INDONES 5 To return the television to normal operation push the TV AV button on the remote control or repeatedly push the button until t...

Страница 29: ... Menu 3 Push the button to access Auto tuning 4 Push the or Button to start the search 1 Push the Set Up button 2 Push the or button to select the Tuning Menu 3 Push the or button to access the Tuning Menu 4 Push the or button to select the Auto tuning 5 Push the or button to start the Auto tuning 6 Push the button on the remote control to return the television to normal operation The television w...

Страница 30: ... select the Tuning Menu 3 Push the or button to access the Tuning Menu 4 Push the or button to select the Manual Tune 5 Push the or button to access the Manual Tune 6 Push the or button to select the programme location number to tune 7 Push the or button to start the search 8 The television will automatically search for the next broadcast signal As each station is found the search will stop If you...

Страница 31: ... the button repeatedly until the Tuning Mode is reached 3 Push the or Button to access the Tuning Menu 4 Push the button to access Fine Tune 5 Push the or Button to fine tune the station 6 The television will fine tune in the direction chosen by you 7 Push the to store the selected station 8 Push the button to return the television to the Tuning Menu 9 To return the television to normal operation ...

Страница 32: ...n to turn Skip on or off f 7 To store the Skip setting push the button 8 Push the button to return the television to normal operation Using the Front Panel 1 Select the Programme location number you want to Skip 2 Push the button repeatedly until the Tuning Mode is reached 3 Push the or Button to access the Tuning Menu 4 Push the button to select Skip 5 Push the or Button to turn the Skip on or of...

Страница 33: ... DVD button key in the manufacturer code setting Then press the VCR DVD button Remote Control VCR DVD Operation This remote control has been designed to work with a variety of VCRs and DVD players Please refer to page 35 for details of manufacturers codes WARNING Unauthorised recording of material from Television Broadcasts or from other video and or audio sources may contravene copyright laws PAU...

Страница 34: ...dby RECORD Push both buttons to Start recording PAUSE PAUSE Pauses the tape during play Pauses the disc during play PLAY PLAY Used to start the VCR Used to start the DVD playing playing FAST FORWARD CUE FAST FORWARD CUE Used to wind the tape Used to watch the disc at forward quickly or to watch fast speed the tape at fast speed VCR Switch Setting DVD Switch Setting Selects VCR Selects DVD PROGRAMM...

Страница 35: ...OP button 5 Release the remote control VCR or DVD Power Button 6 Check the operation of the VCR or DVD If it does not operate correctly repeat steps 1 to 5 and use an alternate code if there is one VCR CODES Manufacturer Code Manufacturer Code Panasonic 10 11 12 13 NEC 40 41 42 43 National ORION 45 46 AIWA 15 16 Philips 50 FUJITSU 20 SANYO 55 56 57 58 HITACHI 25 26 27 SHARP 60 61 JVC 30 31 32 SONY...

Страница 36: ...you must remember to turn the television volume down Please refer to page 17 for headphone volume adjustment The normal television sound controls volume bass treble balance or sound mode have no effect on the headphone sound AV Equipment VCRs cameras games and other video sources can be connected to the television through the front AV input terminals The front panels are particularly useful for te...

Страница 37: ...for DVD or Set Top Box connections Note Some DVD players and set top boxes only have an RCA VIDEO OUT terminal This can be connected to any of the VIDEO Inputs on the television Connect the AUDIO OUT to the corresponding AUDIO terminals on the television Y PB PR AUDIO OUT L L R R Y PB PR DVD OUT Y P P B R VIDEO OUT VIDEO DVD PLAYER S VIDEO VIDEO L AUDIO R AV5 IN AV2 IN COMPONENT MONITOR OUT R P B ...

Страница 38: ... of material from Television Broadcasts or from other video and or audio sources may contravene copyright laws VIDEO VIDEO L AUDIO R MONITOR OUT AUDIO L R Monitor Out The Monitor Out terminals reproduce the signals currently on the television screen The on screen signals could be a television programme or signals connected to one of the AV inputs The Monitor Out facility can be used to allow one v...

Страница 39: ...ket when the Television is not going to be used for an extended period of time In the event of unusual operation e g odd sounds smoke or aromas turn the television Off and remove the power cord from the wall socket Then call the Television Service Centre this may reduce the possibility of expensive repair costs Safety First Danger Always pull the plug out of the wall outlet by holding the plug its...

Страница 40: ...ping with a soft cloth Even if the television is heavily soiled do not apply cleaner directly to the unit Soak a cloth in a solution of neutral cleanser thinned with water Wring out the cloth wipe the television clean and finish by wiping with a dry cloth Cleaning the Remote Control The lens of the Remote Control should be kept clean and free of dirt and grease Use a soft cloth moistened with wate...

Страница 41: ...utomatic tuning and the manual tuning each have specific uses The reason for each is clearly described in the book The reason that automatic tuning is described first is because this is the first option on the screen Question I have started the auto tuning by accident How do I stop it Answer Pushing the remote control TV AV button at any time will stop the Auto tuning and return you to normal view...

Страница 42: ... for a few minutes and try again Colour Control If the picture is from a tape playback try adjusting the tracking Check the colour system Refer to page 21 Retune the Television Refer to page 30 Magnetic Interference from unshielded equipment or the television may have been moved while it was switched ON Switch the television OFF or into Standby and leave it OFF for about 30 minutes Refer to page 2...

Страница 43: ...5Ω Unbalanced coaxial Picture In Picture 1 Tuner plus AV Picture in Picture Picture and Picture Picture out of Picture Teletext TOP FLOF 2000 page Sub text memory 100 page Component Video 1080i 576P and 480P Video Audio Terminals AV1 IN Rear S Video Video Audio L R Terminals AV2 IN Rear Video or Y PB PR Audio L R Terminals AV3 IN Front S Video Video Audio L R Terminals AV4 IN Rear Video or Y PB PR...

Страница 44: ...ified to International Quality Standard AS NZS ISO9001 Certified to International Environmental Standard AS NZS ISO14001 Distributed in New Zealand by Panasonic New Zealand Limited 350 Te Irirangi Drive East Tamaki Auckland Customer Care Center Ph 0800 726 276 Email Customerservice panasonicnz co nz www panasonic co nz AUSTRALIA NEW ZEALAND www panasonic com au ...

Отзывы: