


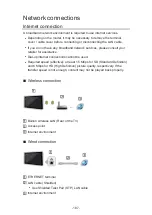

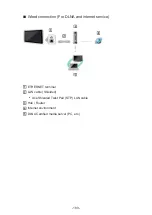


Network settings
Network Connection
Ensure the connections are completed before starting network setup.
■
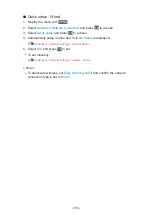
Quick setup - Wireless
1. Display the menu with
MENU
.
2. Select
Network
>
Network Connection
and press
OK
to access.
●
Confirm the encryption key, settings and position of your access point
before starting setup. For details, read the manual of the access point.
3. Select
Quick setup
and press
OK
to access.
●
When the LAN cable is connected, wired setup will be done
automatically.
4. Select your desired access point and press
OK
to access.
●
Available Wireless Networks are displayed automatically.
: Encrypted access point
●
For WPS(Push button)
1) Select
Easy setup with Push button
and press
OK
to access.
2) Press the WPS button on the access point until the light flashes.
3) Connect the TV with the access point with
OK
.
– WPS: Wi-Fi Protected Setup™
– If the connection fails, check the settings and positions of your
access point. And then, follow the on-screen instructions.
●
It is recommended to select the encrypted access point.
5. Enter the encryption key of the access point and press
OK
to set.
●
You can set characters using
Numeric buttons
.
●
Press
BACK/RETURN
to store.
6. Automatically setup is done and
Network Status
is displayed.
Network > Network settings > Network Status
7. Select
Exit
and press
OK
to set.
●
To set manually
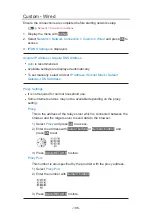
Network > Network settings > Custom - Wireless
- 192 -
Содержание TX-65FZ952B
Страница 1: ...eHELP English TX 55FZ952B TX 65FZ952B TX 55FZ802B TX 65FZ802B ...
Страница 148: ... For details of supported file formats Media Player Supported format 148 ...
Страница 204: ... Note Depending on the area this function may not be available For details consult your local Panasonic dealer 204 ...
Страница 207: ...Mirroring Settings Settings for the mirroring function Functions Mirroring Mirroring Settings 207 ...
Страница 217: ... Aspect cannot be changed depending on the content To return to list BACK RETURN 217 ...
Страница 279: ...Picture Viewing Mode Selects your favourite picture mode for each input Watching For best picture Viewing Mode 279 ...
Страница 289: ...PICTURE Button Setting Sets the viewing mode selection when pressing PICTURE Watching For best picture Viewing Mode 289 ...
Страница 290: ...Lock Settings Locks the settings of Professional1 2 for each input Watching For best picture Lock Settings 290 ...
Страница 292: ...Reset to Defaults Resets the current Picture Viewing Mode to the default settings 292 ...
Страница 293: ...Sound Mode Selects your favourite sound mode for each input Watching For best audio Sound mode 293 ...
Страница 299: ...Reset to Defaults Resets the current Sound Mode to the default settings 299 ...
Страница 302: ...TV Name Sets your favourite name for this TV Network Network settings TV Name 302 ...
Страница 307: ...Mirroring Settings Settings for the mirroring function Functions Mirroring Mirroring Settings 307 ...
Страница 308: ...Control4 Settings Settings for the Control4 function Network Network settings Control4 Settings 308 ...
Страница 312: ...Time Zone Adjusts the time data Watching Basic Adjusting time 312 ...
Страница 316: ...Voice Control Settings Settings for Voice Control function Functions Voice Control Settings 316 ...
Страница 317: ...USB Device Setup Formats the USB HDD or safely removes USB device Recording USB HDD setup Setting for USB HDD 317 ...
Страница 327: ...HDMI HDR Setting Set to On when the HDR device is connected to the TV Watching External equipment HDMI HDR Setting 327 ...
Страница 344: ... There is a little gap around the panel to prevent damage to the panel This is not a malfunction 344 ...
Страница 348: ...ver 3 100 ...


