English
- 5 -
•
Ethernet (LAN) for Internet connectivity and service
•
802.11n built in WIFI Support
•
Media Sharing
Accessories Included
•
Remote Control
•
Batteries: 2 x AAA
•
Instruction Book
•
Quick Start Guide
•
Detachable stand
•
Stand mounting screws (M4 x 12)
Standby Notifications
If the TV does not receive any input signal (e.g. from
an
aerial or HDMI source) for 5 minutes, it will go
into standby. When you next switch-on, the following
message will be displayed:
“
TV switched to stand-by
mode automatically because there was no signal
for a long time.
”
Press
OK
to continue.
If the TV is on and it isn’t being operated for a while
it will go into standby. When you next switch-on, the
following message will be displayed.
“
TV switched to
stand-by mode automatically because no operation
was made for a long time.
”
Press
OK
to continue.
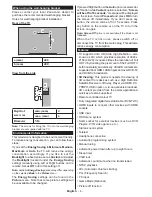
TV Control Buttons & Operation
+
P/CH
+
TV/A
V
1.
Standby/On button
2.
Source button
3.
Pro/- buttons
4.
/- buttons
Press the /- buttons simultaneously to
view main menu and use Pro/- buttons to
navigate and /- buttons to change value.
Note:
The position of the control buttons may differ
depending on the model.
Operation with the Remote Control
Press the
Menu
button on your remote control to
display main menu screen. Use the directional buttons
to select a menu tab and press
OK
to enter. Use the
directional buttons again to select or set an item. Press
Return/Back
or
Menu
button to quit a menu screen.
Input Selection
Once you have connected external systems to your
TV, you can switch to different input sources. Press the
Source
button on your remote control consecutively
to select the different sources.
Changing Channels and Volume
You can change the channel and adjust the volume
by using the
/-
and
Programme
+/-
buttons
on the remote.
Inserting the Batteries into the Remote
Remove the back cover to reveal the battery
compartment. Insert two size
AAA
batteries. Make
sure the (+) and (-) signs match (observe correct
polarity). Do not mix old and new batteries. Replace
only with same or equivalent type. Place the cover
back on.
Connect Power
IMPORTANT
: The TV set is designed to operate on
220-240V AC, 50 Hz
socket. After unpacking, allow
the TV set to reach the ambient room temperature
before you connect the set to the mains. Plug the
power cable to the mains socket outlet.
Antenna Connection
Connect the aerial or cable TV plug to the AERIAL
INPUT (ANT-TV) socket located on the rear bottom
side of the TV.
Rear bottom side of the TV
Notification
TRADEMARK ACKNOWLEDGMENT
The terms HDMI and High-Definition Multimedia
Interface, and the HDMI Logo are trademarks or
registered trademarks of HDMI Licensing LLC in the
United States and other countries.
Manufactured under license from Dolby Laboratories.
Dolby and the double-D symbol are trademarks of
Dolby Laboratories.
YouTube and the YouTube logo are trademarks of
Google Inc.
Содержание TX-48CX400B
Страница 1: ...OPERATING INSTRUCTIONS TX 55CR430B COLOUR TELEVISION WITH REMOTE CONTROL ...
Страница 35: ......


