background image

28

1. If a clear picture with correct colours cannot be obtained when a Broadcast or AV signal is received, refer to the “Colour System

Selection” operation on page 27.

2. After the Automatic tune is finished, press the Programme Number “Up” Button to confirm the tuning condition for each Programme

Number. If some Programme Numbers are unused, it is possible to skip such Programme Numbers. Please refer to the Programme
Skip function on page 27.

Helpful Hint

PICTURE

SOUND

SET UP

TV/TEXT

F.P.

INDEX

STILL

HOLD

100Hz/
PROGRE

CH SEARCH

TV/AV

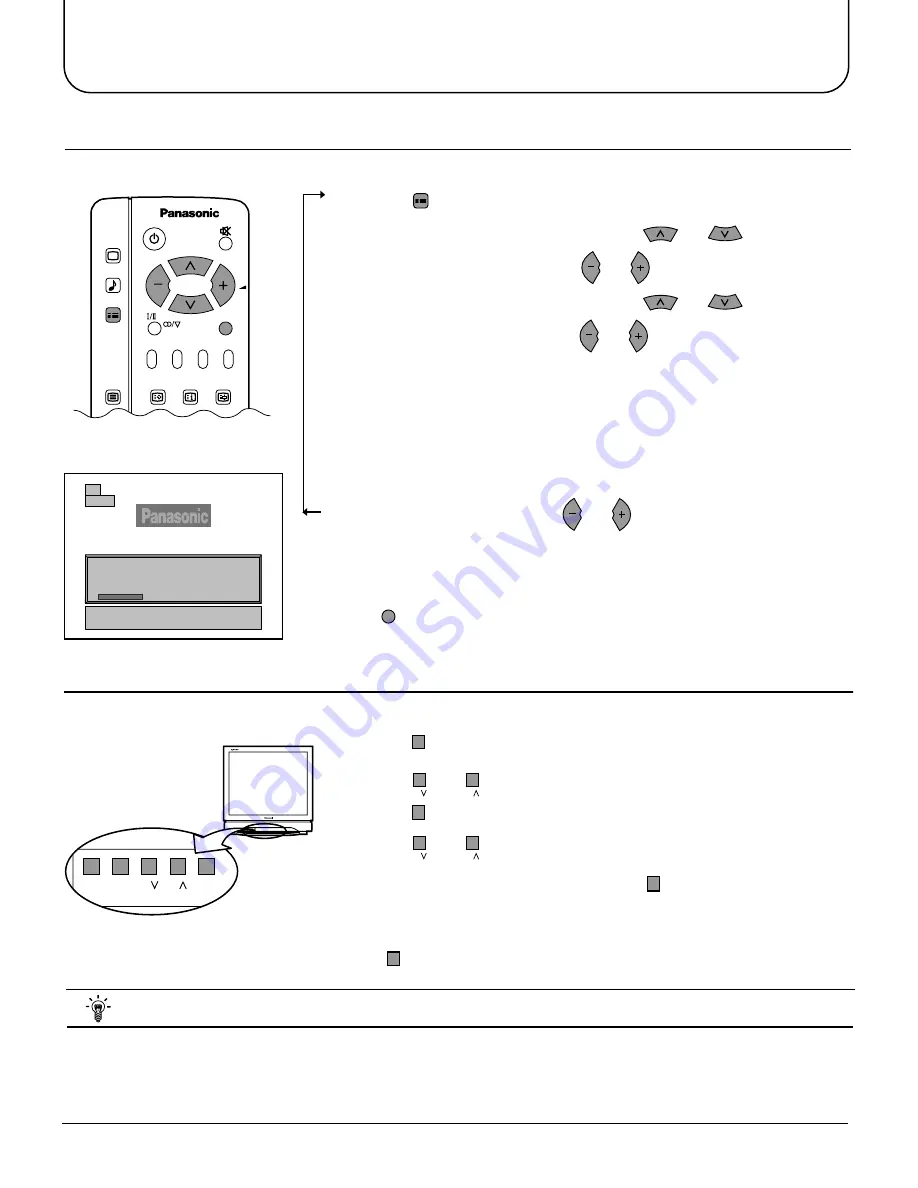
1

   Press 

SET UP

.

2

   Move to chosen menu option by using 

 or 

.

3

   Access Tuning menu by using 

 or 

.

4

   Move to chosen menu option by using 

 or 

.

5

   Access AUTO TUNE by using 

 or 

.

Notes:
• If you proceed with the next step all tuning data will be erased (all stations
  and their programme positions stored in your TV's memory will be wiped out
  so the new settings can be stored).
• If you exit the procedure after this point and before AUTO TUNE is

complete, no station information will be stored. Restar t and complete
the AUTO TUNE procedure so that the TV is re-tuned.

6

   Start AUTO TUNE by using 

 or 

.

Once this operation is completed the TV will display the programme now
stored on programme position 1.

Press 

TV/AV

 at any time to go back to watching TV (please read the Note

in the above procedure).

CH  29

29

   AUTO  SETUP  IN  PROGRESS
   SEARCHING  :

SETUP  :  RETURN  TO  TUNING  MENU
TV/AV  :  TO EXIT

        STORED  CH29

Auto tune (via front panel)

It is also possible to use the control panel buttons on the front of the TV to tune individual programme positions

1

   Press 

F

 (Front panel) until Tuning mode is reached.

2

   Press 

–/  

 or  

+/

 to access Tuning mode.

3

   Press 

F

 (Front panel) to access Auto tune.

4

   Press 

–/  

 or  

+/

 to start search.

When the desired station is found, press 

STR

 to store.

The programme position will flash.
Repeat above procedure to tune additional programme positions.

Press 

F

 at any time to exit the Tuning menu.

100Hz  PROGRESSIVE  PIP TEXT   TX-34P250T

STR

F

–/  

+/

TV/AV

Tuning Menu

Before Auto tune, set the “SYSTEM SELECTION” and “CHANNEL SELECT” mode.

Auto tune

Содержание TX-34P300K

Страница 1: ...o TQB4G0896 tau FLAT TAL DIGI This is a combined Operating Instruction manual for all the above series of models Please read these instructions before operating your set and retain them for future reference TX 29P300X TX 29P300K TX 34P300X TX 34P300K ...

Страница 2: ...1 How to connect the AUDIO OUT terminals 12 How to connect the DIGITAL AUDIO INPUT 12 How to connect External Speakers 13 How to connect the RGB Input Terminals 14 Connecting Headphones 15 Dear Panasonic Customer Welcome to the Panasonic family of customers We hope that you will have many years of enjoyment from your new colour television set To obtain maximum benefit from your set please read the...

Страница 3: ...enu 22 23 Setup Menu 24 25 Tuning Menu 26 29 Channel Selection 26 Tuning Menu 27 Auto tune 28 Auto tune via front panel 28 Manual tune 29 Manual tune via front panel 29 Aspect Controls 30 Menu Operation 31 32 Multi PIP 31 Channel search 32 Surround Sound 33 35 Surround Sound Systems 34 DTS Dolby Digital and Pro Logic modes 35 Simulated mode 35 Speaker level setup 35 Advanced Remote Control Operati...

Страница 4: ...lammable objects TAKE CARE NOT to damage the power cord DO NOT touch the aerial cable and this unit when there is lightning DO NOT place in humid or dusty location or areas exposed to smoke or steam DO NOT place in direct sunlight and other sources of direct heat DO NOT use this unit near water near a bath tub etc DO NOT use if the power cord or power plug is damaged or if the plug does not fit ti...

Страница 5: ...act with insecticide or other volatile substances DO NOT allow the unit to come into contact for extended periods with rubber or vinyl products Place in a safe location Turn the power Off before connecting other electrical equipment DO NOT jolt the unit Ask your sales outlet to install the aerial Dust will accumulate on the picture screen Please wipe with a soft cloth from time to time If you use ...

Страница 6: ...c Don t Recharge Do not use rechargeable Ni Cd batteries They are different in shape and performance and may fail to ensure correct operation Replace the cover and slide in reverse until the lock snaps 3 Two R6 AA size Batteries Use two R6 AA size batteries Insert the batteries ensuring correct polarity This is identifiable by the and symbols on both the batteries and inside the battery compartmen...

Страница 7: ...n upgrading of existing systems or accessories required and the costs incurred are the responsibility of you the Customer UHF Aerial RF In Terminal Coaxial Aerial Plug VHF Aerial Mixer 75 Ohm Coaxial Cable AV1 IN AV2 IN AV4 IN MONITOR OUT AUDIO OUT L R C L R W FRONT CENTRE SUB WOOFER REAR S VIDEO VIDEO VIDEO AUDIO L R AUDIO L R MONO MONO MONO DVD Y Pa PR DVD Y Pa PR Y Y OPTICAL COAXIAL FRONT REAR ...

Страница 8: ...nd see page 22 Aspect see page 30 Picture in Picture Selection see page 31 Recall see page 17 VCR LD DVD Rewind Review see page 37 Normalization see page 21 Store see page 17 Programme Number Up and Down see page 16 Volume Up and Down see page 17 TV AV Mode Selection see page 17 Direct programme Number Two Digit programme Number Selection see page 16 VCR LD DVD Play see page 37 TEXT hold see page ...

Страница 9: ...PR PR OPTICAL COAXIAL FRONT REAR PCM AC 3 DIGITAL AUDIO INPUT EXT L R L R Main Sub S VIDEO VIDEO AUDIO R L MONO RGB 31 5kHz AV3 IN Main Sub S VIDEO VIDEO AUDIO R L MONO RGB 31 5kHz AV3 IN STR F TV AV Item No Function Refer to Page Item No Function Refer to Page Main Headphones Jack 15 Sub Headphones Jack 15 AV3 Input Terminals 10 RGB Input Terminal 14 STR 17 Function 17 Volume Down 16 Volume Up 16...

Страница 10: ...E SUB WOOFER REAR S VIDEO VIDEO VIDEO AUDIO L R AUDIO L R MONO MONO MONO DVD Y PB PR DVD Y PB PR Y PB Y PB PR PR Connect VCRs and other peripheral equipment Notes When an S Video cable is connected to the S Video terminal the Video input will be automatically switched off for that AV mode When a Monaural VCR is used connect the Monaural Audio cable to the Audio L Left terminal Select the desired A...

Страница 11: ...hat time e g TV programmes or signals from AV1 AV2 AV3 or AV4 input Connections Notes The AV4 audio signal is common for both AV4 and DVD input signal terminals The DVD signal input terminal takes priority over the AV4 video signal input terminal Similar connection are available at the COMPONENT VIDEO input 2 terminal Notes Never connect the same video recorder with both the VIDEO IN and MONITOR O...

Страница 12: ...L R C L R W FRONT CENTRE SUB WOOFER REAR Front L R Sub woofer R L Centre DTS Dolby Digital Amplifier To Speakers Use Phono RCA connectors not supplied Rear Centre speaker Front left speaker Rear left surround speaker Front right speaker Rear right surround speaker Subwoofer speaker VCR DVD PLAYER CAMCORDER MONITOR OUT AUDIO OUT L R C L R W FRONT CENTRE SUB WOOFER REAR S VIDEO VIDEO AUDIO L R OPTIC...

Страница 13: ...peaker Speaker Black Red Front left speaker Press lever Insert wire Connections How to connect External Speakers The external speaker connections EXT on the rear of the TV allow you to create your own system using external speakers Connections are provided for front and rear speakers External Speaker unit Part No TY SP300 You may decide for example to connect external front left and right speakers...

Страница 14: ...es This unit can be connected to PCs with 640 480 31 5 kHz 60 Hz or 640 400 31 5 kHz 70 Hz pixel In some cases other PCs may not work with this TV set There is no audio signal in RGB input The sound of the RGB mode is combined with the Audio signal of AV3 Some PC models cannot be connected to the TV set A commercially sold adapter is required to use the RGB cable D sub 15P to connect a PC 98 serie...

Страница 15: ... Mono A Mono A Stereo A Stereo B Stereo Main Headphones Sub Headphones Monitor Output Connecting Headphones 3 5mm Plug Optional not supplied Main Sub S VIDEO VIDEO AUDIO R L MONO RGB 31 5kHz AV3 IN You can listen to sound from each of the headphones plugs as shown below Main Headphones plug Use Volume Up or Down Button to control volume level Sub Headphones plug For the sub Headphones volume contr...

Страница 16: ...ogramme Number Selection Buttons 0 9 and the Programme Number Up or Down Button either on the set or on the Remote Control Programme Number Selection Press the Programme Number Up or Down Button to select the next higher or lower Programme number Direct Programme Number Selection CH SELECT POSITION You can select the numbers directly by pressing Number 0 9 button and the two digit Numbers by press...

Страница 17: ...ttom of the screen Each coloured button corresponds with each input For example pressing the Red button selects AV1 Mute Button Press this button to mute the sound completely The Mute symbol will appear Press the button once again to restore the previous sound level and cancel the mute Recall Button Press the Recall button to display the current system status for example Programme number Channel n...

Страница 18: ...iceable or coloured patches may sometimes appear at the corners of the screen colour purity The Geomagnetic Correction feature can be used to eliminate them if necessary Geomagnetic corrections can be made from the remote control or the TV set F Power ON Remote Control 1 Press the SET UP button 2 Select the Geomagnetic correction menu by pressing E X I T GEOMAGNETIC CORRECTION RETURN TV AV ADJUST ...

Страница 19: ...MAGNETIC SETUP MENU LANGUAGE OFF TIMER FLICKER REDUC STROBE CH COLOUR SET VCR GAME TELETEXT FASTEXT OFF OFF OFF CHILD LOCK OFF SETUP MENU The PICTURE SOUND and SET UP buttons are used to open the main menus and also to return to the previous menu The UP and DOWN cursor buttons are used to move the cursor up and down the menus The LEFT and RIGHT cursor buttons are used to access menus adjust levels...

Страница 20: ...ST SHARPNESS foreachPictureMenu Picture menu mode will be memorized for each TV AV1 AV2 AV3 and AV4 mode PICTURE SOUND SET UP TV TEXT F P INDEX STILL HOLD 100Hz PROGRE CH SEARCH TV AV MENU DYNAMIC MENU STANDARD MENU SOFT CONTRAST BRIGHTNESS COLOUR SHARPNESS NTSC TINT C TEMP MENU SOFT STANDARD PICTURE 1 Press PICTURE 2 Move to chosen menu option by using or 3 Adjust chosen option or access chosen m...

Страница 21: ... Function AUTO 100 Hz MODE PROGRESSIVE The TV software will select the best mode for the signal being viewed 100Hz will give a steady picture for most signal transmission Recommended when receiving NTSC signals C TEMP Colour Temperature P NR Picture Noise Reduction AI SCAN MODE AIlows you to set the overall colour tone of the picture Press or to switch between modes CONTRAST BRIGHTNESS COLOUR SHAR...

Страница 22: ...l be memorized for each TV AV1 AV2 AV3 and AV4 mode VOLUME BASS TREBLE HEADPHONE VOL SUBWOOFER SUB HEADPHONE MENU STANDARD NORMAL SOUND PICTURE SOUND SET UP TV TEXT F P INDEX STILL HOLD 100Hz PROGRE SURROUND ASPECT 1 2 3 4 5 6 7 8 9 CH SEARCH TV AV Sound Menu Function DYNAMIC STANDARD SOFT Amplifies the Low frequencies and outputs optimum sound For music programmes for example For Normal use Human...

Страница 23: ...ally be connected to the TV to provide pictures and sound eg a DVD player connected to AV2 Select from AV1 AV2 AV3 AV4 eg if you have a DVD player connected to the AV2 socket with an optical cable connected to provide digital audio input select AV2 By pressing the Normal N Button on the Remote Control while the Sound menu is displayed the selected menu will be changed to the Normal Mode Normalizat...

Страница 24: ...ting Lets you take a series of freeze frame photos of a piece of action for example the finish of a race See page 32 Colour density varying between broadcast channels can be adjusted to three levels for each reception channel Reproduction of irregular signals such as certain TV games and rental video tapes may be improved Select character set so that all characters needed are available for text on...

Страница 25: ...ignal modes The right SET UP is displayed during RGB connection Details on each functions are as follows Provides access to many other features including system select and Auto TUNE See page 28 Not displayed during AV mode If you notice a slight tilt to the picture or if there are coloured patches at the corners of the screen use this feature to eliminate them See page 18 When you first install th...

Страница 26: ...e No 1 Press the button 1 to view channel 2 Press the button 2 to view channel 4 Press the button 3 to view channel 6 During Position mode various reception channels can be viewed DIRECT SELECT When the Channel Selection is on DIRECT and Auto Tune is performed the unit memories the programme number which is the same as the channel Tuned This method allows you to select the desired channel by press...

Страница 27: ...CA CATV JAPAN China Hong Kong United Kingdom Malaysia Singapore Thailand Asia countries Kuwait Saudi Arabia United Arab Emirates Middle East countries etc New Zealand Indonesia etc Australia CIS Poland etc South Africa U S A Chile Mexico Panama Peru Philippines Taiwan Venezuela etc USA CATV Japan System Select by Region Allows you to automatically retune the TV Useful if you move house and wish to...

Страница 28: ...e after this point and before AUTO TUNE is complete no station information will be stored Restart and complete the AUTO TUNE procedure so that the TV is re tuned 6 Start AUTO TUNE by using or Once this operation is completed the TV will display the programme now stored on programme position 1 Press TV AV at any time to go back to watching TV please read the Note in the above procedure CH 29 29 AUT...

Страница 29: ...s Tuning mode 3 Press TV AV to move between Change programme Search and Change TV system 4 Press or to change programme position or start search When the desired station is found press STR to store The programme position will flash Repeat above procedure to tune additional programme positions Press F at any time to exit the Tuning menu 100Hz PROGRESSIVE PIP TEXT TX 34P250T STR F TV AV CH 2 5 5 MHz...

Страница 30: ... AUTO Explanation When a wide screen signal from the special video is detected by S1 Video Terminal of the unit the Aspect ratio automatically set to 16 9 screen There is a wide variety of software available with aspect ratios from 1 78 1 16 9 to 2 35 1 cinema vision Picture 4 3 will display a 4 3 picture at its standard 4 3 size without any stretching 3 4 4 3 4 3 S ZOOM S Zoom displays the pictur...

Страница 31: ...s the yellow button to swap the contents of the two windows Use the remote control to select a TV channel or an AV source to appear in the main window Picture out of picture This feature allows two programmes to be viewed at the same time as picture in picture does The difference is how the two programmes are displayed in picture in picture the smaller window appears within the main image in pictu...

Страница 32: ...CT EXIT Channel search Menu Operation STILL HOLD Picture and text Press TV TEXT to move between watching the current programme viewing teletext and the picture and text feature Picture and text lets you see the current programme and a page of teletext side by side Whilst using this feature the remote control affects the teletext page if you wish to make changes to the programme viewed press TV TEX...

Страница 33: ...llowing selection of NORMAL PHANTOM or 3 STEREO modes as described on page 35 If Simulated is selected in Surround mode this menu option is Simulated setting allowing selection of DISCO MOVIE or STADIUM modes as described on page 35 Allows adjustment of the volume for each speaker as described on page 35 Allows setting of the distance from the listening position to the front speakers 1M 3M 4M 2M 8...

Страница 34: ...des in front of you to the right The 0 1 Low Frequency Effects LFE channel gives impact to bass sounds and to special effects more felt than heard eg the thud of a dinosaur footfall or the rumble of thunder While DTS and Dolby Digital are both high quality 5 1 channel surround systems the two systems differ in how they break down and store sound information They also differ in how they work with e...

Страница 35: ...ff and front left and right speakers connected these must be connected using RCA cables via an external amplifier otherwise they will not output any sound See page 12 for connection details This is the best mode to use if rear speakers are not connected When using this mode the surround information is redirected to the front left and right speakers Centre information is output by theTV s internal ...

Страница 36: ... easier if the mode is set to the MONO position using the stereo bilingual sound selection button DUAL also known as DUAL MONO or as BILINGUAL is not currently transmitted in some countries Audio Signal Type of broadcast Mode Indicator No Indicator Regular broadcast Standard Audio Regular broadcast Standard Audio BILINGUAL or DUAL MONO MAIN I Regular NICAM MONO I MAIN I NICAM STEREO STEREO NICAM D...

Страница 37: ...INDEX STILL HOLD 100Hz PROGRE SURROUND ASPECT 1 2 3 4 5 6 7 8 9 0 MULTI PIP CH SEARCH N REC VCR STR HELP DISC SIDE A B LD DVD TV AV 8 2 3 4 5 6 7 1 9 10 11 Button Function VCR LD DVD 1 2 3 4 5 6 7 8 9 10 11 Play button Rew Rewind Review button Stop button VCR Power button REC Record button Pause Still button FF Fast Forward Cue button VCR LD DVD Select button Programme Number Up and Down buttons f...

Страница 38: ...the current programme teletext and the picture and text feature lets you see the current programme and teletext side by side see page 32 TV TEXT Page Selection Pages can be selected in two ways a Press or to increase or decrease the page number by one b By entering the page number using 0 9 on the remote control FulI Top Bottom Press SET UP to display special functions followed by the Green button...

Страница 39: ...ng the normal programme until the correct sub page is found Select the required page number using buttons 0 9 If the top of the page indicates that sub pages are being transmitted yet the page does not change then the number at the top of the page is there to indicate that the broadcaster has updated the page s contents there are no sub pages Press SET UP followed by the Blue button T will be disp...

Страница 40: ...12 1 2 11 12 13 2 13 14 1 2 1 2 12 13 57 21 62 63 69 21 62 63 69 21 62 63 69 21 62 63 69 21 62 63 69 62 63 69 62 63 62 C13 S 1 S 2 S 3 S 1 S 2 S 3 S 1 S 2 S 3 S 1 S 1 S 2 S 3 21 22 23 24 28 57 58 59 62 63 69 90 91 92 93 94 95 96 97 98 99 70 73 74 75 76 77 78 79 80 81 89 100 117 118 120 125 100 125 Z10 Z11 Z12 Z13 Z14 Z15 Z16 Z17 Z18 Z19 S11 S12 S13 S14 S15 S16 S17 S18 S19 S20 S11 S12 S13 S14 S15 S...

Страница 41: ...nections Aerial Location direction or Connections Electrical Appliances Cars Motorcycles Fluorescent Lamps Volume Check whether the mute function has been activated on the Remote Control Not plugged into AC outlet Not switched on Contrast and Brightness Volume setting Check by pressing the Power Switch or Stand by Button on the Remote Control Colour Control Retune Channels Magnetic interference fr...

Страница 42: ... 13 62 NTSC M Japan 14 69 NTSC M U S A 21 Systems Function 1 2 3 4 5 6 7 8 9 10 11 12 13 14 15 16 17 18 19 20 21 PAL B G H PAL I PAL D K SECAM B G SECAM D K SECAM K1 NTSC M NTSC 3 58 4 5 MHz Reception of broadcast transmis sions and Playback from Video Cassette Tape Recorders Playback from Special VCR s Playback from Special Disc Players and Special VCR s NTSC 4 43 5 5 MHz NTSC 4 43 6 0 MHz NTSC 4...

Страница 43: ...are trademarks of Dolby Laboratories Manufactured under license from Dolby Laboratories Manufactured under license from DigitalTheater Systems Inc US Pat No 5 451 942 and other world wide patents issued and pending DTS and DTS Digital Surround are trademarks of Digital Theater Systems Inc Copyright 1996 Digital Theater Systems Inc All Right Reserved Note Design and Specifications are subject to ch...

Страница 44: ...uld note this serial number in the space provided below and retain this book plus your purchase receipt as a permanent record of your purchase to aid in identification in the event of theft or loss and for Warranty Service purposes Model Number Serial Number Matsushita Electric Industrial Co Ltd Central P O Box 288 Osaka 530 8692 Japan ...

Отзывы: