background image

English

   - 6 -

Standby Notifications

If the TV does not receive any input signal (e.g.  from 

an 

aerial or HDMI source) fo

r 3 m

inutes, it will go 

into standby. When you next switch-on, the following 

message will be displayed: 

TV switched to stand-by 

mode automatically because there was no signal 

for a long time.

” 

Press 

OK

 to continue.

If the TV is on and it isn’t being operated for a while 

it will go into standby. When you next switch-on, the 

following message will be displayed. 

TV switched to 

stand-by mode automatically because no operation 

was made for a long time.

” 

Press 

OK

 to continue.

TV Control Switch & Operation

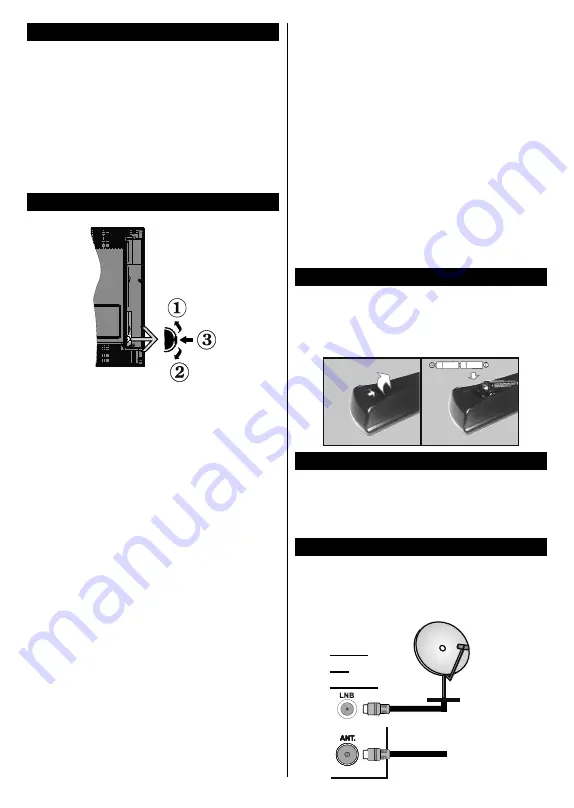
1. 

Up direction

2. 

Down direction

3. 

Volume / Info / Sources List selection and 

Standby-On switch

The Control button allows you to control the Volume/ 

Programme/Source and Standby-On functions of 

the TV.

To change volume: 

Increase the volume by pushing 

the button up. Decrease the volume by pushing the 

button down.

To change channel:

 Press the middle of the button  

in, the information banner will appear on the screen. 

Scroll through the stored channels by pushing the 

button up or down.

To change source:

 Press the middle of the button in 

twice(for the second time in total), the source list will 

appear on the screen. Scroll through the available 

sources by pushing the button up or down.

To turn the TV off: 

Press the middle of the button in 

and hold it down for a few seconds, the TV will turn 

into standby mode.

To turn on the TV:

 Press the middle of the button in, 

the TV will turn on.

Notes: 

• 

If you turn the TV off, this circle starts again beginning 

with the volume setting.

• 

Main menu OSD cannot be displayed via control 

buttons.

Operation with the Remote Control

Press 

Menu

 button on your remote control to display 

main menu screen. Use the directional buttons to select 

a menu tab and press 

OK

 to enter. Use the directional 

buttons again to select or set an item. Press 

Return/

Back 

button or 

Menu

 button to quit a menu screen.

Input Selection

Once you have connected external systems to your 

TV, you can switch to different input sources. Press 

Source

 button on your remote control consecutively 

to select the different sources.

Changing Channels and Volume

You can change the channel and adjust the volume 

by using the 

/-

 and 

Programme


+/-

 buttons 

on the remote. 

Inserting the Batteries into the Remote

Remove the back cover to reveal the battery 

compartment. Insert two size 

AA

 batteries. Make sure 

the (+) and (-) signs match (observe correct polarity). 

Do not mix old and new batteries. Replace only with 

same or equivalent type. Place the cover back on.

Connect Power 

IMPORTANT

: The TV set is designed to operate on 

220-240V AC, 50 Hz

 socket. After unpacking, allow the 

TV set to reach the ambient room temperature before 

you connect the set to the mains. Plug the power cable 

to the mains socket outlet.

Antenna Connection

Connect the aerial or cable TV plug to the AERIAL 

INPUT (ANT) socket or satellite plug to the SATELLITE 

INPUT (LNB) socket located on the back of the TV.

satellite

REAR

OF

THE TV

aerial 

or

cable

Содержание TX-32EW334

Страница 1: ...OPERATING INSTRUCTIONS MODE D EMPLOI BEDIENUNGSANLEITUNG KULLANIM KILAVUZU TX 32EW334 LED TV Téléviseur LED ...

Страница 2: ......

Страница 3: ...nnection 6 Notification 7 Specification 8 Remote Control 9 Connections 10 Switching On Off 11 First Time Installation 11 Media Playback via USB Input 12 Media Player Menu 12 CEC and CEC RC Passthrough 12 TV Menu Contents 13 General TV Operation 17 Using the Channel List 17 Configuring Parental Settings 17 Electronic Programme Guide EPG 17 Teletext Services 18 Software Upgrade 18 Troubleshooting Ti...

Страница 4: ...ripping or splashing of liquids and do not place objects filled with liquids such as vases cups etc on or over the TV e g on shelves above the unit Do not expose the TV to direct sunlight or do not place open flames such as lit candles on the top of or near the TV Do not place any heat sources such as electric heaters radiators etc near the TV set Do not place the TV on the floor and inclined surf...

Страница 5: ...NGS Read the instructions before mounting your TV on the wall The wall mount kit is optional You can obtain from your local dealer if not supplied with your TV Do not install the TV on a ceiling or on an inclined wall Use the specified wall mounting screws and other accessories Tighten the wall mounting screws firmly to prevent the TV from fall Do not over tighten the screws WARNING Apparatus conn...

Страница 6: ...l or other hard objects Do not allow the cabinet and pedestal to make contact with a rubber or PVC substance for a long time This may degrade surface quality Mains plug Wipe the mains plug with a dry cloth at regular intervals Moisture and dust may cause fire or electrical shock Assembling Removing the pedestal Preparations Take out the pedestal s and the TV from the packing case and put the TV on...

Страница 7: ...hanged If pressed Right button while Auto option is selected or Left button while Custom option is selected Screen will be off in 15 seconds message will be displayed on the screen Select Proceed and press OK to turn the screen off immediately If you don t press any button the screen will be off in 15 seconds Press any button on the remote or on the TV to turn the screen on again Note Screen Off o...

Страница 8: ...tandby mode To turn on the TV Press the middle of the button in the TV will turn on Notes If you turn the TV off this circle starts again beginning with the volume setting Main menu OSD cannot be displayed via control buttons Operation with the Remote Control Press Menu button on your remote control to display main menu screen Use the directional buttons to select a menu tab and press OK to enter ...

Страница 9: ...ational legislation By disposing of them correctly you will help to save valuable resouces and prevent any potential negative effects on human health and the environment For more information about collection and recycling please contact your local municipality Penalties may be applicable for incorrect disposal of this waste in accordance with national legislation Note for the battery symbol bottom...

Страница 10: ...igned to meet the standards as of August 2013 of DVB T T2 MPEG2 and MPEG4 AVC H 264 digital terrestrial services DVB C MPEG2 and MPEG4 AVC H 264 digital cable services and DVB S MPEG2 and MPEG4 AVC H 264 digital satellite services Consult your local dealer for availability of DVB T T2 or DVB S services in your area Consult your cable service provider for availability of DVB C services with this TV...

Страница 11: ...player mode Red Stop Play Green Play Jump Yellow Pause Subtitle time correction Blue Stop 10 Screen Changes the aspect ratio of the screen 11 Volume 12 Numeric buttons Switches the channel enters a number or a letter in the text box on the screen switches the TV on when in standby mode 13 TV Displays channel list Switches to TV Source 14 Swap Quickly cycles between previous and current channels or...

Страница 12: ...ernal device is connected via the SCART socket the TV will automatically switch to AV mode When receiving DTV channels Mpeg4 H 264 or while in Media Player mode output will not be available via the scart socket When using the wall mounting kit available from third party in the market if not supplied we recommend that you plug all your cables into the back of the TV before mounting on the wall Inse...

Страница 13: ...to search Select YES and press OK to proceed To cancel operation select NO and press OK You can select Network or set values such as Frequency Network ID and Search Step When finished press OK button Note Searching duration will change depending on the selected Search Step Satellite If Satellite broadcast search option is turned on the TV will search for digital satellite broadcasts after other in...

Страница 14: ... Menu Loop Shuffle Mode Operation Start playback with the Green button and activate All files in the list will be continuously played in original order Start playback with the OK button and activate The same file will be played continuously repeat Start playback with the Green button and activate All files in the list will be played once in random order Start playback with the Green button and act...

Страница 15: ...ns Picture Zoom Sets the desired image size format Film Mode Films are recorded at a different number of frames per second to normal television programmes Turn this feature on when you are watching films to see the fast motion scenes clearly Skin Tone Skin tone can be changed between 5 and 5 Colour Shift Adjust the desired colour tone RGB Gain Optional You can configure the colour temperature valu...

Страница 16: ...s AVL Automatic Volume Limiting Sets the sound to obtain fixed output level between programmes Headphone Lineout When you connect an external amplifier to your TV using the headphone jack you can select this option as Lineout If you have connected headphones to the TV set this option as Headphone Please ensure before using headphones that this menu item is set to Headphone If it is set to Lineout ...

Страница 17: ...eens Software Upgrade Ensures that your TV has the latest firmware Press OK to see the menu options Application Version Displays current software version Subtitle Mode This option is used to select which subtitle mode will be on the screen DVB subtitle Teletext subtitle if both is available Default value is DVB subtitle This feature is available only for the country option of Norway Auto TV OFF Se...

Страница 18: ...ored Satellite Settings Displays satellite settings Satellite list Displays available satellites You can Add Delete satellites or Edit satellite settings on the list Antenna installation You can change satellite anntenna settings and or start a satellite scan Installation Settings Optional Displays installation settings menu Standby Search Your TV will search for new or missing channels while in s...

Страница 19: ...urity information from the broadcast and if this maturity level is disabled disables access to the broadcast Note If the country option in the First Time Installation is set as France Italy or Austria Maturity Lock s value will be set to 18 as default Child Lock If this option is set to ON the TV can only be controlled by the remote control In this case the control buttons on the TV will not work ...

Страница 20: ...gate to Software upgrade and press the OK button In Upgrade options menu select Scan for upgrade and press OK button to check for a new software upgrade If a new upgrade is found it starts to download the upgrade After the download is completed confirm the question asking about rebooting the TV by pressing the OK to continue with the reboot operation 3 AM search and upgrade mode Your TV will searc...

Страница 21: ...Signal Compatibility Source Supported Signals Available EXT SCART PAL 50 60 O NTSC 60 O RGB 50 O RGB 60 O Side AV PAL 50 60 O NTSC 60 O PC YPbPr 480I 480P 60Hz O 576I 576P 50Hz O 720P 50Hz 60Hz O 1080I 50Hz 60Hz O 1080P 50Hz 60Hz O HDMI 480I 60Hz O 480P 60Hz O 576I 576P 50Hz O 720P 50Hz 60Hz O 1080I 50Hz 60Hz O 1080P 24Hz 25Hz 30Hz 50Hz 60Hz O X Not Available O Available In some cases a signal on ...

Страница 22: ...05kHz 24kHz 8kHz 11 025kHz 12kHz Sampling rate works only with video files AC3 32Kbps 640Kbps Bit rate 32kHz 44 1kHz 48kHz Sampling rate AAC 16Kbps 576Kbps Bit rate 48kHz 44 1kHz 32kHz 24kHz 22 05kHz 16kHz 12kHz 11 025kHz 8kHz Sampling rate EAC3 32Kbps 6Kbps Bit rate 32kHz 44 1kHz 48kHz Sampling rate LPCM Unsigned 8bit PCM Signed Unsigned 16bit PCM big little endian 24bit PCM big endian DVD LPCM 1...

Страница 23: ... HDMI cable not supplied you can refer to the following resolution information 56Hz 60Hz 66Hz 70Hz 72Hz 75Hz 640x400 þ 640x480 þ þ þ þ 800x600 þ þ þ þ þ 832x624 þ 1024x768 þ þ þ þ þ 1152x864 þ þ þ 1152x870 þ 1280x768 þ þ 1360x768 þ 1280x960 þ þ 1280x1024 þ þ 1400x1050 þ þ 1440x900 þ þ 1600x1200 þ 1680x1050 þ 1920x1080 þ ...

Страница 24: ...cation 29 Spécifications 30 Télécommande 31 Connexions 32 Marche Arrêt 33 Installation initiale 33 Lecture de média via entrée USB 34 Menu Lecteur multimédia 34 Serveurs intermédiaires CEC et CEC RC 35 Contenu du menu Téléviseur 36 Fonctionnement général de la TV 40 Utilisation de la liste de chaînes 40 Configuration des paramètres parentaux 40 Guide des programmes électroniques EPG 40 Services té...

Страница 25: ...choc électrique Ne nouez et n attachez jamais le cordon d alimentation à d autres cordons Lorsqu il est endommagé faites le remplacer par un personnel qualifié N exposez pas le téléviseur à des gouttes ou des éclaboussures de liquide et ne posez pas d objets contenant du liquide tels que les vases les tasses etc sur ou au dessus du téléviseur par exemple sur les étagères au dessus de l appareil N ...

Страница 26: ...xation murale pour éviter la chute du téléviseur Ne serrez pas trop les vis i CLASS 1 LASER PRODUCT AVERTISSEMENT Ne posez jamais un téléviseur sur un support instable ou incliné Le téléviseur pourrait chuter et provoquer de graves blessures corporelles voire la mort Vous pouvez éviter de nombreuses blessures notamment aux enfants en prenant des précautions simples telles que Utilisez des armoires...

Страница 27: ...ce du panneau d affichage du téléviseur ou du socle à l aide d un chiffon doux pour enlever la poussière ou les empreintes digitales En cas de saleté persistante 1 Nettoyez d abord la poussière à la surface 2 Mouillez un chiffon doux avec de l eau propre ou un détergent neutre dilué 1 part de détergent liquide pour 100 parts d eau 3 Essorez correctement le chiffon Veillez à ne laisser entrer aucun...

Страница 28: ...support soit correctement fixé Retrait du socle du téléviseur Assurez vous de retirer le socle de la manière suivante lors de l utilisation de la fixation murale ou du remballage du téléviseur Posez le téléviseur sur une table de travail avec le panneau de l écran couché sur un tissu propre et doux Laissez le s support s en saillie sur le bord de la surface Desserrez les vis qui fixent le s suppor...

Страница 29: ... Jeu est activé Veuillez mettre le téléviseur hors tension et le débrancher du secteur lorsque vous ne vous en servez pas Cela permettra également de réduire la consommation d énergie Fonctions TV couleur avec télécommande TV numérique par câble satellite entièrement intégrée DVB T T2 C S S2 Entrées HDMI pour connecter d autres appareils aux prises HDMI Entrée USB Système de menu OSD Prise péritel...

Страница 30: ... principal Utilisez les touches de navigation pour sélectionner un onglet du menu et appuyez sur OK pour entrer Utilisez à nouveau les touches de navigation pour sélectionner ou régler un élément Appuyez sur le bouton Return Back ou Menu pour quitter un écran de menu Sélection d entrée Une fois les équipements externes connectés à votre téléviseur vous pouvez commuter entre différentes sources d e...

Страница 31: ...ays En vous en débarrassant correctement vous participerez à la sauvegarde de ressources inestimables et éviterez des effets néfastes sur la santé humaine et sur l environnement Pour plus d informations concernant la collecte et le recyclage veuillez contacter votre municipalité locale Conformément à la législation en vigueur dans votre pays des pénalités peuvent être imposées pour mauvaise mise a...

Страница 32: ...es DVB T T2 MPEG2 et MPEG4 AVC H 264 des services numériques par câble DVB C MPEG2 et MPEG4 AVC H 264 et des services numériques par satellite DVB S MPEG2 et MPEG4 AVC H 264 Consultez votre distributeur local pour tout renseignement sur la disponibilité des services DVB T T2 ou DVB S dans votre localité Consultez votre fournisseur de services par câble pour plus d informations sur la disponibilité...

Страница 33: ... boutons coloriés En mode lecteur multimédia Rouge Stop Play Vert Play Raccourci Jaune Pause Correction du temps de sous titrage Bleu Arrêt 10 Écran modifie le format de l image 11 Volume 12 Boutons numériques Permettent de changer de chaîne de saisir un chiffre ou une lettre dans la zone de texte qui apparaît à l écran d allumer le téléviseur lorsqu il est en mode veille 13 TV Affiche la liste de...

Страница 34: ...s PÉRITEL le téléviseur passe automatiquement en mode AV Pendant la réception des chaînes DTV Mpeg4 H 264 ou en mode Lecteur Multimédia la sortie ne sera pas disponible à travers la prise péritel Lorsque vous utilisez le kit de montage au mur fourni par un tiers du contrat si non fourni nous vous recommandons de connecter tous vos câbles à l arrière du téléviseur avant l installation murale Insére...

Страница 35: ...N choisi ne saurait être 0000 Vous devez le saisir si l on vous demande de le faire pour toute opération dans le menu plus tard À propos de la sélection des types de diffusion Antenne numérique Si l option de recherche des émissions par Antenne numérique est activée le téléviseur procède à la recherche d émissions numériques hertziennes une fois les autres réglages initiaux terminés Câble numériqu...

Страница 36: ...e seront pas disponibles selon le choix du pays Lecture de média via entrée USB Vous pouvez connecter des disques durs externes de 2 5 et 3 5 pouces disques durs avec câble d alimentation externe ou une carte mémoire USB à votre TV via les entrées USB de votre TV IMPORTANT Sauvegardez les fichiers sur vos périphériques de stockage avant de les raccorder au téléviseur La responsabilité du fabricant...

Страница 37: ... Channel Cette fonction est un lien audio qui permet de remplacer d autres câbles entre la Télé et le système audio récepteur A V ou système stéréo Si le mode ARC est activé la Télé ne mute pas automatiquement les autres sorties audio Vous devrez baisser manuellement le volume de la Télé à zéro si vous voulez que le son sorte uniquement du périphérique audio connecté pareil pour les autres sorties...

Страница 38: ...format et la taille de l image souhaités Mode Film Les films sont enregistrés à un nombre d images par seconde différent des programmes de télévision normaux Activez cette fonction lorsque vous regardez des films afin de mieux visualiser les images accélérées Carnation La fonction Carnation peut être modifiée entre 5 et 5 Changer de couleur Réglez le ton de la couleur désirée Gain RGB En option Vo...

Страница 39: ...e Cette fonction règle le son pour obtenir le niveau de sortie prévu entre les programmes Casque Sortie de ligne Si vous voulez connecter un amplificateur externe à votre télé à l aide d une fiche pour casque audio sélectionnez l option Sortie de Ligne Si vous avez branché des casques sur votre téléviseur définissez cette option en tant que Casque Veuillez vous assurer avant d utiliser les casques...

Страница 40: ...dernier microprogramme Appuyez sur OK pour afficher les options de menu Version de L application Affiche la version actuelle de l application Mode Sous Titre Cette option permet de choisir le mode sous titre qui s affiche à l écran sous titre DVB sous titre TXT si les deux sont disponibles DVB est le sous titre par défaut Cette fonction n est disponible que pour les pays comme la Norvège Mise hors...

Страница 41: ...satellite Liste du satellite Affiche les satellites disponibles Vous pouvez Ajouter Supprimer les satellites ou Éditer les paramètres satellite de la liste Installation de l antenne Vous pouvez modifier les paramètres de l antenne satellite et ou démarrer une nouvelle recherche de satellite Paramètres d installation en option Affiche le menu des paramètres d installation Recherche en mode de veill...

Страница 42: ... accéder à certains menus Ces réglages sont accessibles au menu Configuration Contrôle Parental Pour afficher les options du menu de verrouillage saisissez le code PIN Après avoir saisi le code PIN approprié le menu Paramètres du Contrôle parental s affiche Verrouillage Menu Cette option permet d autoriser ou de verrouiller l accès à tous les menus ou menus d installation du téléviseur Contrôle pa...

Страница 43: ...me intervalle de temps Services télétexte Appuyez sur le bouton Text pour entrer Appuyez à nouveau sur ce bouton pour activer le mode de mélange ce qui vous permet de voir la page télétexte et la diffusion télévisée simultanément Appuyez de nouveau sur ce bouton pour quitter Si disponible des sections contenues dans une page de télétexte présenteront un code coloré et peuvent être sélectionnées en...

Страница 44: ... Remplacez les piles Les sources d entrée ne peuvent pas être sélectionnées Si vous ne pouvez sélectionner une source d entrée il est possible qu aucun appareil ne soit connecté Le cas échéant Vérifiez les câbles AV et les branchements si vous essayez de basculer à la source d entrée dédiée à l appareil connecté Modes d affichage typiques de l entrée PC Le tableau ci après est une illustration de ...

Страница 45: ...aux d échantillonnage fonctionne uniquement avec les fichiers vidéo AC3 32Kbps 640Kbps Débit binaire 32 kHz 44 1 kHz 48 kHz Taux d échantillonnage AAC 16Kbps 576Kbps Débit binaire 48kHz 44 1kHz 32kHz 24kHz 22 05kHz 16kHz 12kHz 11 025kHz 8kHz Taux d échantillonnage EAC3 32Kbps 6Kbps Débit binaire 32 kHz 44 1 kHz 48 kHz Taux d échantillonnage LPCM 8bit PCM non signé 16bit PCM signé signé grand petit...

Страница 46: ... votre téléviseur à l aide des câbles convertisseurs DVI DVI à HDMI non fournis 56Hz 60Hz 66Hz 70Hz 72Hz 75Hz 640x400 þ 640x480 þ þ þ þ 800x600 þ þ þ þ þ 832x624 þ 1024x768 þ þ þ þ þ 1152 x 864 þ þ þ 1152x870 þ 1280x768 þ þ 1360x768 þ 1280x960 þ þ 1280x1024 þ þ 1400x1050 þ þ 1 440 x 900 þ þ 1600x1200 þ 1680 x 1050 þ 1920x1080 þ ...

Страница 47: ... der Antenne 51 Meldung 52 Technische Daten 53 Fernbedienung 54 Anschlüsse 55 Ein Ausschalten 56 Erste Installation 56 Medien Abspielen über USB Eingang 57 Media Player Menü 57 CEC und CEC RC Passthrough 58 TV Menüinhalte 59 Allgemeine Bedienung 63 Verwendung der Programmliste 63 Einstellung der Kindersicherungseinstellungen 63 EPG Elektronischer Programmführer 63 Teletext Dienste 64 Softwareaktua...

Страница 48: ...Gerät nicht durch Ziehen des Netzkabels vom Netz Berühren Sie niemals das Netzkabel den Stecker mit nassen Händen da dies einen Kurzschluss oder elektrischen Schlag verursachen kann Machen Sie niemals Knoten in das Netzkabel und binden Sie es nie mit anderen Kabeln zusammen Wenn es beschädigt ist muss das Kabel ersetzt werden Diese Arbeit darf ausschließlich durch eine qualifizierte Fachkraft ausg...

Страница 49: ...fe auf i CLASS 1 LASER PRODUCT WARNUNG Stellen Sie das TV Gerät niemals auf eine instabile oder geneigte Unterlage Andernfalls könnte das TV Gerät umfallen und dabei ernste Verletzungen mit möglicher Todesfolge verursachen Viele Verletzungen insbesondere bei Kindern können vermieden werden wenn die folgenden einfachen Vorsichtsmaßnahmen getroffen werden Verwenden Sie nur vom Hersteller des TV Gerä...

Страница 50: ...letzungen zu verhindern sollten Sie das TV Gerät von der Wand abnehmen wenn es nicht länger verwendet wird WARTUNG Ziehen Sie zuerst den Stecker aus Steckdose Bildschirm Gehäuse Ständer Normale Pflege Wischen Sie die Oberfläche des Bildschirms des Gehäuse bzw Ständers mit einem weichen Tuch ab um Schmutz oder Fingerabdrücke zu beseitigen Bei hartnäckigem Schmutz 1 Reinigen Sie zuerst die Oberfläch...

Страница 51: ... vorsichtig fest bis der Ständer sicher befestigt ist Entfernen des Ständers vom TV Gerät Achten Sie darauf den Ständer in der folgenden Weise zu entfernen wenn Sie eine Wandhalterung verwenden oder das TV Gerät wieder verpacken wollen Legen Sie das Gerät auf eine Arbeitsfläche mit der Bildschirmseite nach unten die auf ein sauberes und weiches Tuch gelegt werden muss Lassen Sie den die Ständer üb...

Страница 52: ...tellt ist Schalten Sie das Gerät aus oder ziehen Sie den Netzstecker wenn das TV Gerät nicht verwendet wird Dies wird auch den Energieverbrauch reduzieren Funktionen Fernbedienbares Farbfernsehgerät Vollintegriertes digitales terrestrisches Kabel Satelliten TV Gerät DVB T T2 C S S2 HDMI Eingänge um andere Geräte mit HDMI Anschlüssen zu verbinden USB Eingang OSD Menüsystem Scart Buchsen für externe...

Страница 53: ...gstasten um eine Menü Registerkarte zu wählen und drücken Sie OK um diese aufzurufen Benutzen Sie die Richtungstasten um ein Element auszuwählen Drücken Sie auf die Taste Return Back oder Menü um den Menü Bildschirm zu verlassen Eingangsauswahl Sobald Sie ein externes System an Ihr Gerät angeschlossen haben können Sie zwischen den verschiedenen Eingangsquellen schalten Drücken Sie auf den Source a...

Страница 54: ... abgegeben werden Durch die sachgerechte Entsorgung tragen Sie zum Schutz der Ressourcen bei und verhindern negative Auswirkungen auf die menschliche Gesundheit und die Umwelt Für weitere Informationen zur Erfassung und Recycling wenden Sie sich bitte an die Vorort zuständigen Behörden Je nach den bei Ihnen gültigen gesetzlichen Regelungen kann es sein dass unsachgemäße Entsorgung dieses Produkts ...

Страница 55: ...EG4 AVC H 264 digitale terrestrische Programme und DVB C MPEG2 und MPEG4 AVC H 264 digitale Kabelprogrammdienste und DVB S MPEG2 and MPEG4 AVC H 264 digital Satellitendienste Fragen Sie Ihren Händler nach der Verfügbarkeit von DVB T T2 oder DBV S Programmen in Ihrer Gegend Fragen Sie Ihren Kabelanbieter nach der Verfügbarkeit von DVB C Programmen für dieses TV Gerät Dieses TV Gerät funktioniert mö...

Страница 56: ...gabe Grün Wiedergabe Springen Gelb Pause Untertitelzeitkorrektur Blau Stoppen 10 Bildschirm Ändert das Seitenverhältnis des Bildschirms 11 Lautstärke 12 Nummerntasten Wechselt den Kanal gibt eine Nummer oder einen Buchstaben in das Textfeld auf dem Bildschirm ein schaltet das TV Gerät aus den Standby Modus ein 13 Fernsehen Zeigt die Kanalliste an Schaltet zur TV Quelle zurück 14 Swap Sucht schnell...

Страница 57: ... SCART Anschluss angeschlossen wird schaltet das TV Gerät automatisch in den AV Modus Wenn Sie gerade DTV Kanäle Mpeg4 H 264 empfangen oder im Medienbrowsermodus sind ist die Ausgabe über die Scart Buchse nicht verfügbar Bei Verwendung des Wandmontage Kits erhältlich bei verschiedenen Drittanbietern falls nicht mitgeliefert empfehlen wir Ihnen bevor Sie das TV Gerät an die Wand montieren alle Kabe...

Страница 58: ...Sie später eine PIN für jede Menübedienung eingeben Über die Sendertypauswahl Digitalantenne Wenn die Suchoption Digitalantenne eingestellt wurde sucht das TV Gerät nach digitalen terrestrischen Sendern sobald die Ersteinstellungen vorgenommen worden sind Digitalkabel Wenn die Suchoption Digitalkabel eingestellt wurde sucht das TV Gerät nach digitalen Kabelsendern sobald die Ersteinstellungen vorg...

Страница 59: ...g Über die USB Eingänge am TV Gerät können Sie 2 5 und 3 5 Zoll HDD mit externer Stromversorgung externe Festplatten oder einen USB Speicherstick an das TV Gerät anschließen WICHTIG Sichern Sie die Dateien Ihres Speichergerätes bevor Sie es mit dem Gerät verbinden Der Hersteller übernimmt keinerlei Haftung für beschädigte Dateien oder Datenverluste Unter Umständen sind bestimmte Arten von USB Gerä...

Страница 60: ...annel Diese Funktion ist ein Audio Link um andere Kabel zwischen dem Fernseher und der Audioanlage A V Receiver oder Lautsprecher System zu ersetzen Bei aktivierten ARC schaltet das TV Gerät seine anderen Audio Ausgänge nicht automatisch stumm Das heißt dass Sie die TV Lautstärke manuell auf Null reduzieren müssen wenn Sie den Ton des angeschlossenen Audiogeräts bzw andere optische oder koaxiale D...

Страница 61: ...Bildzoom Stellt das gewünschte Bildgrößenformat ein Filmmodus Filme werden mit einer unterschiedlichen Anzahl von Bildern je Sekunde bis zu normalen Fernsehprogrammen aufgezeichnet Schalten Sie diese Funktion ein wenn Sie sich schnell bewegende Szenen eines Films klarer sehen möchten Hauttöne Die Balance kann zwischen 5 und 5 eingestellt werden Farbtonverschiebung Stellt den gewünschten Farbton ei...

Страница 62: ...ktion stellt den Ton so ein dass zwischen den Programmen ein konstanter Ausgangspegel erhalten bleibt Kopfhörer Lineout Wenn Sie einen externen Verstärker an Ihren Fernseher anschließen durch Benutzen des Kopfhöreranschlusses können Sie diese Option als Lineout festlegen Wenn Sie einen Kopfhörer an den Fernseher angeschlossen haben legen Sie diese Option als Kopfhörer fest Bevor Sie einen Kopfhöre...

Страница 63: ...are des TV Geräts stets auf dem neusten Stand ist Drücken Sie OK um die Menüoptionen anzuzeigen Anwendungsversion Zeigt die aktuelle Software Version an Untertitel Modus Diese Option wird verwendet um den auf dem Bildschirm angezeigten Untertitel Modus DVB Untertitel Teletext Untertitel auszuwählen wenn beide verfügbar sind Als Standard ist die Option DVB Untertitel eingestellt Diese Funktion ist ...

Страница 64: ...llitenliste Zeigt die verfügbaren Satelliten an Sie können Satelliten Hinzufügen löschen oder Satelliteneinstellungen auf der Liste Bearbeiten Antenneninstallation Sie können die Satellitenantenneneinstellungen ändern und oder eine neue Satellitensuche starten Installationseinstellungen Optional Zeigt das Menü Installationseinstellungen an Standby Suche Ihr Fernsehgerät sucht im Standby nach neuen...

Страница 65: ...ang zu bestimmten Programmen Sendern und zur Nutzung der Menüs zu verwehren Diese Einstellungen befinden sich im Menü Setup Kindersicherung Um die Menüoptionen der Kindersicherung anzuzeigen muss eine PIN eingegeben werden Nach der Eingabe der richtigen PIN werden die Kindersicherungseinstellungen angezeigt Menüsperre Diese Einstellung aktiviert bzw deaktiviert den Zugang zu allen Menüs bzw Alters...

Страница 66: ...um den Misch Modus einzuschalten der es Ihnen ermöglicht die Teletext Seite und die Fernsehsendung gleichzeitig zu sehen Drücken Sie nochmals diese Taste um den Modus wieder zu verlassen Sofern vorhanden werden die Abschnitte einer Teletextseite farbcodiert und können dann durch Drücken der entsprechenden Farbtaste ausgewählt werden Folgen Sie den auf dem Bildschirm angezeigten Anweisungen Digital...

Страница 67: ... Sie diese Eingangsquellen können nicht ausgewählt werden Wenn Sie keine Eingangsquelle wählen können haben Sie wahrscheinlich kein Gerät angeschlossen Wenn nicht Prüfen Sie die AV Kabel und deren Anschlüsse wenn Sie versuchen die dem angeschlossenen Gerät zugewiesene Eingangsquelle einzuschalten Typische Anzeigemodi PC Eingang In der folgenden Tabelle werden einige der üblichen Modi zur Videoanze...

Страница 68: ...48kHz 16kHz 22 05kHz 24kHz 8kHz 11 025kHz 12kHz Abtastrate funktioniert nur mit Video Dateien AC3 32Kbps 640Kbps Bitrate 32kHz 44 1kHz 48kHz Abtastrate AAC 16Kbps 576Kbps Bit rate 48kHz 44 1kHz 32kHz 24kHz 22 05kHz 16kHz 12kHz 11 025kHz 8kHz Abtastrate EAC3 32Kbps 6Kbps Bitrate 32kHz 44 1kHz 48kHz Abtastrate LPCM Unsigned 8bit PCM Signed Unsigned 16bit PCM jeweils big little Endian 24bit PCM big E...

Страница 69: ... Anschlüsse Ihres TV Gerätes anschließen können Sie die folgenden Auflösungsrichtwerte verwenden 56Hz 60Hz 66Hz 70Hz 72Hz 75Hz 640x400 þ 640x480 þ þ þ þ 800x600 þ þ þ þ þ 832x624 þ 1024x768 þ þ þ þ þ 1152x864 þ þ þ 1152x870 þ 1280x768 þ þ 1360x768 þ 1280x960 þ þ 1280x1024 þ þ 1400x1050 þ þ 1440x900 þ þ 1600x1200 þ 1680x1050 þ 1920x1080 þ ...

Страница 70: ...ğlantısı 74 Bilgi 74 Özellikler 75 Uzaktan Kumanda 76 Bağlantılar 77 Açma Kapatma 78 İlk Kurulum 78 USB Girişi yoluyla Medya Tekrar Oynatma 79 Medya Oynatıcı Menüsü 79 CEC ve CEC RC Geçişi 80 TV Menüsü İçeriği 81 TV nin Genel Kullanımı 85 Kanal Listesinin Kullanılması 85 Ebeveyn Ayarlarını Yapılandırma 85 Elektronik Program Rehberi EPG 85 Teletekst Servisleri 86 Yazılım Yükseltme 86 Sorun Giderme ...

Страница 71: ...işim işlemi bir vasıflı eleman tarafından gerçekleştirilmelidir TV nin damlayan veya sıçrayan sıvılara maruz kalmasına veya vazo kupa vb gibi içi sıvı dolu kapların TV üzerine yerleştirilmesine örn ünitenin üzerindeki raflara izin vermeyiniz TV nin doğrudan güneş ışığına maruz kalmasına izin vermeyiniz veya yanan mumlar gibi açık alevleri TV nin üzerine veya yakınlarına yerleştirmeyiniz TV setinin...

Страница 72: ...len aynı tedbirlerin uygulanması gereklidir DUVARA MONTAJ UYARILARI TV nizi duvara monte etmeden önce bu açıklamaları okuyunuz Duvara montaj seti opsiyoneldir Eğer TV niz ile birlikte verilmemişse bölgenizdeki bayiden temin edebilirsiniz TV yi tavana ya da eğimli bir duvara monte etmeyiniz Belirtilen duvara montaj vidalarını ve diğer aksesuarları kullanınız TV nin düşmemesi için duvara montaj vida...

Страница 73: ... bozlmasına veya boyanın dökülmesine neden olabilir Ekran panelinin yüzeyine özel işlem yapılması gereklidir bu yüzey kolaylıkla zarar görebilir Ekran yüzeyini tırnaklarınızla veya sert cisimlerle çizmemeye özen gösteriniz Kabinin ve sehpanın uzun süreyle kauçuk veya PVC bir maddeye temas etmesine izin vermeyiniz Aksi takdirde yüzey kalitesi bozulabilir Elektrik fişi Elektrik fişini düzenli aralık...

Страница 74: ... Bu ayarı kapatmak için Kapalı olarak ayarlayınız Not Görüntü menüsünde seçimi yapılan Mod değerine bağlı olarak Enerji Tasarrufu seçenekleri farklı olabilir Enerji Tasarrufu ayarları Görüntü menüsünde bulunmaktadır Bazı görüntü ayarlarının kullanılabilir veya değiştirilebilir olmadığını unutmayınız Eğer Otomatik seçeneği sırasında Sağ tuşa veya Özel seçeneği sırasında Sol tuşa basılırsa ekranda E...

Страница 75: ...allar arasında gezinin Kaynağı değiştirmek için Tuşun ortasına iki kez basınız toplamda iki kez kaynak listesi ekranda görünecektir Yukarı ve aşağı tuşlarına basarak mevcut kaynaklar arasında gezinin TV yi kapatmak için Orta tuşa basın ve birkaç saniye basılı tutun TV bekleme moduna geçecektir TV yi açmak için Tuşun ortasına basınız TV açılacaktır Notlar Eğer TV yi kapatırsanız bu daire başlangıçt...

Страница 76: ...lektrikli ve elektronik bileşenler ile pillerin genel evsel atıklar ile karıştırılmaması gerektiği anlamına gelmektedir Eski ürünlere uygun işlemler geri kazanım ve geri dönüşüm yapılabilmesi için lütfen bu tür malzemeleri ulusal mevzuata uygun biçimde uygun toplama merkezlerine götürünüz Uygun bir şekilde bertaraf edilmelerini sağlayarak kıymetli kaynaklarımızın korunmasına yardımcı olursunuz ve ...

Страница 77: ... karasal yayınlar ve DVB C MPEG2 ve MPEG4 AVC H 264 dijital kablolu yayınlar ve DVB S MPEG2 ve MPEG4 AVC H 264 sayısal kablo yayınları standartlarını Ağustos 2013 itibarıyla karşılamak üzere tasarlanmıştır Bölgenizde DVB T T2 veya DVB S yayınlarının mevcudiyeti için yetkili satıcılarımızdan bilgi alabilirsiniz Bu TV ile DVB C yayınların izlenebilmesi hakkında kablolu yayın sağlayıcınızdan bilgi al...

Страница 78: ...dya oynatıcı modunda Kırmızı Durdur Oynat Yeşil Oynat Atla Sarı Duraklat Altyazı zamanı düzeltme Mavi Durdur 10 Ekran Ekranın en boy oranını değiştirir 11 Ses Seviyesi 12 Sayısal tuşlar Kanal değiştirir ekrandaki bir metin kutusuna rakam veya sayı girişi yapar bekleme modundan TV ye geçiş yapar 13 TV Kanal listesini görüntüler TV kaynağına geçiş yapar 14 Değiştir Önceki kanal ile mevcut kanal veya...

Страница 79: ...gereklidir SKART soketi yoluyla harici bir cihaz bağlanmışsa TV otomatik olarak AV moduna geçer DTV kanalları Mpeg4 H 264 alırken veya Medya Oynatıcı modundayken çıkış skart soketinden mümkün olmayacaktır Duvara montaj kiti eğer birlikte verilmemişse piyasadan üçüncü taraf bir malzeme temin edilebilir kullanılırken duvara montaj yapmadan önce tüm kablolarınızı TV nin arkasına takmanızı öneririz CI...

Страница 80: ...ijital karasal yayınları arayacaktır Dijital Kablo Eğer Dijital Kablolu yayın arama seçeneği açılırsa ilk ayarlar tamamlandıktan sonra TV dijital kablolu yayınları arayacaktır Diğer tercihlerinize bağlı olarak aramaya başlamadan önce bir doğrulama mesajı görüntülenebilir EVET seçimini yapınız ve devam etmek için OK tuşuna basınız İşlemi iptal etmek için HAYIR seçimini yapıp OK tuşuna basınız Ağ se...

Страница 81: ...ma aygıtınızda bulunan dosyaları yedekleyiniz Üretici herhangi bir dosya hasarından veya veri kaybından sorumlu tutulamaz Belirli USB cihazı türlerinin bu TV ile uyumlu olmaması olası bir durumdur ör MP3 Çalarlar TV FAT32 ve NTFS disk formatlarını destekler Oynatıcı halen dosyaları okuyor olabileceği için her söküp takma öncesinde bir süre bekleyiniz Aksi takdirde USB oynatıcıda ve USB cihazın ken...

Страница 82: ...ışı bırakılabilir TV ARC Ses Dönüş Kanalı özelliğini de desteklemektedir Bu özellik TV ile ses sistemleri A V alıcı veya hoparlör sistemi arasındaki kablo bağlantılarının yerine kullanılan bir ses bağlantısıdır ARC aktif olduğunda TV diğer ses çıkışlarını otomatik olarak sessiz moda almaz Bu yüzden eğer sadece bağlanmış olan ses cihazından gelen sesi duymak istiyorsanız TV sesini manüel olarak kıs...

Страница 83: ...atı İstenilen görüntü ölçüsü biçimini ayarlar Film Modu Filmler normal televizyon programlarından farklı sayıda saniye başına düşen kare miktarına sahiptir Bu özelliği hızlı hareketleri net bir şekilde görmek istediğiniz filmleri izlerken açınız Ten Rengi Tonu Ten rengi tonu 5 ile 5 arasında değiştirilebilir Renk kaydırma İstenen renk tonunu ayarlar RGB Kazancı opsiyonel RGB Gain özelliğini kullan...

Страница 84: ...ar arasında sabit bir ses çıkışı elde edilebilmesine olanak sağlar Kulaklık Ses Çıkışı Kulaklık jakını kullanarak televizyona harici bir amplifikatör bağlarsanız bu seçeneği Ses Çıkışı olarak seçebilirsiniz Eğer televizyona kulaklık bağlarsanız bu seçeneği Kulaklık olarak seçiniz Kulaklık kullanmadan önce bu menü ögesinin Kulaklık olarak ayarlandığından emin olunuz Bu ayar Ses Çıkışı olarak ayarla...

Страница 85: ...sini değiştirir Yazılım Yükseltme TV nizin en son yazılıma sahip olmasını sağlar Menü seçeneklerini görmek için OK tuşuna basınız Uygulama Sürümü Geçerli yazılım sürümünü gösterir Altyazı Modu Bu seçenek eğer her ikisi de mevcutsa ekranda hangi altyazı modunun DVB altyazısı Teletekst altyazısı görüntüleneceğini seçer Varsayılan değer DVB altyazısıdır Bu özellik sadece ülke seçimi Norveç olarak yap...

Страница 86: ...mevcut değildir Uydu ayarları Uydu ayarlarını gösterir Uydu listesi Kullanılabilir uyduları görüntüler Bu listeye uydu Ekleme Silme veya uydu Düzenleme yapabilirsiniz Anten kurulumu Uydu anteni ayarlarını değiştirebilir ve veya yeni bir uydu araması başlatabilirsiniz Kurulum Ayarları Opsiyonel Kurulum ayarları menüsünü görüntüler Arka Plan Araması TV niz bekleme modunda iken yeni veya eksik kanall...

Страница 87: ...Bu ayarlar Ayarlar Ebeveyn menüsünde bulunmaktadır Ebeveyn kilit menü seçeneklerini göstermek için PIN numarası girilmelidir Doğru PIN kodu girildikten sonra Ebeveyn Ayarları menüsü görüntülenir Menü Kilidi Tüm menülere veya TV kurulum menülerine erişimi etkinleştirir veya devre dışı bırakır Yetişkin Kilidi Bu seçenek ayarlandığında TV yayından yetişkin bilgisi alınır ve yetişkin seviyesinin devre...

Страница 88: ... zamanlayıcı ayarlamak mümkün değildir Teletekst Servisleri Girmek için Text tuşuna basınız Karma modunu etkinleştirmek için yeniden basınız bu şekilde teletekst sayfası ve TV yayınını aynı anda görüntüleyebilirsiniz Çıkmak için bir kez daha basınız Eğer mevcutsa bir teletekst sayfasındaki bölümler renk kodlu olur ve renkli tuşlara basılarak seçilebilir Teletekst ekranında görüntülenen talimatları...

Страница 89: ...iriniz Giriş kaynakları seçilemez Eğer bir giriş kaynağı seçemiyorsanız hiçbir cihazın bağlı olmaması olasıdır Eğer bağlıysa Giriş kaynağını bağlanılan cihaza ayarlamak istiyorsanız AV kablolarını ve bağlantılarını kontrol ediniz PC Girişi Tipik Ekran Modları Aşağıdaki tablo bazı tipik video ekran konumlarının bir örneğidir TV niz tüm çözünürlükleri desteklemiyor olabilir TV niz 1920x1080 e kadar ...

Страница 90: ...z 11 025kHz 12kHz Örnekleme hızı sadece video dosyaları ile çalışır AC3 32Kbps 640Kbps Bit hızı 32kHz 44 1kHz 48kHz Örnekleme hızı AAC 16Kbps 576Kbps Bit hızı 48kHz 44 1kHz 32kHz 24kHz 22 05kHz 16kHz 12kHz 11 025kHz 8kHz Örnekleme hızı EAC3 32Kbps 6Kbps Bit hızı 32kHz 44 1kHz 48kHz Örnekleme hızı LPCM İşaretsiz 8bit PCM İşareti İşaretsiz 16bit PCM yüksek düşük son haneli 24bit PCM yüksek son hanel...

Страница 91: ...in konektörüne bağladığınızda aşağıdaki çözülüm bilgilerine başvurabilirsiniz 56Hz 60Hz 66Hz 70Hz 72Hz 75Hz 640x400 þ 640x480 þ þ þ þ 800x600 þ þ þ þ þ 832x624 þ 1024x768 þ þ þ þ þ 1152x864 þ þ þ 1152x870 þ 1280x768 þ þ 1360x768 þ 1280x960 þ þ 1280x1024 þ þ 1400x1050 þ þ 1440x900 þ þ 1600x1200 þ 1680x1050 þ 1920x1080 þ ...

Страница 92: ... 5 W Off mode power consumption 0 01 W Screen resolution 1366 x 768 1 Energy consumption XYZ kWh per year based on the power consumption of the television operating 4 hours per day for 365 days The actual energy consumption will depend on how the television is used 2 when the TV is turned off with the remote control and no function is active For the information of rated power consumption refer to ...

Страница 93: ...voor informatie over het nominale elektriciteitsverbruik icatore del modello G Consumo annuo di energia di efficienza energetica H Consumo di energia in modo stand by I Consumo di energia in modo spento J Risoluzione dello schermo anno calcolato sulla base del consumo di un televisore in funzione per 4 onsumo effettivo di energia dipende dall utilizzo reale del televisore to con il telecomando e n...

Страница 94: ...sultaţi eticheta de pe capacul posterior al televizorului Latviešu valodā A Produkta speciālā zīme C Modeļa identifikators G Ikgadējais enerģijas patēriņš B Piegādātājs D Energoefektivitātes klase H Gatavības režīma elektroenerģijas patēriņš E Ekrāna redzamās daļas izmērs pa diagonāli I Izslēgtā režīma elektroenerģijas patēriņš F Aktīvā režīma elektroenerģijas patēriņš J Ekrāna izšķirtspēja K Ener...

Страница 95: ......

Страница 96: ......

Отзывы: