Panasonic TX-28PL10P Скачать руководство пользователя страница 21

21

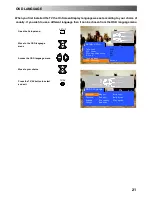
When you first installed the TV the On Screen Display language was set according to your choice of

country. If you wish to use a different language then it can be chosen from the OSD language menu
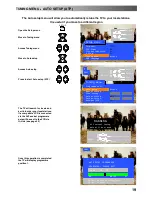
Open the Setup menu

Move to the OSD language
menu

Access the OSD language menu

Move to your choice

Press the TV/AV button to select
and exit

OSD LANGUAGE

Setup menu

Teletext

FLOF

Off timer

Off

Flicker reduction

On

Q

--

Link

Off

Tuning menu
OSD language

Access

TV/AV

Select

Access

Exit

OSD language

Return

--

Select

Select

Exit

TV/AV

English

Magyar

Hrvatski

Č

e

š

tina

Russkij

Bulgarian

Român

ă

Slovensky

Slovensko

Polski

Nema

č

ki

TV/AV

SET UP

Содержание TX-28PL10P

Страница 1: ...Pana sonic Panasonic Panasonic Panasonic Panasonic Panaso nic Panasonic Panasonic Panasonic Panasonic Panasoni c Panasonic Panasonic Panasonic Panasonic Panasonic Panasonic Panasonic Panasonic Panason...

Страница 2: ...ire donot expose this TV set torainor excessivemoisture ThisTV must not be exposed to dripping or splashing water and objects filled with liquid such as vases must not be placed on top of or above the...

Страница 3: ...n book n D Make sure that the batteries are fitted the correct way round D Do not mix old batteries with new batteries Remove old exhausted batteries immediately D Donot mix different battery types i...

Страница 4: ...d data from the TV you may need to select the Download option from the VCR s menu D If Q Link is not operating correctly check it is connected to the television s AV2 socket the SCART lead is a full f...

Страница 5: ...any On Screen Display menus Open the flap on the television s front panel Press and release here to open flap Press the F button repeatedly until the Geomagnetic Correction feature is displayed F Pre...

Страница 6: ...lect Displays the On Screen Display functions use repeatedly to select from the available functions Volume Contrast Brightness Colour Sharpness Tint in NTSC mode Bass Treble Balance Tuning mode and Ge...

Страница 7: ...d down cursor buttons are used to move the cursor up and down the menus The left and right cursor buttons are used to access menus adjust levels or to select from a range of options The STR button is...

Страница 8: ...therefore the WSS is weak then it is possible that the picture may not expand to full size and that the TV will display black areas around the edges If the original source signal was a standard 4 3 as...

Страница 9: ...ode you experience problems with the screen display size when playing back widescreen format recordings from your VCR then it is possible that the tracking control of your VCR requires adjustment your...

Страница 10: ...ied to the centre of the screen so that elongation is only apparent at the left and right edges of the screen The size of the picture will depend on the original signal STILL Control The STILL key all...

Страница 11: ...allow adjustment of the hue The Colour balance settingallows youto set the overall colour tone of the picture P NR will automatically reduce unwanted picture interference The AI setting automatically...

Страница 12: ...ill suit your listening position MPX will usually be set to Stereo to provide the best reproduction however if reception deteriorates or if the service is not available then it is advisable to switch...

Страница 13: ...electing the Off position Q Link allows you to enable or disable data communication with a compatible VCR See page 22 The Tuning menu provides an entry to many other features including Programme edit...

Страница 14: ...r system menu allows you to decide the correct choice of transmission standard Volume correction allows you to adjust the volume level of individual stations This option is used when a decoder is conn...

Страница 15: ...e finished in the Programme edit menu press the TV AV button to exit TUNING MENU PROGRAMME EDIT TV AV STR SET UP Setup menu Teletext FLOF Off timer Off Flicker reduction On Q Link Off Tuning menu OSD...

Страница 16: ...gain to confirm If you have finished in the Programme edit menu press the TV AV button to exit TUNING MENU PROGRAMME EDIT STR TV AV Prog Chan Name Lock Sys 1 CH41 XYZ Off SC2 2 Off SC2 3 CH44 ZXY Off...

Страница 17: ...acter position Continue until renaming is done Press STR to store If you have finished in the Programme edit menu press the TV AV button to exit TUNING MENU PROGRAMME EDIT Return Change channel Select...

Страница 18: ...to the Prog column Press the Blue button on the remote control Programme data will now be sent to the VCR This might take a few seconds depending on the number of stations stored If the message Unabl...

Страница 19: ...ia Q Link see page 22 Once this operation is completed the TV will display programme position 1 TUNING MENU AUTO SETUP ATP Setup menu Teletext FLOF Off timer Off Flicker reduction On Q Link Off Tuning...

Страница 20: ...s Tuning mode Press the TV AV button to move between Change programme Search or Change TV system Press the or button to change programme position start search or alter TV system When the desired stati...

Страница 21: ...menu Move to the OSD language menu Access the OSD language menu Move to your choice Press the TV AV button to select and exit OSD LANGUAGE Setup menu Teletext FLOF Off timer Off Flicker reduction On Q...

Страница 22: ...he VCR will automatically stop recording and switch off The write protection tab on the back of the cassette has been removed No recording VCR IS PLAYING No recording ALREADY RECORDING VCR recording o...

Страница 23: ...en the Setup menu Move to your choice Access adjustments or options Press the TV AV button to exit Open the Sound menu Move to your choice Access adjustments or options Press the TV AV button to exit...

Страница 24: ...y mode press to view the picture rapidly forward DVD Press once to skip to the next track In play mode press and hold to view the picture rapidly forward Skip Fast Forward Cue VCR Press to rewind the...

Страница 25: ...mation of the subjects shown Press the TV TEXT button The screen will display the Teletext page Press again when you wish to return to TV mode TV Teletext mode Pages can be selected in two ways a Pres...

Страница 26: ...screen Press the Yellow button to view the page Press TV TEXT to return to normal TV operation Update Display When Teletext information exceeds more than one page it may take some time for the automa...

Страница 27: ...Audio out R CVBS in video RGB status earth Status RGB Status CVBS Audio in L Audio earth Audio in R 21 19 17 15 13 11 9 7 5 3 1 20 18 16 14 12 10 8 6 4 2 AV1 21 pin SCART terminal AV2 Pins 15 and 20 a...

Страница 28: ...Output from L R AUDIO OUT Sockets Rear AV1 AV2 S 21 Pin SCART and RCA Audio Out Terminals Notes Ancillary equipment and cables shown are not supplied with this TV set Do not connect a computer with T...

Страница 29: ...lugged into A C outlet Not switched on Picture Sound controls set at minimum levels Check if in standby mode No Colour Normal Sound Colour controls set at minimum levels Poor or Distorted Picture Weak...

Страница 30: ...der AV2 Geomagnetic correction Flicker reduction H Sleep Feature If the set is notswitched offwhen theTV stationstops transmitting it will automatically go to standby mode after 30 minutes This functi...

Страница 31: ...31 NOTES...

Страница 32: ...32 2002CS...

Отзывы: