


13
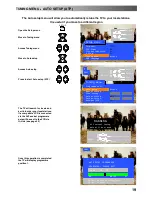
The Setup menu provides access to various advanced features and also to the Tuning menu
Open the Setup menu
Move to your choice
Increase or decrease levels, set
options or access further menus
Press the TV/AV button to exit
the Setup menu
The Teletext option allows you to choose
between FLOF or LIST mode.
See page 25.
Off timer will switch the TV off within a
preset time which you can choose from
between 0 to 90 minutes in 15 minute
intervals.
You will normally find that Flicker
reduction is best set to
On
to reduce any
slight picture movement. However, it is
possible
that
some
occasional
broadcasts may benefit by selecting the
Off
position.
Q
--
Link allows you to enable or disable
data communication with a compatible
VCR. See page 22.
The Tuning menu provides an entry to
many
other
features
including
Programme edit, ATP, Fine tuning,
Manual tuning, Colour system and
Volume correction. See page 14.
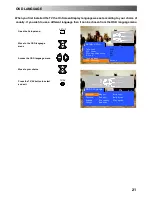
OSD language allows you to select the
language used for On Screen Displays.
See page 21.
SETUP MENU
TV/AV
SET UP
Setup menu
Teletext
FLOF
Off timer
Off
Flicker reduction
On
Q
--
Link
On
Tuning menu
OSD language
TV/AV
Select
Change
Exit
Setup menu
Teletext
FLOF
Off timer
Off
Flicker reduction
On
Q
--
Link
On
Tuning menu
OSD language
TV/AV
Select
Change
Exit
Setup menu
Teletext
FLOF
Off timer
Off
Flicker reduction
On
Q
--
Link
Off
Tuning menu
OSD language
TV/AV
Select
Change
Exit
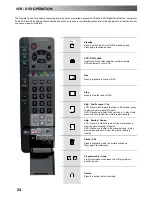
Off timer
Teletext
Q
--
Link
Tuning menu
OSD language
Flicker reduction
Содержание TX-28PL10P
Страница 31: ...31 NOTES...
Страница 32: ...32 2002CS...


