


40
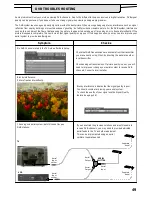
What You See Is What You Record (DIRECT TV RECORDING)
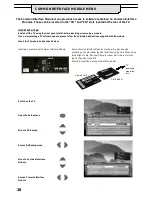
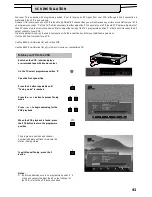
This will allow the immediate recording of the program currently shown on the Television.
Press the DIRECT TV REC button on the remote control
If the VCR is in Standby mode with a useable tape inserted, it will automatically switch on when you press the DIRECT TV REC button.
If a “Q
--
Link” VCR is connected a message will appear on the TV screen showing what is being recorded, or if it is not possible to record.
Some “Q
--
Link” compatible VCR’s will only display the message when on the VCR programme position(0) or in AV mode. Refer to the
VCR operating instruction book.
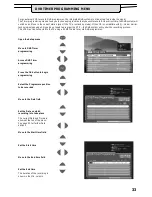
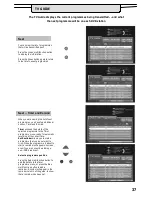
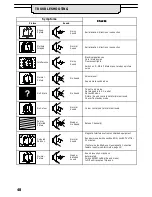
VCR recording preset prog
VCR recording TV source
No recording
--
NO TAPE
No recording
--
TAPE IS PROTECTED
VCR is recording the programme signal from its
own tuner. If you wish you can switch off the TV
and leave the VCR recording in the normal way.
VCR is recording the programme signal from the television.
You must not change programme position or switch off the TV: if
you do, the VCR will automatically stop recording and switch off.
The write protection tab on the back of the cassette
has been removed.
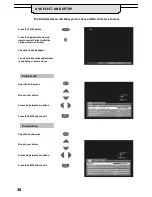
No recording
--
VCR IS PLAYING
No recording
--
ALREADY RECORDING!
No recording
--
TAPE MAY BE DAMAGED
VCR Recording VCR external
No recording
--
NO SOURCE AVAILABLE
Examples of other messages that might be displayed are:
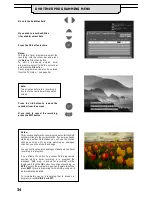
Recording this programme now
Recording DVB stations
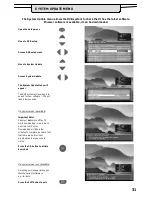
If you press the DIRECT TV REC button while watching a DVB station, the VCR will automatically switch to its AV input to record the DVB
signal from the TV (via the SCART cable), and the DVB programme position will be locked. If you attempt to select another DVB
programme position while recording, you will see the message “This programme is locked”. Press the OK button to clear the message,
or the EXIT button to unlock the programme. Beware that if you press EXIT the DVB programme will be unlocked - - switching to
another DVB programme will spoil your intended recording.
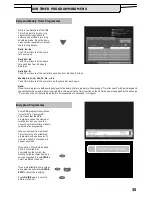
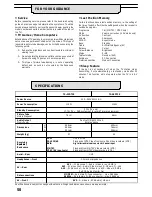
TV / VCR Auto Power On
(With a Panasonic Q
--
Link VCR connected, this additional feature is available).
D
If you insert a tape in the VCR and press the Play button whilst the TV is in ’Standby’ mode, the TV will automatically switch On
and select the AV2 input so that you can view the tape.
Some other VCR’s may support this feature. Refer to the VCR operating instruction book.
VCR Auto Power Standby
(With a Panasonic Q
--
Link VCR connected, this additional feature is available).
When the TV is switched into ’Standby’ mode, the VCR will also switch into ’Standby’ mode if there is no tape in the VCR, or
if there is a tape in and the VCR is in ’Rewind’ or ’Stop’ mode (if the VCR is rewinding a tape, it will not switch into ’Standby’ mode until
rewinding has finished).
Some other VCR’s may support this feature. Refer to the VCR operating instruction book.
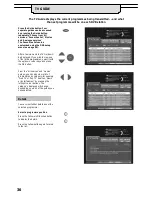
VCR Image View On
(With a Panasonic Q
--
Link VCR connected, this additional feature is available).
If the TV is in Standby mode and the VCR sends a menu to be displayed on the TV screen (e.g. Main menu), the TV will automatically
switch On and the menu will be displayed.
Some other VCR’s may support this feature. Refer to the VCR operating instruction book.
Q
--
LINK
Содержание TX-28DT30
Страница 51: ...51 NOTES...
Страница 52: ...52 NOTES...
Страница 53: ...53 02X Panasonic U K Ltd Willoughby Road Bracknell Berks RG12 8FP...


